SSM整合流程 1.创建工程
2.SSM整合
Spring
MyBatis
MybatisConfig
JdbcConfig
jdbc.properties
SpringMVC
ServletConfig
SpringMvcConfig
3.功能模块
表与实体类
dao(接口+自动代理)
Service(接口+实现类)
Controller
整合配置 步骤1:创建Maven的web项目 可以使用Maven的骨架创建
步骤2:添加依赖 pom.xml添加SSM所需要的依赖jar包
<?xml version="1.0" encoding="UTF-8" ?> <project xmlns ="http://maven.apache.org/POM/4.0.0" xmlns:xsi ="http://www.w3.org/2001/XMLSchema-instance" xsi:schemaLocation ="http://maven.apache.org/POM/4.0.0 http://maven.apache.org/xsd/maven-4.0.0.xsd" > <modelVersion > 4.0.0</modelVersion > <groupId > com.zx</groupId > <artifactId > springmvc_08_ssm</artifactId > <version > 1.0-SNAPSHOT</version > <packaging > war</packaging > <dependencies > <dependency > <groupId > org.springframework</groupId > <artifactId > spring-webmvc</artifactId > <version > 5.2.10.RELEASE</version > </dependency > <dependency > <groupId > org.springframework</groupId > <artifactId > spring-jdbc</artifactId > <version > 5.2.10.RELEASE</version > </dependency > <dependency > <groupId > org.springframework</groupId > <artifactId > spring-test</artifactId > <version > 5.2.10.RELEASE</version > </dependency > <dependency > <groupId > org.mybatis</groupId > <artifactId > mybatis</artifactId > <version > 3.5.6</version > </dependency > <dependency > <groupId > org.mybatis</groupId > <artifactId > mybatis-spring</artifactId > <version > 1.3.0</version > </dependency > <dependency > <groupId > mysql</groupId > <artifactId > mysql-connector-java</artifactId > <version > 5.1.47</version > </dependency > <dependency > <groupId > com.alibaba</groupId > <artifactId > druid</artifactId > <version > 1.1.16</version > </dependency > <dependency > <groupId > junit</groupId > <artifactId > junit</artifactId > <version > 4.12</version > <scope > test</scope > </dependency > <dependency > <groupId > javax.servlet</groupId > <artifactId > javax.servlet-api</artifactId > <version > 3.1.0</version > <scope > provided</scope > </dependency > <dependency > <groupId > com.fasterxml.jackson.core</groupId > <artifactId > jackson-databind</artifactId > <version > 2.9.0</version > </dependency > </dependencies > <build > <plugins > <plugin > <groupId > org.apache.tomcat.maven</groupId > <artifactId > tomcat7-maven-plugin</artifactId > <version > 2.1</version > <configuration > <port > 80</port > <path > /</path > </configuration > </plugin > </plugins > </build > </project >
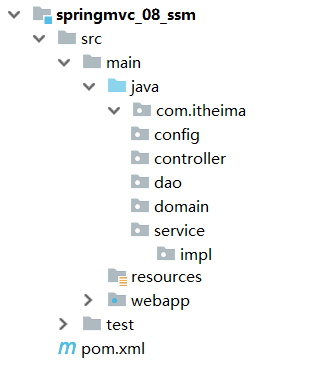
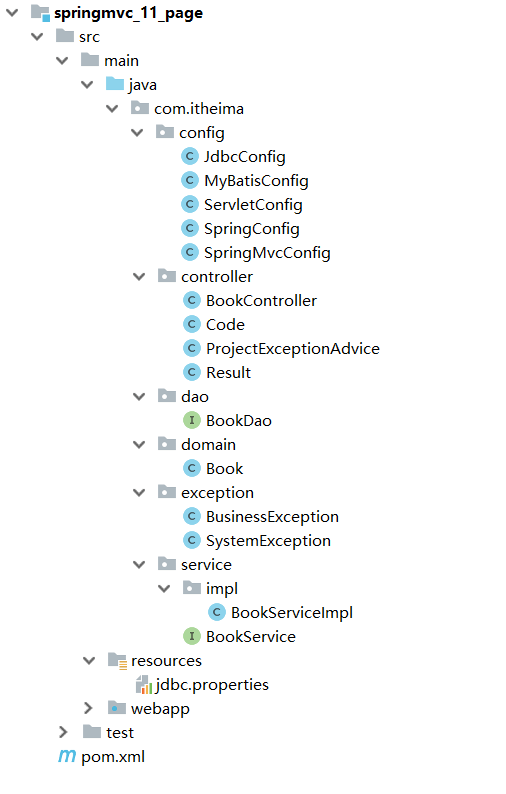
步骤3:创建项目包结构
config目录存放的是相关的配置类
controller编写的是Controller类
dao存放的是Dao接口,因为使用的是Mapper接口代理方式,所以没有实现类包
service存的是Service接口,impl存放的是Service实现类
resources:存入的是配置文件,如Jdbc.properties
webapp:目录可以存放静态资源
test/java:存放的是测试类
步骤4:创建SpringConfig配置类 @Configuration @ComponentScan({"com.zx.service"}) @PropertySource("classpath:jdbc.properties") @Import({JdbcConfig.class,MyBatisConfig.class}) @EnableTransactionManagement public class SpringConfig {}
步骤5:创建JdbcConfig配置类 public class JdbcConfig { @Value("${jdbc.driver}") private String driver; @Value("${jdbc.url}") private String url; @Value("${jdbc.username}") private String username; @Value("${jdbc.password}") private String password; @Bean public DataSource dataSource () { DruidDataSource dataSource = new DruidDataSource (); dataSource.setDriverClassName(driver); dataSource.setUrl(url); dataSource.setUsername(username); dataSource.setPassword(password); return dataSource; } @Bean public PlatformTransactionManager transactionManager (DataSource dataSource) { DataSourceTransactionManager ds = new DataSourceTransactionManager (); ds.setDataSource(dataSource); return ds; } }
步骤6:创建MybatisConfig配置类 public class MyBatisConfig { @Bean public SqlSessionFactoryBean sqlSessionFactory (DataSource dataSource) { SqlSessionFactoryBean factoryBean = new SqlSessionFactoryBean (); factoryBean.setDataSource(dataSource); factoryBean.setTypeAliasesPackage("com.zx.domain" ); return factoryBean; } @Bean public MapperScannerConfigurer mapperScannerConfigurer () { MapperScannerConfigurer msc = new MapperScannerConfigurer (); msc.setBasePackage("com.zx.dao" ); return msc; } }
步骤7:创建jdbc.properties 在resources下提供jdbc.properties,设置数据库连接四要素
jdbc.driver =com.mysql.jdbc.Driver jdbc.url =jdbc:mysql://localhost:3306/ssm_db jdbc.username =root jdbc.password =root
步骤8:创建SpringMVC配置类 @Configuration @ComponentScan("com.zx.controller") @EnableWebMvc public class SpringMvcConfig {}
步骤9:创建Web项目入口配置类 public class ServletConfig extends AbstractAnnotationConfigDispatcherServletInitializer { protected Class<?>[] getRootConfigClasses() { return new Class []{SpringConfig.class}; } protected Class<?>[] getServletConfigClasses() { return new Class []{SpringMvcConfig.class}; } protected String[] getServletMappings() { return new String []{"/" }; } @Override protected Filter[] getServletFilters() { CharacterEncodingFilter filter = new CharacterEncodingFilter (); filter.setEncoding("utf-8" ); return new Filter []{filter}; } }
至此SSM整合的环境就已经搭建好了。
功能模块开发 步骤1:创建数据库及表
需求:对表tbl_book进行新增、修改、删除、根据ID查询和查询所有
create database ssm_db character set utf8;use ssm_db; create table tbl_book( id int primary key auto_increment, type varchar (20 ), name varchar (50 ), description varchar (255 ) ) insert into `tbl_book`(`id`,`type`,`name`,`description`) values (1 ,'计算机理论' ,'Spring实战 第五版' ,'Spring入门经典教程,深入理解Spring原理技术内幕' ),(2 ,'计算机理论' ,'Spring 5核心原理与30个类手写实践' ,'十年沉淀之作,手写Spring精华思想' ),(3 ,'计算机理论' ,'Spring 5设计模式' ,'深入Spring源码刨析Spring源码中蕴含的10大设计模式' ),(4 ,'计算机理论' ,'Spring MVC+Mybatis开发从入门到项目实战' ,'全方位解析面向Web应用的轻量级框架,带你成为Spring MVC开发高手' ),(5 ,'计算机理论' ,'轻量级Java Web企业应用实战' ,'源码级刨析Spring框架,适合已掌握Java基础的读者' ),(6 ,'计算机理论' ,'Java核心技术 卷Ⅰ 基础知识(原书第11版)' ,'Core Java第11版,Jolt大奖获奖作品,针对Java SE9、10、11全面更新' ),(7 ,'计算机理论' ,'深入理解Java虚拟机' ,'5个纬度全面刨析JVM,大厂面试知识点全覆盖' ),(8 ,'计算机理论' ,'Java编程思想(第4版)' ,'Java学习必读经典,殿堂级著作!赢得了全球程序员的广泛赞誉' ),(9 ,'计算机理论' ,'零基础学Java(全彩版)' ,'零基础自学编程的入门图书,由浅入深,详解Java语言的编程思想和核心技术' ),(10 ,'市场营销' ,'直播就这么做:主播高效沟通实战指南' ,'李子柒、李佳奇、薇娅成长为网红的秘密都在书中' ),(11 ,'市场营销' ,'直播销讲实战一本通' ,'和秋叶一起学系列网络营销书籍' ),(12 ,'市场营销' ,'直播带货:淘宝、天猫直播从新手到高手' ,'一本教你如何玩转直播的书,10堂课轻松实现带货月入3W+' );
步骤2:编写模型类 public class Book { private Integer id; private String type; private String name; private String description; }
步骤3:编写Dao接口 public interface BookDao { @Insert("insert into tbl_book (type,name,description) values(#{type},#{name},#{description})") public void save (Book book) ; @Update("update tbl_book set type = #{type}, name = #{name}, description = #{description} where id = #{id}") public void update (Book book) ; @Delete("delete from tbl_book where id = #{id}") public void delete (Integer id) ; @Select("select * from tbl_book where id = #{id}") public Book getById (Integer id) ; @Select("select * from tbl_book") public List<Book> getAll () ; }
步骤4:编写Service接口和实现类 @Transactional public interface BookService { public boolean save (Book book) ; public boolean update (Book book) ; public boolean delete (Integer id) ; public Book getById (Integer id) ; public List<Book> getAll () ; }
@Service public class BookServiceImpl implements BookService { @Autowired private BookDao bookDao; public boolean save (Book book) { bookDao.save(book); return true ; } public boolean update (Book book) { bookDao.update(book); return true ; } public boolean delete (Integer id) { bookDao.delete(id); return true ; } public Book getById (Integer id) { return bookDao.getById(id); } public List<Book> getAll () { return bookDao.getAll(); } }
说明:
单元测试 步骤1:新建测试类 @RunWith(SpringJUnit4ClassRunner.class) @ContextConfiguration(classes = SpringConfig.class) public class BookServiceTest {}
步骤2:注入Service类 @RunWith(SpringJUnit4ClassRunner.class) @ContextConfiguration(classes = SpringConfig.class) public class BookServiceTest { @Autowired private BookService bookService; }
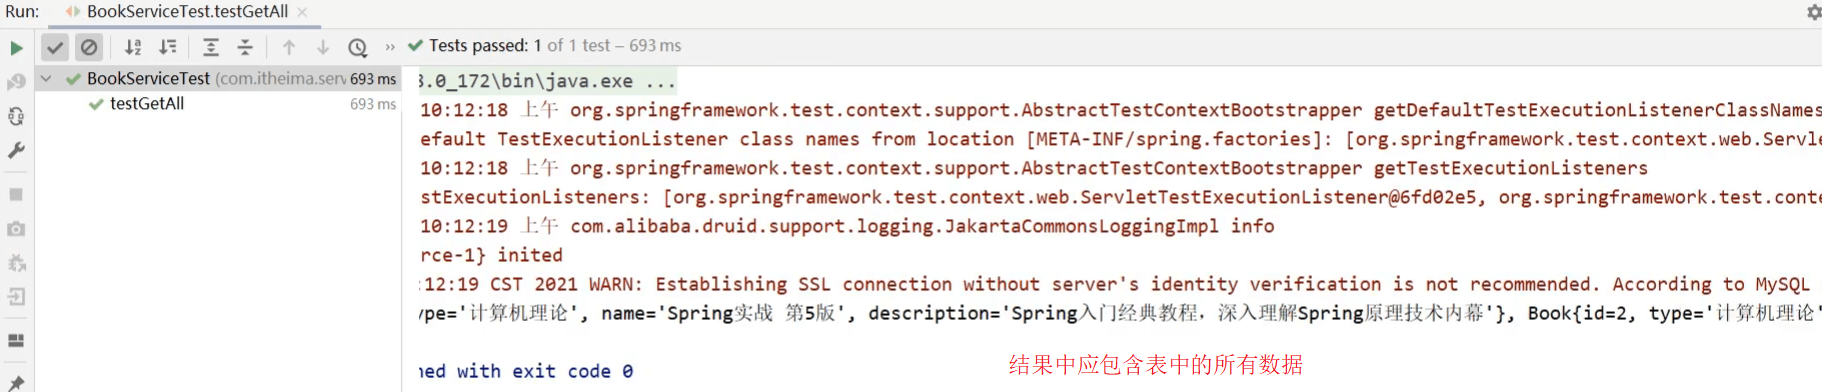
步骤3:编写测试方法 我们先来对查询进行单元测试。
@RunWith(SpringJUnit4ClassRunner.class) @ContextConfiguration(classes = SpringConfig.class) public class BookServiceTest { @Autowired private BookService bookService; @Test public void testGetById () { Book book = bookService.getById(1 ); System.out.println(book); } @Test public void testGetAll () { List<Book> all = bookService.getAll(); System.out.println(all); } }
根据ID查询,测试的结果为:
查询所有,测试的结果为:
PostMan测试 新增 http://localhost/books
{ "type" : "类别测试数据" , "name" : "书名测试数据" , "description" : "描述测试数据" }
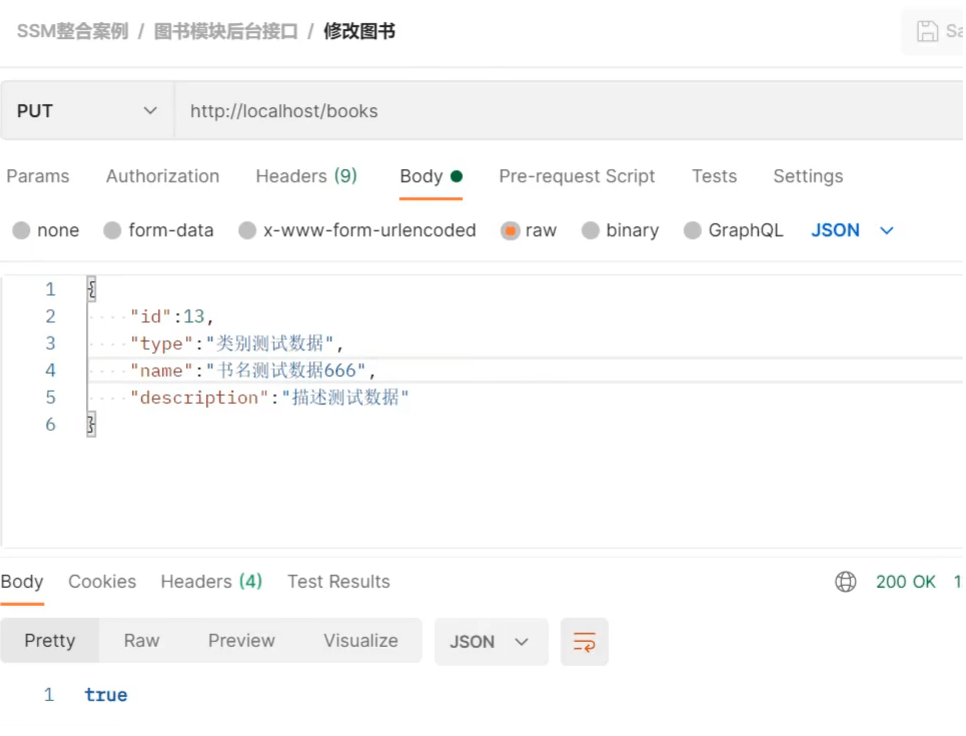
修改 http://localhost/books
{ "id" : 13 , "type" : "类别测试数据" , "name" : "书名测试数据" , "description" : "描述测试数据" }
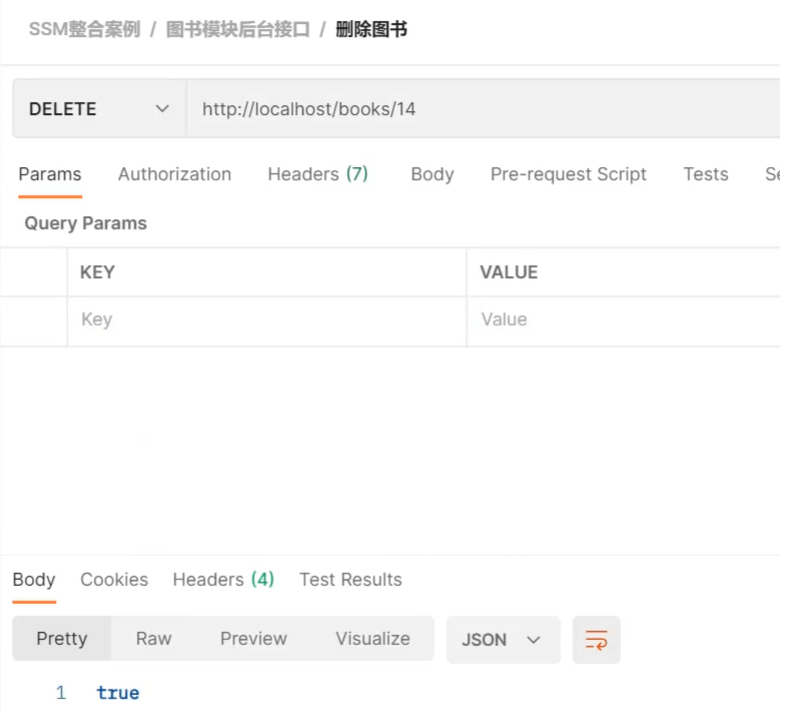
删除 http://localhost/books/14
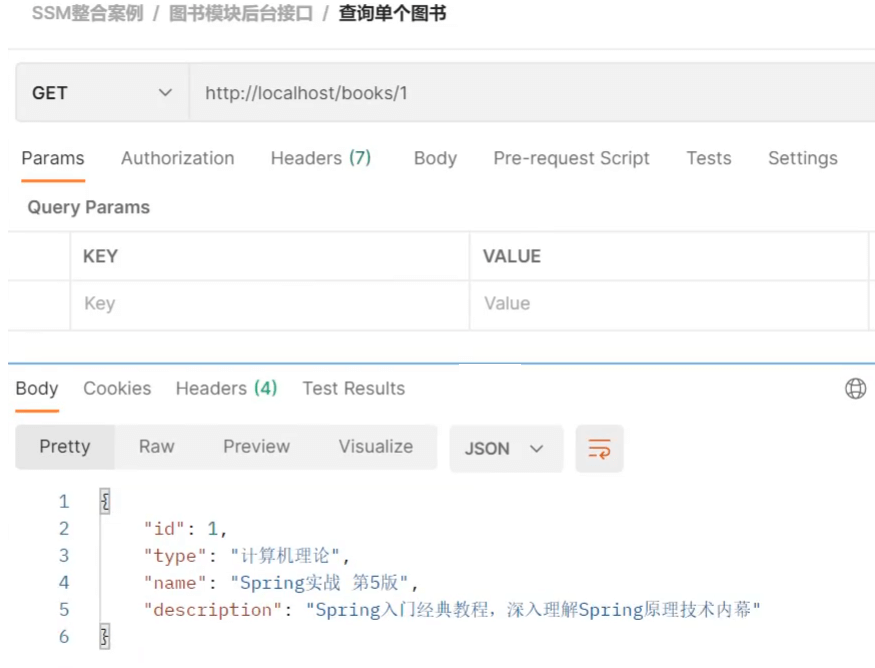
查询单个 http://localhost/books/1
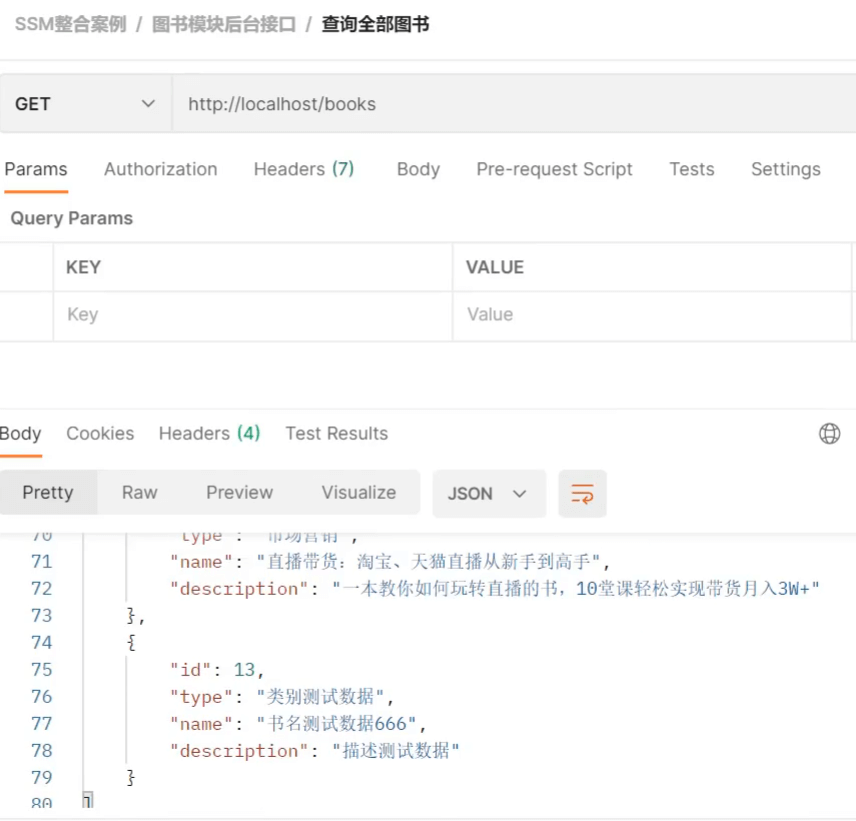
查询所有 http://localhost/books
统一结果封装 public class Result private Object data ; private Integer code; private String msg; public Result() { } public Result(Integer code,Object data ) { this .data = data ; this .code = code; } public Result(Integer code, Object data , String msg) { this .data = data ; this .code = code; this .msg = msg; } }
public class Code { public static final Integer SAVE_OK = 20011 ; public static final Integer DELETE_OK = 20021 ; public static final Integer UPDATE_OK = 20031 ; public static final Integer GET_OK = 20041 ; public static final Integer SAVE_ERR = 20010 ; public static final Integer DELETE_ERR = 20020 ; public static final Integer UPDATE_ERR = 20030 ; public static final Integer GET_ERR = 20040 ; }
@RestController @RequestMapping ("/books" )public class BookController { @Autowired private BookService bookService; @PostMapping public Result save (@RequestBody Book book boolean flag = bookService.save (book); return new Result (flag ? Code .SAVE_OK :Code .SAVE_ERR ,flag); } @PutMapping public Result update (@RequestBody Book book boolean flag = bookService.update (book); return new Result (flag ? Code .UPDATE_OK :Code .UPDATE_ERR ,flag); } @DeleteMapping ("/{id}" ) public Result delete (@PathVariable Integer id boolean flag = bookService.delete (id); return new Result (flag ? Code .DELETE_OK :Code .DELETE_ERR ,flag); } @GetMapping ("/{id}" ) public Result getById (@PathVariable Integer id Book book = bookService.getById (id); Integer code = book != null ? Code .GET_OK : Code .GET_ERR ; String msg = book != null ? "" : "数据查询失败,请重试!" ; return new Result (code,book,msg); } @GetMapping public Result getAll ( List <Book > bookList = bookService.getAll (); Integer code = bookList != null ? Code .GET_OK : Code .GET_ERR ; String msg = bookList != null ? "" : "数据查询失败,请重试!" ; return new Result (code,bookList,msg); } }
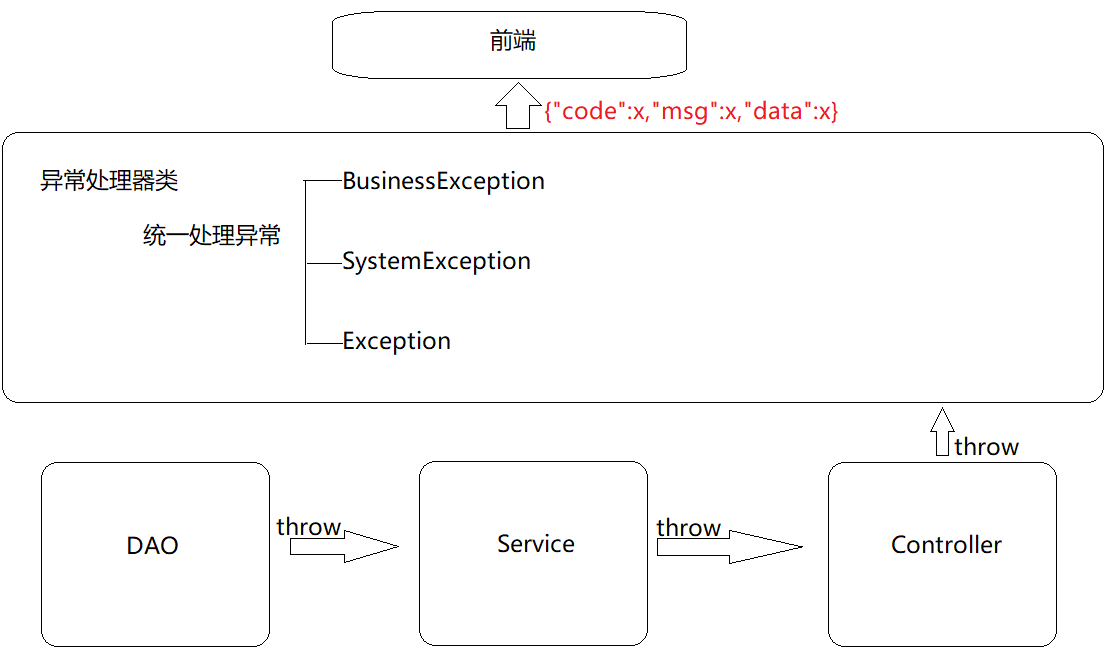
统一异常处理 在解决问题之前,我们先来看下异常的种类及出现异常的原因:
框架内部抛出的异常:因使用不合规导致
数据层抛出的异常:因外部服务器故障导致(例如:服务器访问超时)
业务层抛出的异常:因业务逻辑书写错误导致(例如:遍历业务书写操作,导致索引异常等)
表现层抛出的异常:因数据收集、校验等规则导致(例如:不匹配的数据类型间导致异常)
工具类抛出的异常:因工具类书写不严谨不够健壮导致(例如:必要释放的连接长期未释放等)
异常处理器类返回结果给前端
@RestControllerAdvice public class ProjectExceptionAdvice { @ExceptionHandler (Exception.class ) public Result doException(Exception ex){ System.out .println("嘿嘿,异常你哪里跑!" ) return new Result(666 ,null ,"嘿嘿,异常你哪里跑!" ); } }
知识点1:@RestControllerAdvice
名称
@RestControllerAdvice
类型
==类注解==
位置
Rest风格开发的控制器增强类定义上方
作用
为Rest风格开发的控制器类做增强
**说明:**此注解自带@ResponseBody注解与@Component注解,具备对应的功能
知识点2:@ExceptionHandler
名称
@ExceptionHandler
类型
==方法注解==
位置
专用于异常处理的控制器方法上方
作用
设置指定异常的处理方案,功能等同于控制器方法,
说明: 此类方法可以根据处理的异常不同,制作多个方法分别处理对应的异常
项目异常处理方案 异常分类 业务异常(BusinessException)
规范的用户行为产生的异常
不规范的用户行为操作产生的异常
系统异常(SystemException)
项目运行过程中可预计但无法避免的异常 ,比如数据库或服务器宕机
其他异常(Exception)
异常解决方案 业务异常(BusinessException)
系统异常(SystemException)
发送固定消息传递给用户,安抚用户
系统繁忙,请稍后再试
系统正在维护升级,请稍后再试
系统出问题,请联系系统管理员等
发送特定消息给运维人员,提醒维护
记录日志
发消息和记录日志对用户来说是不可见的,属于后台程序
其他异常(Exception)
发送固定消息传递给用户,安抚用户
发送特定消息给编程人员,提醒维护(纳入预期范围内)
记录日志
异常解决方案的具体实现
思路:
1.先通过自定义异常,完成BusinessException和SystemException的定义
2.将其他异常包装成自定义异常类型
3.在异常处理器类中对不同的异常进行处理
自定义异常类
public class SystemException extends RuntimeException { private Integer code; public Integer getCode () { return code; } public void setCode (Integer code) { this .code = code; } public SystemException (Integer code, String message) { super (message); this .code = code; } public SystemException (Integer code, String message, Throwable cause) { super (message, cause); this .code = code; } } public class BusinessException extends RuntimeException { private Integer code; public Integer getCode () { return code; } public void setCode (Integer code) { this .code = code; } public BusinessException (Integer code, String message) { super (message); this .code = code; } public BusinessException (Integer code, String message, Throwable cause) { super (message, cause); this .code = code; } }
将其他异常包成自定义异常
public Book getById (Integer id) { if (id == 1 ){ throw new BusinessException(Code.BUSINESS_ERR,"请不要使用你的技术挑战我的耐性!" ); } try { int i = 1 /0 ; }catch (Exception e){ throw new SystemException(Code.SYSTEM_TIMEOUT_ERR,"服务器访问超时,请重试!" ,e); } return bookDao.getById (id) }
//状态码
public class Code {
    public static final Integer SAVE_OK = 20011;
    public static final Integer DELETE_OK = 20021;
    public static final Integer UPDATE_OK = 20031;
    public static final Integer GET_OK = 20041;

    public static final Integer SAVE_ERR = 20010;
    public static final Integer DELETE_ERR = 20020;
    public static final Integer UPDATE_ERR = 20030;
    public static final Integer GET_ERR = 20040;
    public static final Integer SYSTEM_ERR = 50001;
    public static final Integer SYSTEM_TIMEOUT_ERR = 50002;
    public static final Integer SYSTEM_UNKNOW_ERR = 59999;

    public static final Integer BUSINESS_ERR = 60002;
}
处理器类中处理自定义异常
@RestControllerAdvice public class ProjectExceptionAdvice { @ExceptionHandler(SystemException.class ) public Result do SystemException(SystemException ex ) { return new Result(ex .getCode () ,null,ex.getMessage() ); } @ExceptionHandler(BusinessException.class ) public Result do BusinessException(BusinessException ex ) { return new Result(ex .getCode () ,null,ex.getMessage() ); } @ExceptionHandler(Exception.class ) public Result do OtherException(Exception ex ) { return new Result(Code.SYSTEM_UNKNOW_ERR,null ,"系统繁忙,请稍后再试!" ) ; } }
以后项目中的异常处理方式为:
前后端协议联调 环境准备
创建一个Web的Maven项目
pom.xml添加SSM整合所需jar包
创建对应的配置类
编写Controller、Service接口、Service实现类、Dao接口和模型类
resources下提供jdbc.properties配置文件
内容参考前面的项目或者直接使用前面的项目进行本节内容的学习。
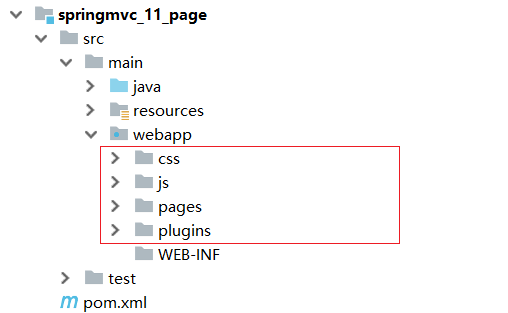
最终创建好的项目结构如下:
将资料\SSM功能页面下面的静态资源拷贝到webapp下。
因为添加了静态资源,SpringMVC会拦截,所有需要在SpringConfig的配置类中将静态资源进行放行。
接下来我们就需要将所有的列表查询、新增、修改、删除等功能一个个来实现下。
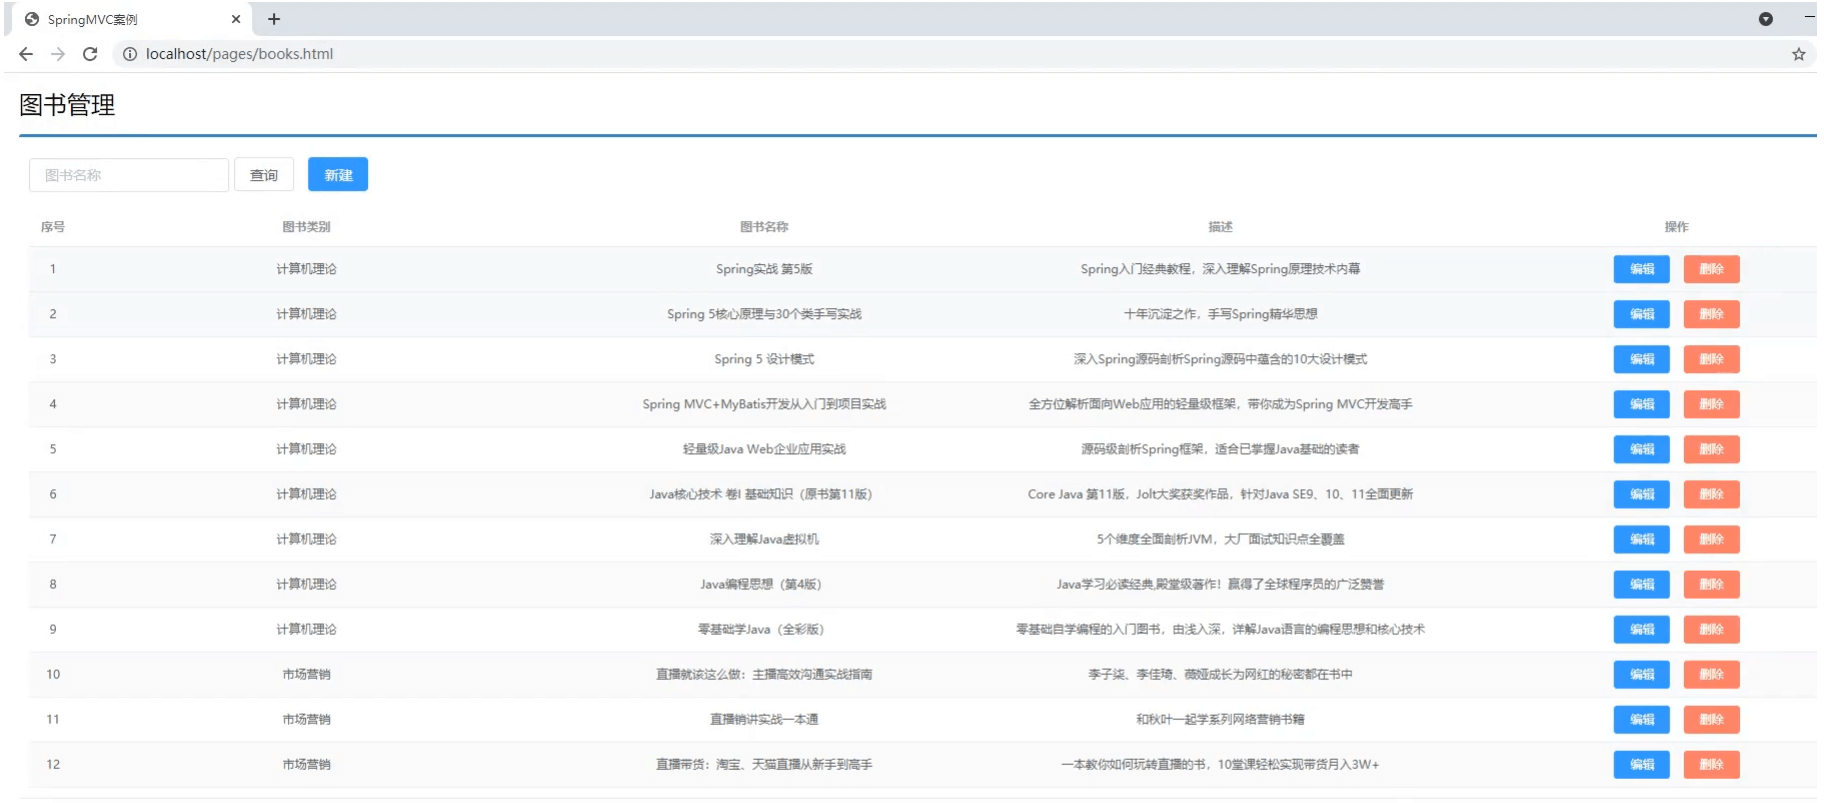
列表功能
需求:页面加载完后发送异步请求到后台获取列表数据进行展示。
1.找到页面的钩子函数,created()
2.created()方法中调用了this.getAll()方法
3.在getAll()方法中使用axios发送异步请求从后台获取数据
4.访问的路径为http://localhost/books
5.返回数据
返回数据res.data的内容如下:
{ "data" : [ { "id" : 1 , "type" : "计算机理论" , "name" : "Spring实战 第五版" , "description" : "Spring入门经典教程,深入理解Spring原理技术内幕" } , { "id" : 2 , "type" : "计算机理论" , "name" : "Spring 5核心原理与30个类手写实践" , "description" : "十年沉淀之作,手写Spring精华思想" } , ... ] , "code" : 20041 , "msg" : "" }
发送方式:
getAll ( axios.get ("/books" ).then ((res )=> { this .dataList = res.data .data ; }); }
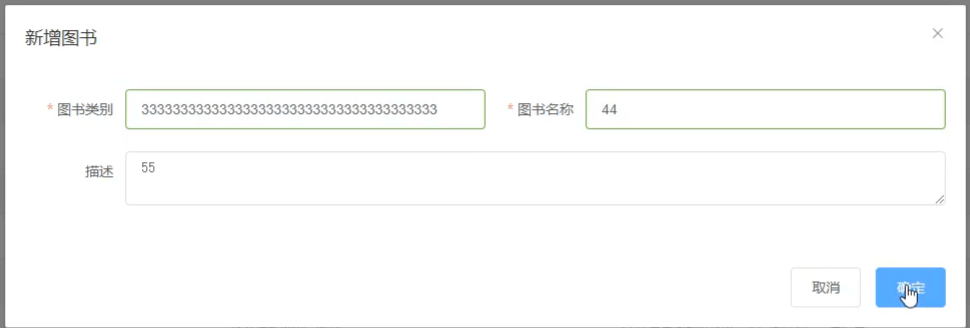
添加功能
需求:完成图片的新增功能模块
1.找到页面上的新建按钮,按钮上绑定了@click="handleCreate()"方法
2.在method中找到handleCreate方法,方法中打开新增面板
3.新增面板中找到确定按钮,按钮上绑定了@click="handleAdd()"方法
4.在method中找到handleAdd方法
5.在方法中发送请求和数据,响应成功后将新增面板关闭并重新查询数据
handleCreate打开新增面板
handleCreate ( this .dialogFormVisible = true ; },
handleAdd方法发送异步请求并携带数据
handleAdd () { axios.post ("/books" ,this .formData ).then ((res )=> { this .dialogFormVisible = false ; this .getAll (); }); }
添加功能状态处理 基础的新增功能已经完成,但是还有一些问题需要解决下:
需求:新增成功是关闭面板,重新查询数据,那么新增失败以后该如何处理?
1.在handlerAdd方法中根据后台返回的数据来进行不同的处理
2.如果后台返回的是成功,则提示成功信息,并关闭面板
3.如果后台返回的是失败,则提示错误信息
(1)修改前端页面
handleAdd () { axios.post ("/books" ,this .formData ).then ((res )=> { if (res.data .code == 20011 ){ this .dialogFormVisible = false ; this .$message .success ("添加成功" ); }else if (res.data .code == 20010 ){ this .$message .error ("添加失败" ); }else { this .$message .error (res.data .msg ); } }).finally (()=> { this .getAll (); }); }
(2)后台返回操作结果,将Dao层的增删改方法返回值从void改成int
public interface BookDao { @Insert("insert into tbl_book (type,name,description) values(#{type},#{name},#{description})") public int save (Book book) ; @Update("update tbl_book set type = #{type}, name = #{name}, description = #{description} where id = #{id}") public int update (Book book) ; @Delete("delete from tbl_book where id = #{id}") public int delete (Integer id) ; @Select("select * from tbl_book where id = #{id}") public Book getById (Integer id) ; @Select("select * from tbl_book") public List<Book> getAll () ; }
(3)在BookServiceImpl中,增删改方法根据DAO的返回值来决定返回true/false
@Service public class BookServiceImpl implements BookService { @Autowired private BookDao bookDao; public boolean save (Book book) { return bookDao.save(book) > 0 ; } public boolean update (Book book) { return bookDao.update(book) > 0 ; } public boolean delete (Integer id) { return bookDao.delete(id) > 0 ; } public Book getById (Integer id) { if (id == 1 ){ throw new BusinessException (Code.BUSINESS_ERR,"请不要使用你的技术挑战我的耐性!" ); } return bookDao.getById(id); } public List<Book> getAll () { return bookDao.getAll(); } }
(4)测试错误情况,将图书类别长度设置超出范围即可
处理完新增后,会发现新增还存在一个问题,
新增成功后,再次点击新增按钮会发现之前的数据还存在,这个时候就需要在新增的时候将表单内容清空。
resetForm ( this .formData = {}; } handleCreate ( this .dialogFormVisible = true ; this .resetForm (); }
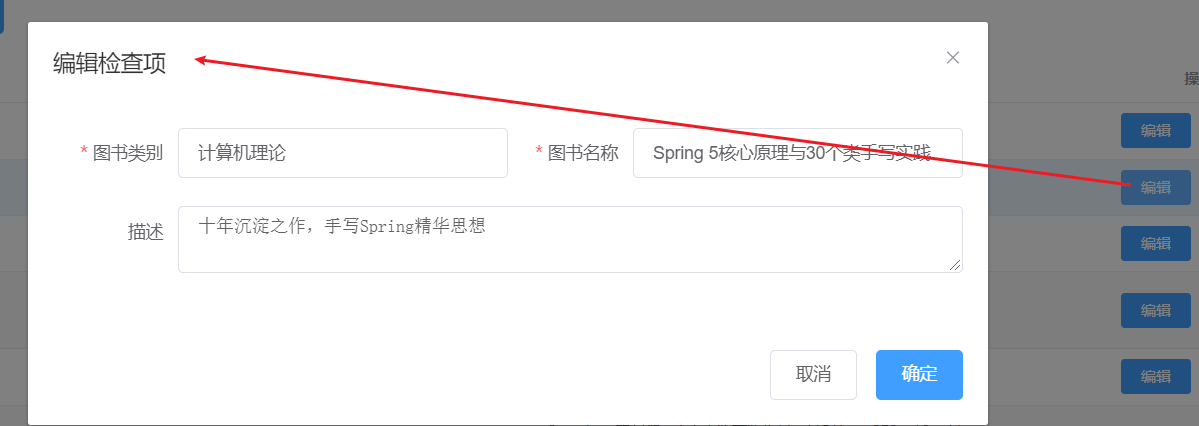
修改功能
需求:完成图书信息的修改功能
1.找到页面中的编辑按钮,该按钮绑定了@click="handleUpdate(scope.row)"
2.在method的handleUpdate方法中发送异步请求根据ID查询图书信息
3.根据后台返回的结果,判断是否查询成功
如果查询成功打开修改面板回显数据,如果失败提示错误信息
4.修改完成后找到修改面板的确定按钮,该按钮绑定了@click="handleEdit()"
5.在method的handleEdit方法中发送异步请求提交修改数据
6.根据后台返回的结果,判断是否修改成功
如果成功提示错误信息,关闭修改面板,重新查询数据,如果失败提示错误信息
scope.row代表的是当前行的行数据,也就是说,scope.row就是选中行对应的json数据,如下:
{ "id" : 1 , "type" : "计算机理论" , "name" : "Spring实战 第五版" , "description" : "Spring入门经典教程,深入理解Spring原理技术内幕" }
修改handleUpdate方法
handleUpdate (row ) { axios.get ("/books/" +row.id ).then ((res )=> { if (res.data .code == 20041 ){ this .formData = res.data .data ; this .dialogFormVisible4Edit = true ; }else { this .$message .error (res.data .msg ); } }); }
修改handleEdit方法
handleEdit ( axios.put ("/books" ,this .formData ).then ((res )=> { if (res.data .code == 20031 ){ this .dialogFormVisible4Edit = false ; this .$message .success ("修改成功" ); }else if (res.data .code == 20030 ){ this .$message .error ("修改失败" ); }else { this .$message .error (res.data .msg ); } }).finally (()=> { this .getAll (); }); }
至此修改功能就已经完成。
删除功能
需求:完成页面的删除功能。
1.找到页面的删除按钮,按钮上绑定了@click="handleDelete(scope.row)"
2.method的handleDelete方法弹出提示框
3.用户点击取消,提示操作已经被取消。
4.用户点击确定,发送异步请求并携带需要删除数据的主键ID
5.根据后台返回结果做不同的操作
如果返回成功,提示成功信息,并重新查询数据
如果返回失败,提示错误信息,并重新查询数据
修改handleDelete方法
handleDelete (row ) { this .$confirm("此操作永久删除当前数据,是否继续?" ,"提示" ,{ type :'info' }).then (()=> { axios.delete ("/books/" +row.id ).then ((res )=> { if (res.data .code == 20021 ){ this .$message .success ("删除成功" ); }else { this .$message .error ("删除失败" ); } }).finally (()=> { this .getAll (); }); }).catch (()=> { this .$message .info ("取消删除操作" ); }); }
接下来,下面是一个完整页面 <!DOCTYPE html > <html > <head > <meta charset ="utf-8" > <meta http-equiv ="X-UA-Compatible" content ="IE=edge" > <title > SpringMVC案例</title > <meta content ="width=device-width,initial-scale=1,maximum-scale=1,user-scalable=no" name ="viewport" > <link rel ="stylesheet" href ="../plugins/elementui/index.css" > <link rel ="stylesheet" href ="../plugins/font-awesome/css/font-awesome.min.css" > <link rel ="stylesheet" href ="../css/style.css" > </head > <body class ="hold-transition" > <div id ="app" > <div class ="content-header" > <h1 > 图书管理</h1 > </div > <div class ="app-container" > <div class ="box" > <div class ="filter-container" > <el-input placeholder ="图书名称" v-model ="pagination.queryString" style ="width: 200px;" class ="filter-item" > </el-input > <el-button @click ="getAll()" class ="dalfBut" > 查询</el-button > <el-button type ="primary" class ="butT" @click ="handleCreate()" > 新建</el-button > </div > <el-table size ="small" current-row-key ="id" :data ="dataList" stripe highlight-current-row > <el-table-column type ="index" align ="center" label ="序号" > </el-table-column > <el-table-column prop ="type" label ="图书类别" align ="center" > </el-table-column > <el-table-column prop ="name" label ="图书名称" align ="center" > </el-table-column > <el-table-column prop ="description" label ="描述" align ="center" > </el-table-column > <el-table-column label ="操作" align ="center" > <template slot-scope ="scope" > <el-button type ="primary" size ="mini" @click ="handleUpdate(scope.row)" > 编辑</el-button > <el-button type ="danger" size ="mini" @click ="handleDelete(scope.row)" > 删除</el-button > </template > </el-table-column > </el-table > <div class ="add-form" > <el-dialog title ="新增图书" :visible.sync ="dialogFormVisible" > <el-form ref ="dataAddForm" :model ="formData" :rules ="rules" label-position ="right" label-width ="100px" > <el-row > <el-col :span ="12" > <el-form-item label ="图书类别" prop ="type" > <el-input v-model ="formData.type" /> </el-form-item > </el-col > <el-col :span ="12" > <el-form-item label ="图书名称" prop ="name" > <el-input v-model ="formData.name" /> </el-form-item > </el-col > </el-row > <el-row > <el-col :span ="24" > <el-form-item label ="描述" > <el-input v-model ="formData.description" type ="textarea" > </el-input > </el-form-item > </el-col > </el-row > </el-form > <div slot ="footer" class ="dialog-footer" > <el-button @click ="dialogFormVisible = false" > 取消</el-button > <el-button type ="primary" @click ="handleAdd()" > 确定</el-button > </div > </el-dialog > </div > <div class ="add-form" > <el-dialog title ="编辑检查项" :visible.sync ="dialogFormVisible4Edit" > <el-form ref ="dataEditForm" :model ="formData" :rules ="rules" label-position ="right" label-width ="100px" > <el-row > <el-col :span ="12" > <el-form-item label ="图书类别" prop ="type" > <el-input v-model ="formData.type" /> </el-form-item > </el-col > <el-col :span ="12" > <el-form-item label ="图书名称" prop ="name" > <el-input v-model ="formData.name" /> </el-form-item > </el-col > </el-row > <el-row > <el-col :span ="24" > <el-form-item label ="描述" > <el-input v-model ="formData.description" type ="textarea" > </el-input > </el-form-item > </el-col > </el-row > </el-form > <div slot ="footer" class ="dialog-footer" > <el-button @click ="dialogFormVisible4Edit = false" > 取消</el-button > <el-button type ="primary" @click ="handleEdit()" > 确定</el-button > </div > </el-dialog > </div > </div > </div > </div > </body > <script src ="../js/vue.js" > </script > <script src ="../plugins/elementui/index.js" > </script > <script type ="text/javascript" src ="../js/jquery.min.js" > </script > <script src ="../js/axios-0.18.0.js" > </script > <script > var vue = new Vue ({ el : '#app' , data :{ pagination : {}, dataList : [], formData : {}, dialogFormVisible : false , dialogFormVisible4Edit :false , rules : { type : [{ required : true , message : '图书类别为必填项' , trigger : 'blur' }], name : [{ required : true , message : '图书名称为必填项' , trigger : 'blur' }] } }, created ( this .getAll (); }, methods : { getAll ( axios.get ("/books" ).then ((res )=> { this .dataList = res.data .data ; }); }, handleCreate ( this .dialogFormVisible = true ; this .resetForm (); }, resetForm ( this .formData = {}; }, handleAdd () { axios.post ("/books" ,this .formData ).then ((res )=> { console .log (res.data ); if (res.data .code == 20011 ){ this .dialogFormVisible = false ; this .$message .success ("添加成功" ); }else if (res.data .code == 20010 ){ this .$message .error ("添加失败" ); }else { this .$message .error (res.data .msg ); } }).finally (()=> { this .getAll (); }); }, handleUpdate (row ) { axios.get ("/books/" +row.id ).then ((res )=> { if (res.data .code == 20041 ){ this .formData = res.data .data ; this .dialogFormVisible4Edit = true ; }else { this .$message .error (res.data .msg ); } }); }, handleEdit ( axios.put ("/books" ,this .formData ).then ((res )=> { if (res.data .code == 20031 ){ this .dialogFormVisible4Edit = false ; this .$message .success ("修改成功" ); }else if (res.data .code == 20030 ){ this .$message .error ("修改失败" ); }else { this .$message .error (res.data .msg ); } }).finally (()=> { this .getAll (); }); }, handleDelete (row ) { this .$confirm("此操作永久删除当前数据,是否继续?" ,"提示" ,{ type :'info' }).then (()=> { axios.delete ("/books/" +row.id ).then ((res )=> { if (res.data .code == 20021 ){ this .$message .success ("删除成功" ); }else { this .$message .error ("删除失败" ); } }).finally (()=> { this .getAll (); }); }).catch (()=> { this .$message .info ("取消删除操作" ); }); } } }) </script > </html >
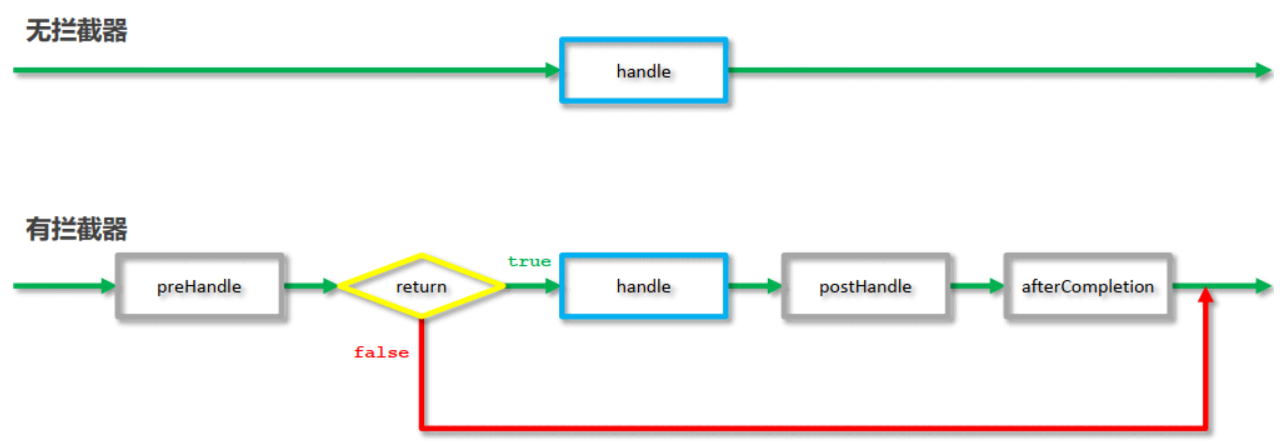
拦截器 概念 拦截器(Interceptor)是一种动态拦截方法调用的机制,在SpringMVC中动态拦截控制器方法的执行
作用:
在指定的方法调用前后执行预先设定的代码
阻止原始方法的执行
总结:拦截器就是用来做增强
拦截器与过滤器的区别
归属不同:Filter属于Servlet技术,Interceptor属于SpringMVC技术
拦截内容不同:Filter对所有访问进行增强,Interceptor仅针对SpringMVC的访问进行增强
入门案例 1.制作拦截器功能类
2.配置拦截器的执行位置
@Component public class ProjectInterceptor implements HandlerInterceptor { public boolean preHandler (..) throws Exception { System.out.println("preHandler..." ); } public boolean postHandler (..) throws Exception { System.out.println("postHandler..." ); } public boolean afterCompletion (..) throws Exception { System.out.println("afterCompletion..." ); } }
@Configuration public class SpringMvcSupport extends WebMvcConfigurationSupport { @Autowired private ProjectInterceptor projectInterceptor; @Override public void addInterceptors (InterceptorRegistry registry) { registry.addInterceptor(projectInterceptor).addPathPatterns("/books" ); } }
也可以使用标准接口WebMvcConfigure简化开发(注意:侵入性较强)
@Configuration @ComponentScan("com.zx.controller") @EnableWebMvc public class SpringMvcConfig implements WebMvcConfigurer { @Autowired private ProjectInterceptor projectInterceptor; @Override public void addInterceptors (InterceptorRegistry registry) { registry.addInterceptor(projectInterceptor).addPathPatterns("/books" ,"/books/*" ); } }
拦截器执行流程
参数 前置处理
public boolean preHandle (HttpServletRequest request, HttpServletResponse response, Object handler) throws Exception { System.out.println("preHandle" ); String contentType = request.getHeader("Content-Type" ); System.out.println("preHandle..." +contentType); HandlerMethod hm = (HandlerMethod)handler; String methodName = hm.getMethod().getName(); System.out.println("preHandle..." +methodName); return true ; }
request:请求对象
response:响应对象
handler:被调用的处理器对象,本质上是一个方法对象,对反射中的Method对象进行了再包装
后置处理
public void postHandle(HttpServletRequest request, HttpServletResponse response, Object handler , ModelAndView modelAndView) throws Exception { System .out .println("postHandle"); }
modelAndView:如果处理器执行完成具有返回结果,可以读取到对应数据与页面信息,并进行调整
因为咱们现在都是返回json数据,所以该参数的使用率不高。
完成处理方法
public void afterCompletion(HttpServletRequest request, HttpServletResponse response, Object handler , Exception ex) throws Exception { System .out .println("afterCompletion"); }
ex:如果处理器执行过程中出现异常对象,可以针对异常情况进行单独处理
因为我们现在已经有全局异常处理器类,所以该参数的使用率也不高。
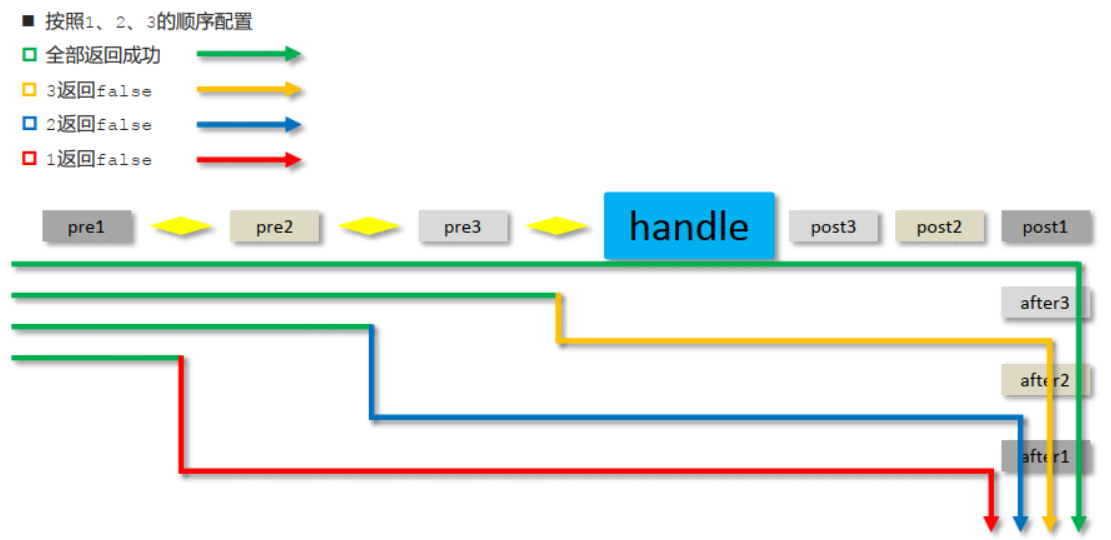
拦截器链配置
当配置多个拦截器时,形成拦截器链
拦截器链的运行顺序参照拦截器添加顺序为准
当拦截器中出现对原始处理器的拦截,后面的拦截器均终止运行
当拦截器运行中断,仅运行配置在前面的拦截器的afterCompletion操作
preHandle:与配置顺序相同,必定运行
postHandle:与配置顺序相反,可能不运行
afterCompletion:与配置顺序相反,可能不运行。
这个顺序不太好记,最终只需要把握住一个原则即可:以最终的运行结果为准