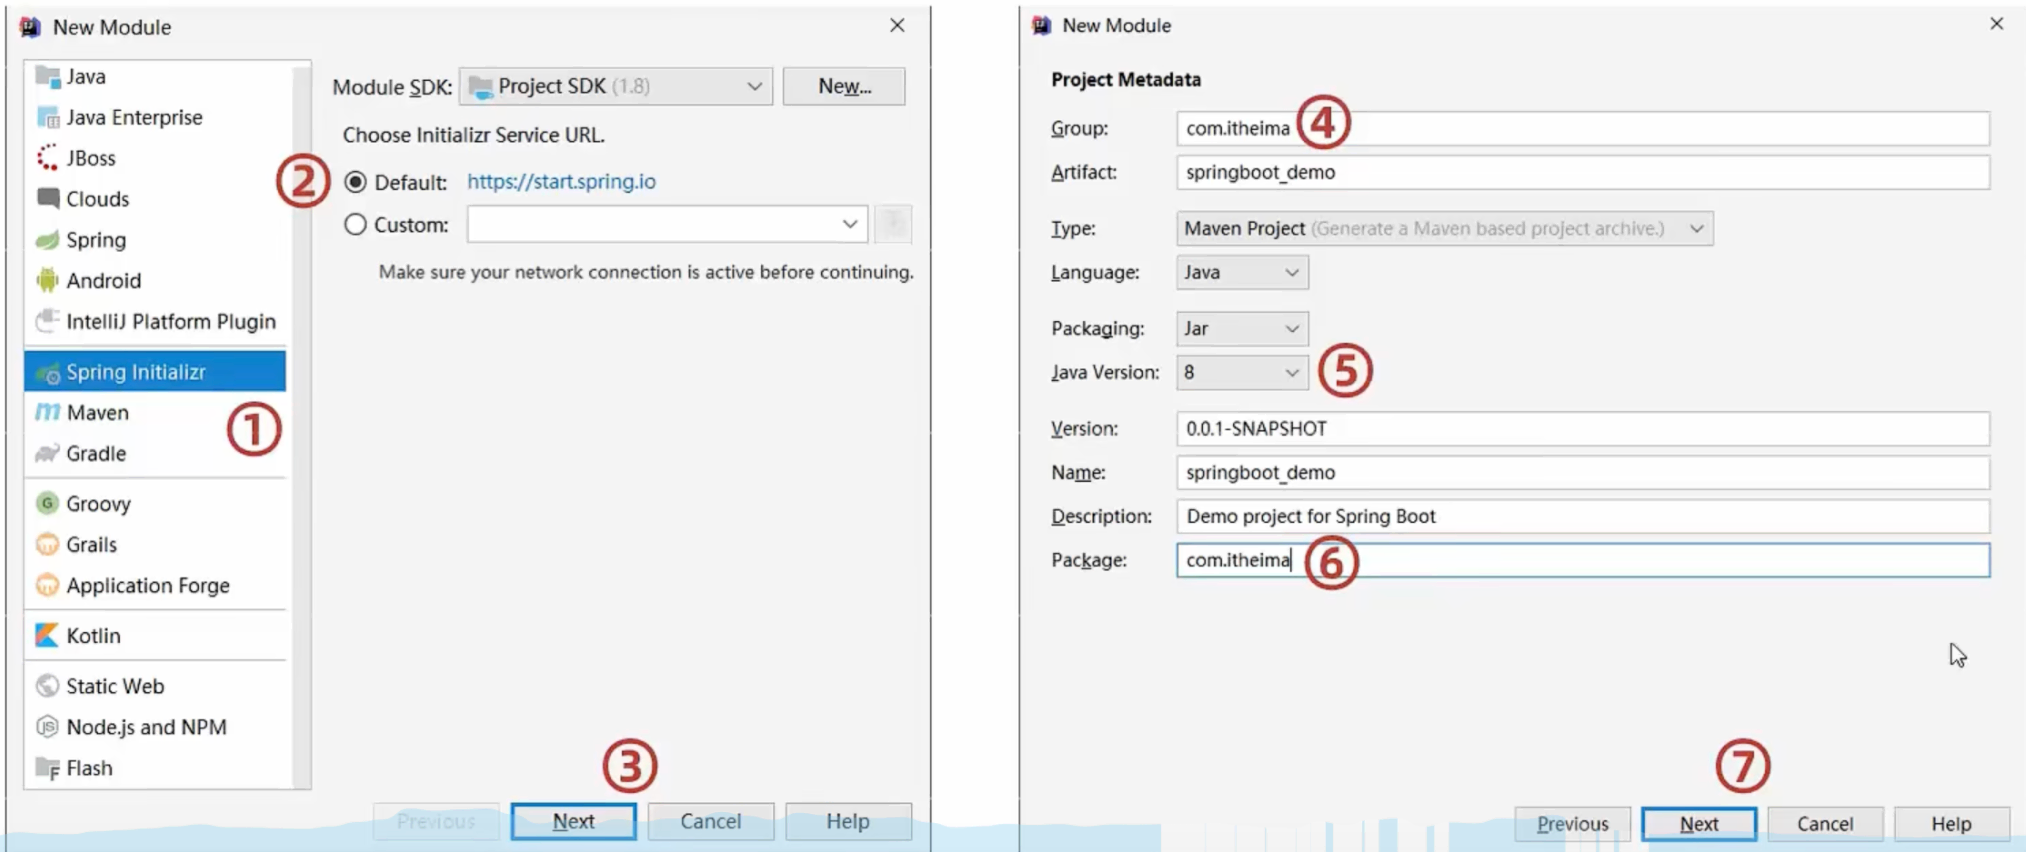
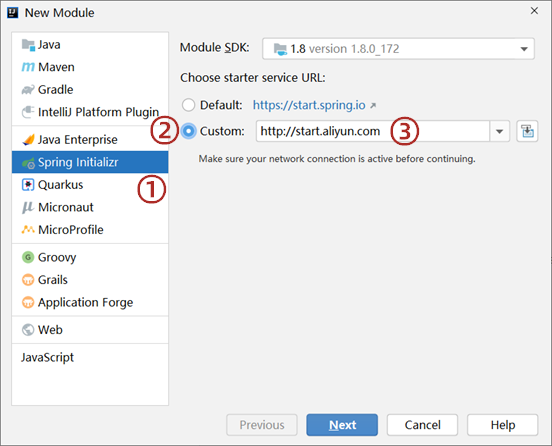
SpringBoot项目快速创建 IDEA联网版 1.创建新模块,选择Spring初始化,并配置模块相关基础信息
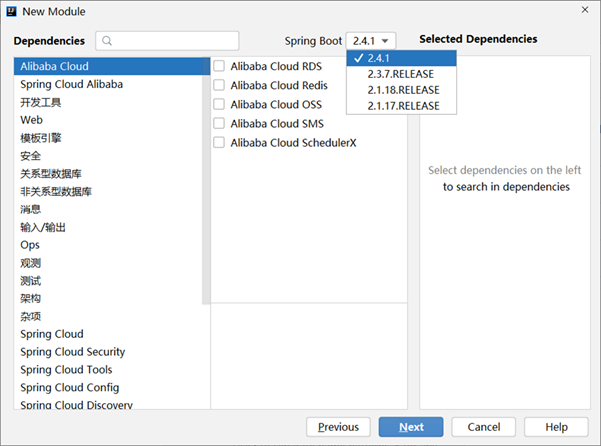
2.选择当前模块需要使用的技术集
3.开发控制器类
@RestController @RequestMapping("/books" ) public class BookController @GetMapping("/{id}" ) public String getById(@PathVariable Integer id){ System.out .println("id ==> " +id); return "hello , spring boot!" ; } }
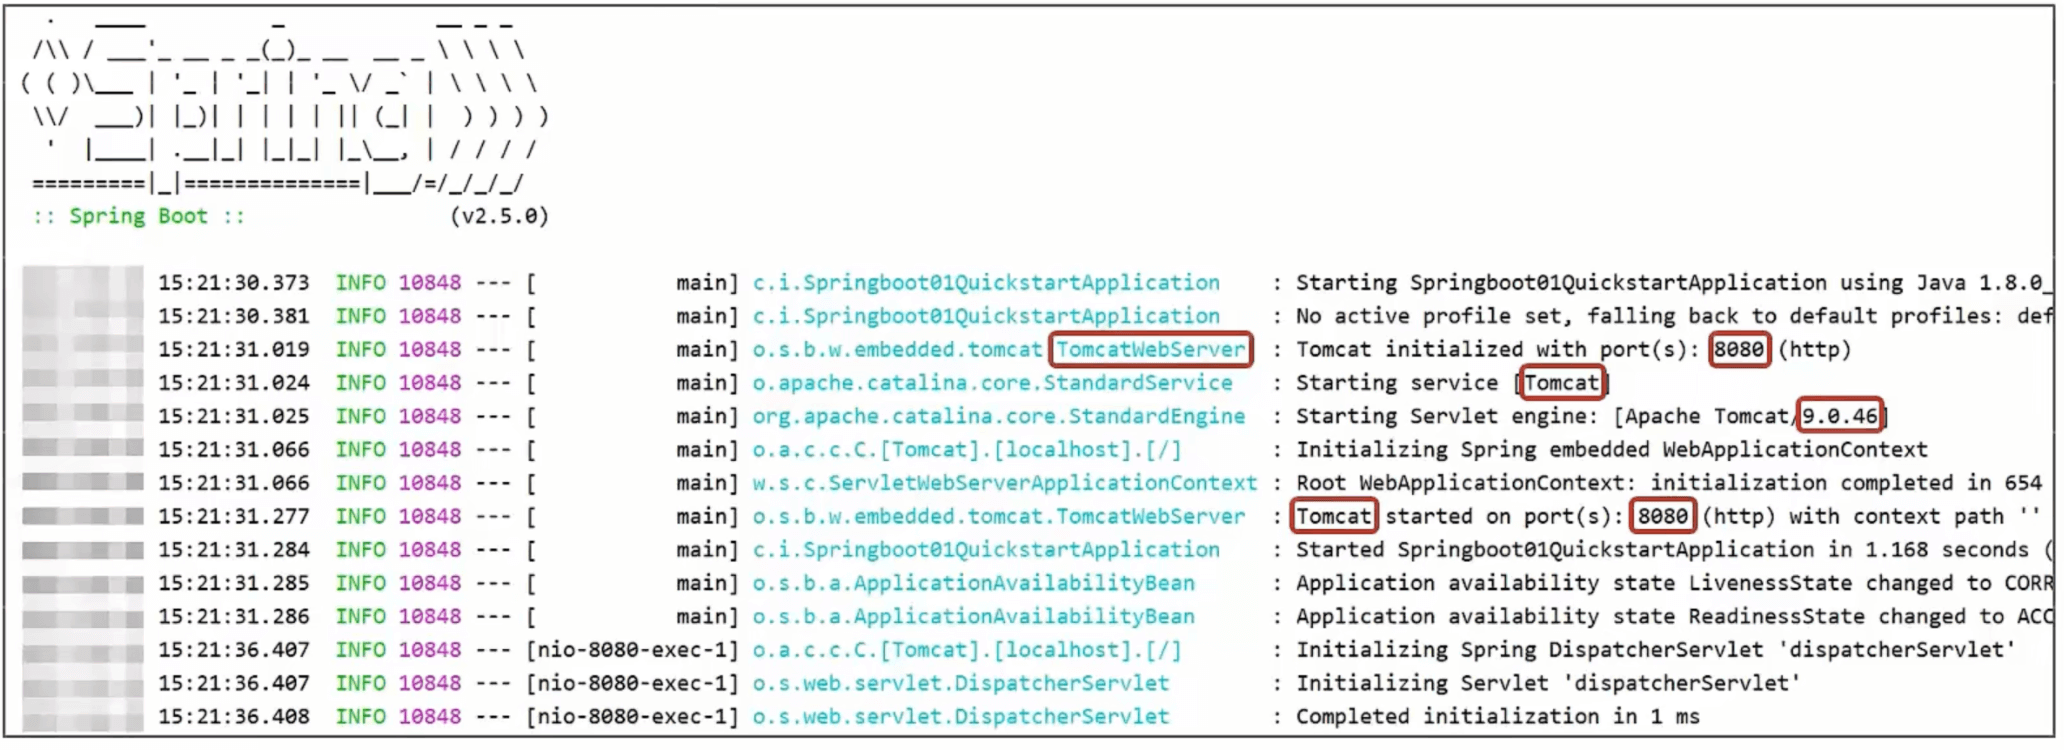
4.运行自动生成的Application类
官网创建版
基于idea开发SpringBoot程序需要确保联网
也可官网创建:
https://spring.io/projects/spring-boot
进入到 SpringBoot 官网后拖到最下方就可以看到如下内容
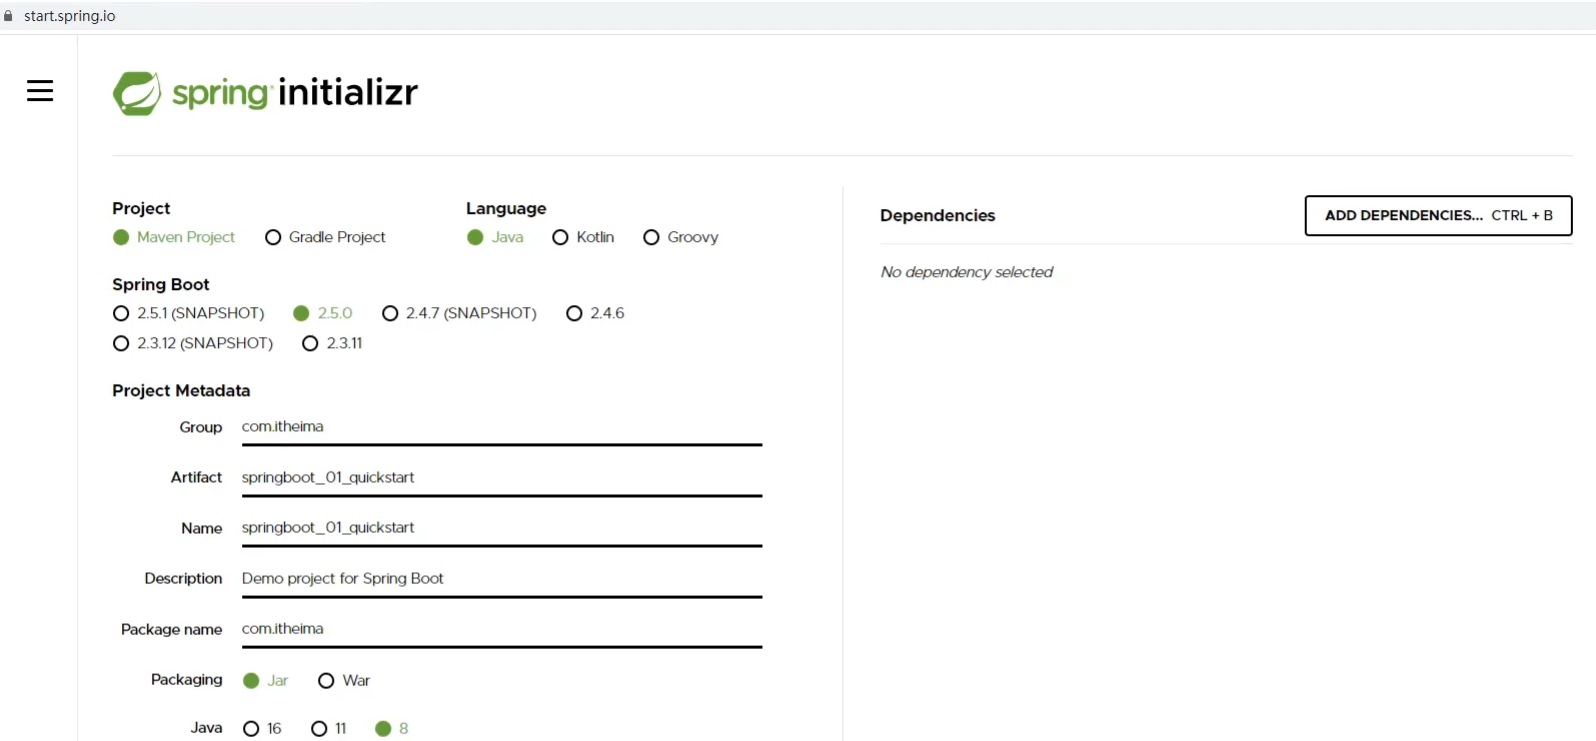
然后点击 Spring Initializr 超链接就会跳转到如下页面
选择 Spring Web 可以点击上图右上角的 ADD DEPENDENCIES... CTRL + B 按钮,就会出现如下界面
阿里云版
手工版 前提是jar之前已下过
参照标准SpringBoot工程的pom文件,书写自己的pom文件即可
<?xml version="1.0" encoding="UTF-8" ?> <project xmlns ="http://maven.apache.org/POM/4.0.0" xmlns:xsi ="http://www.w3.org/2001/XMLSchema-instance" xsi:schemaLocation ="http://maven.apache.org/POM/4.0.0 http://maven.apache.org/xsd/maven-4.0.0.xsd" > <modelVersion > 4.0.0</modelVersion > <parent > <groupId > org.springframework.boot</groupId > <artifactId > spring-boot-starter-parent</artifactId > <version > 2.5.4</version > </parent > <groupId > com.itheima</groupId > <artifactId > springboot_01_04_quickstart</artifactId > <version > 1.0-SNAPSHOT</version > <properties > <maven.compiler.source > 8</maven.compiler.source > <maven.compiler.target > 8</maven.compiler.target > </properties > <dependencies > <dependency > <groupId > org.springframework.boot</groupId > <artifactId > spring-boot-starter-web</artifactId > </dependency > </dependencies > </project >
创建启动类
@SpringBootApplication public class Application { public static void main (String[] args) { SpringApplication.run(<Application.class); } }
总结
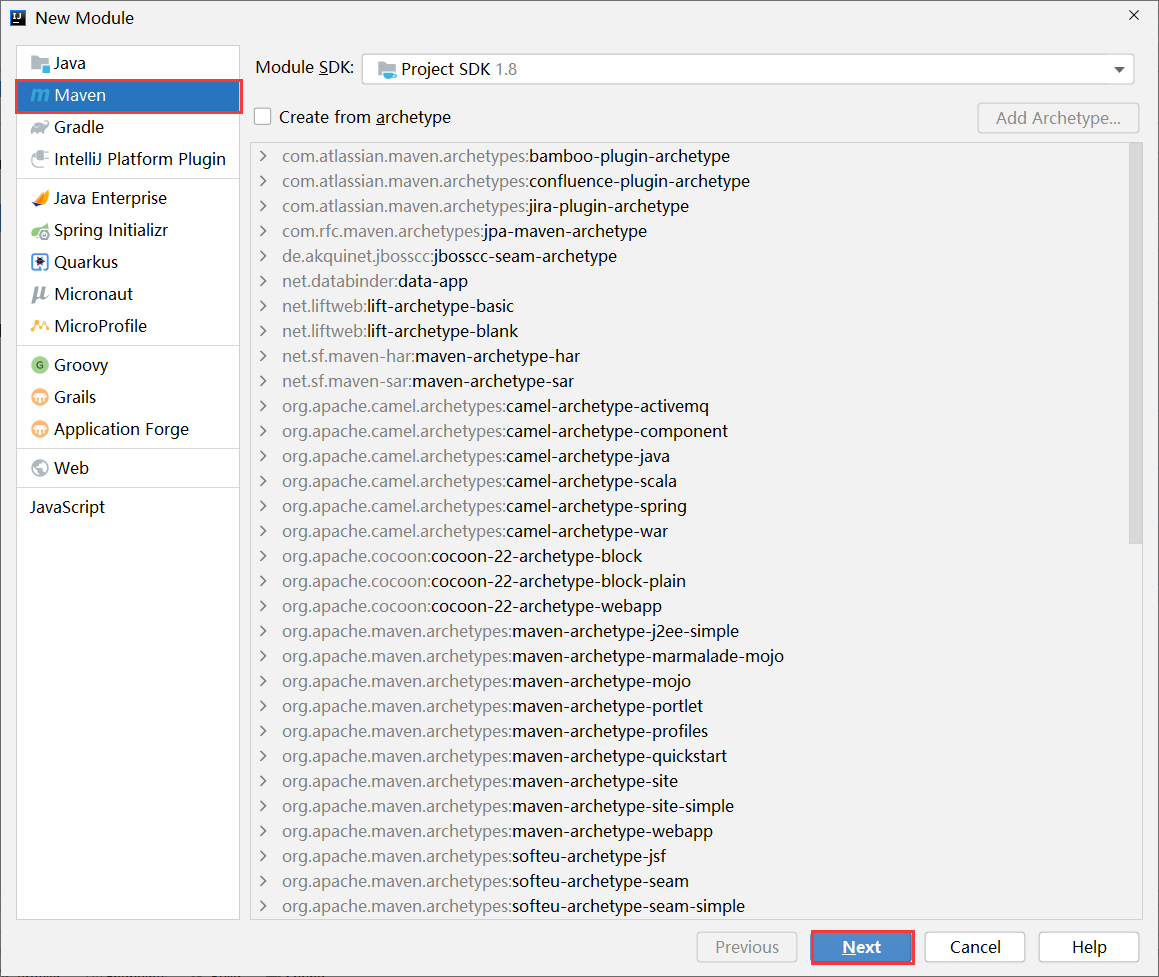
创建普通Maven工程
继承spring-boot-starter-parent
添加依赖spring-boot-starter-web
制作引导类Application
最简单SpringBoot程序所包含的基础文件 pom.xml文件
<?xml version="1.0" encoding="UTF-8" ?> <project xmlns ="http://maven.apache.org/POM/4.0.0" xmlns:xsi ="http://www.w3.org/2001/XMLSchema-instance" xsi:schemaLocation ="http://maven.apache.org/POM/4.0.0 https://maven.apache.org/xsd/maven-4.0.0.xsd" > <modelVersion > 4.0.0</modelVersion > <parent > <groupId > org.springframework.boot</groupId > <artifactId > spring-boot-starter-parent</artifactId > <version > 2.5.0</version > </parent > <groupId > com.itheima</groupId > <artifactId > springboot_01_quickstart</artifactId > <version > 0.0.1-SNAPSHOT</version > <properties > <java.version > 8</java.version > </properties > <dependencies > <dependency > <groupId > org.springframework.boot</groupId > <artifactId > spring-boot-starter-web</artifactId > </dependency > <dependency > <groupId > org.springframework.boot</groupId > <artifactId > spring-boot-starter-test</artifactId > <scope > test</scope > </dependency > </dependencies > <build > <plugins > <plugin > <groupId > org.springframework.boot</groupId > <artifactId > spring-boot-maven-plugin</artifactId > </plugin > </plugins > </build > </project >
Application类
@SpringBootApplication public class Application { public static void main (String [] args SpringApplication .run (Application .class , args); } }
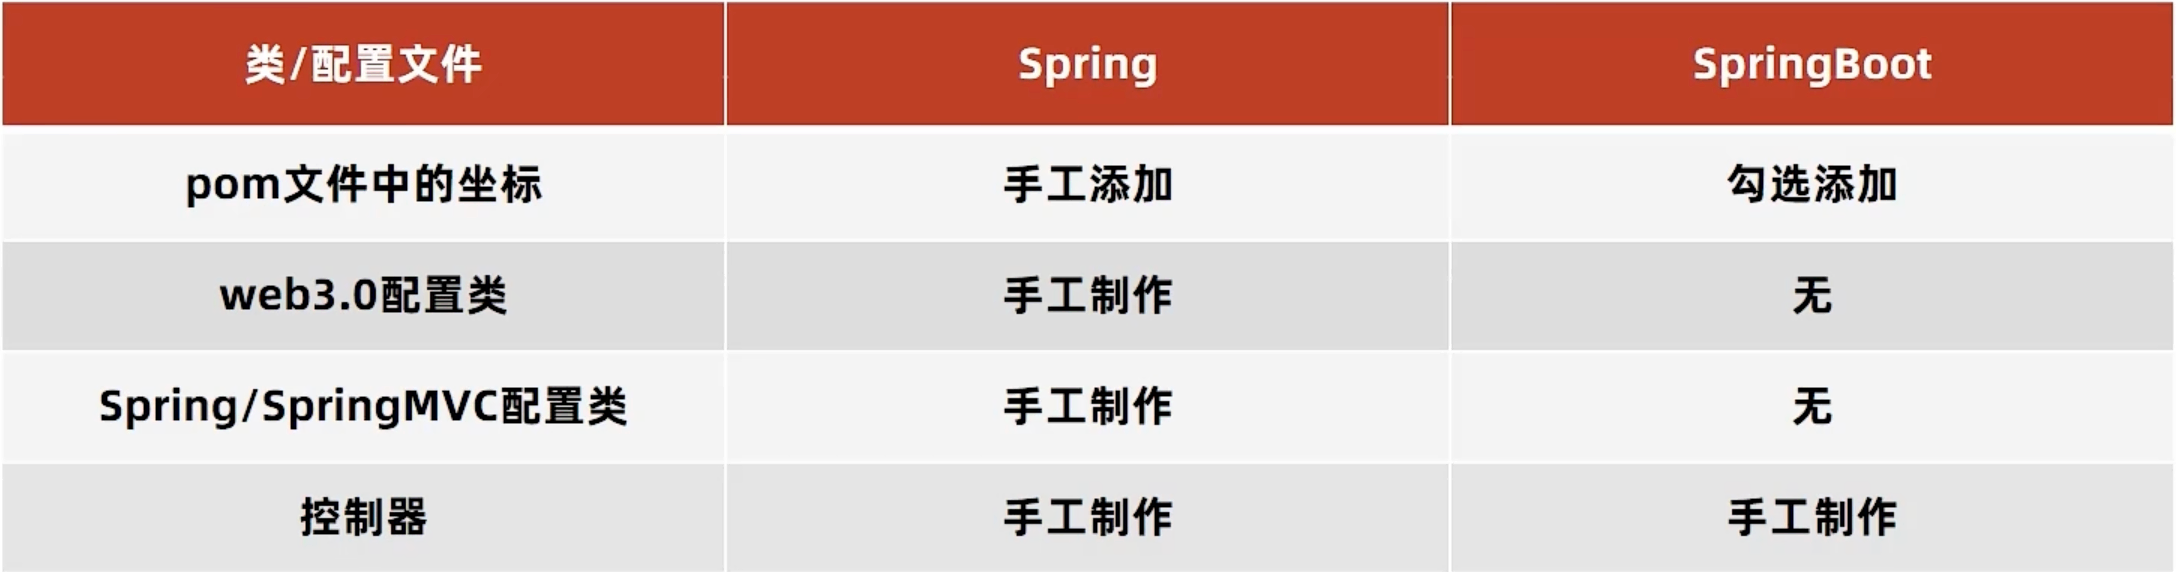
Spring程序与SpringBoot程序对比
入门案例解析
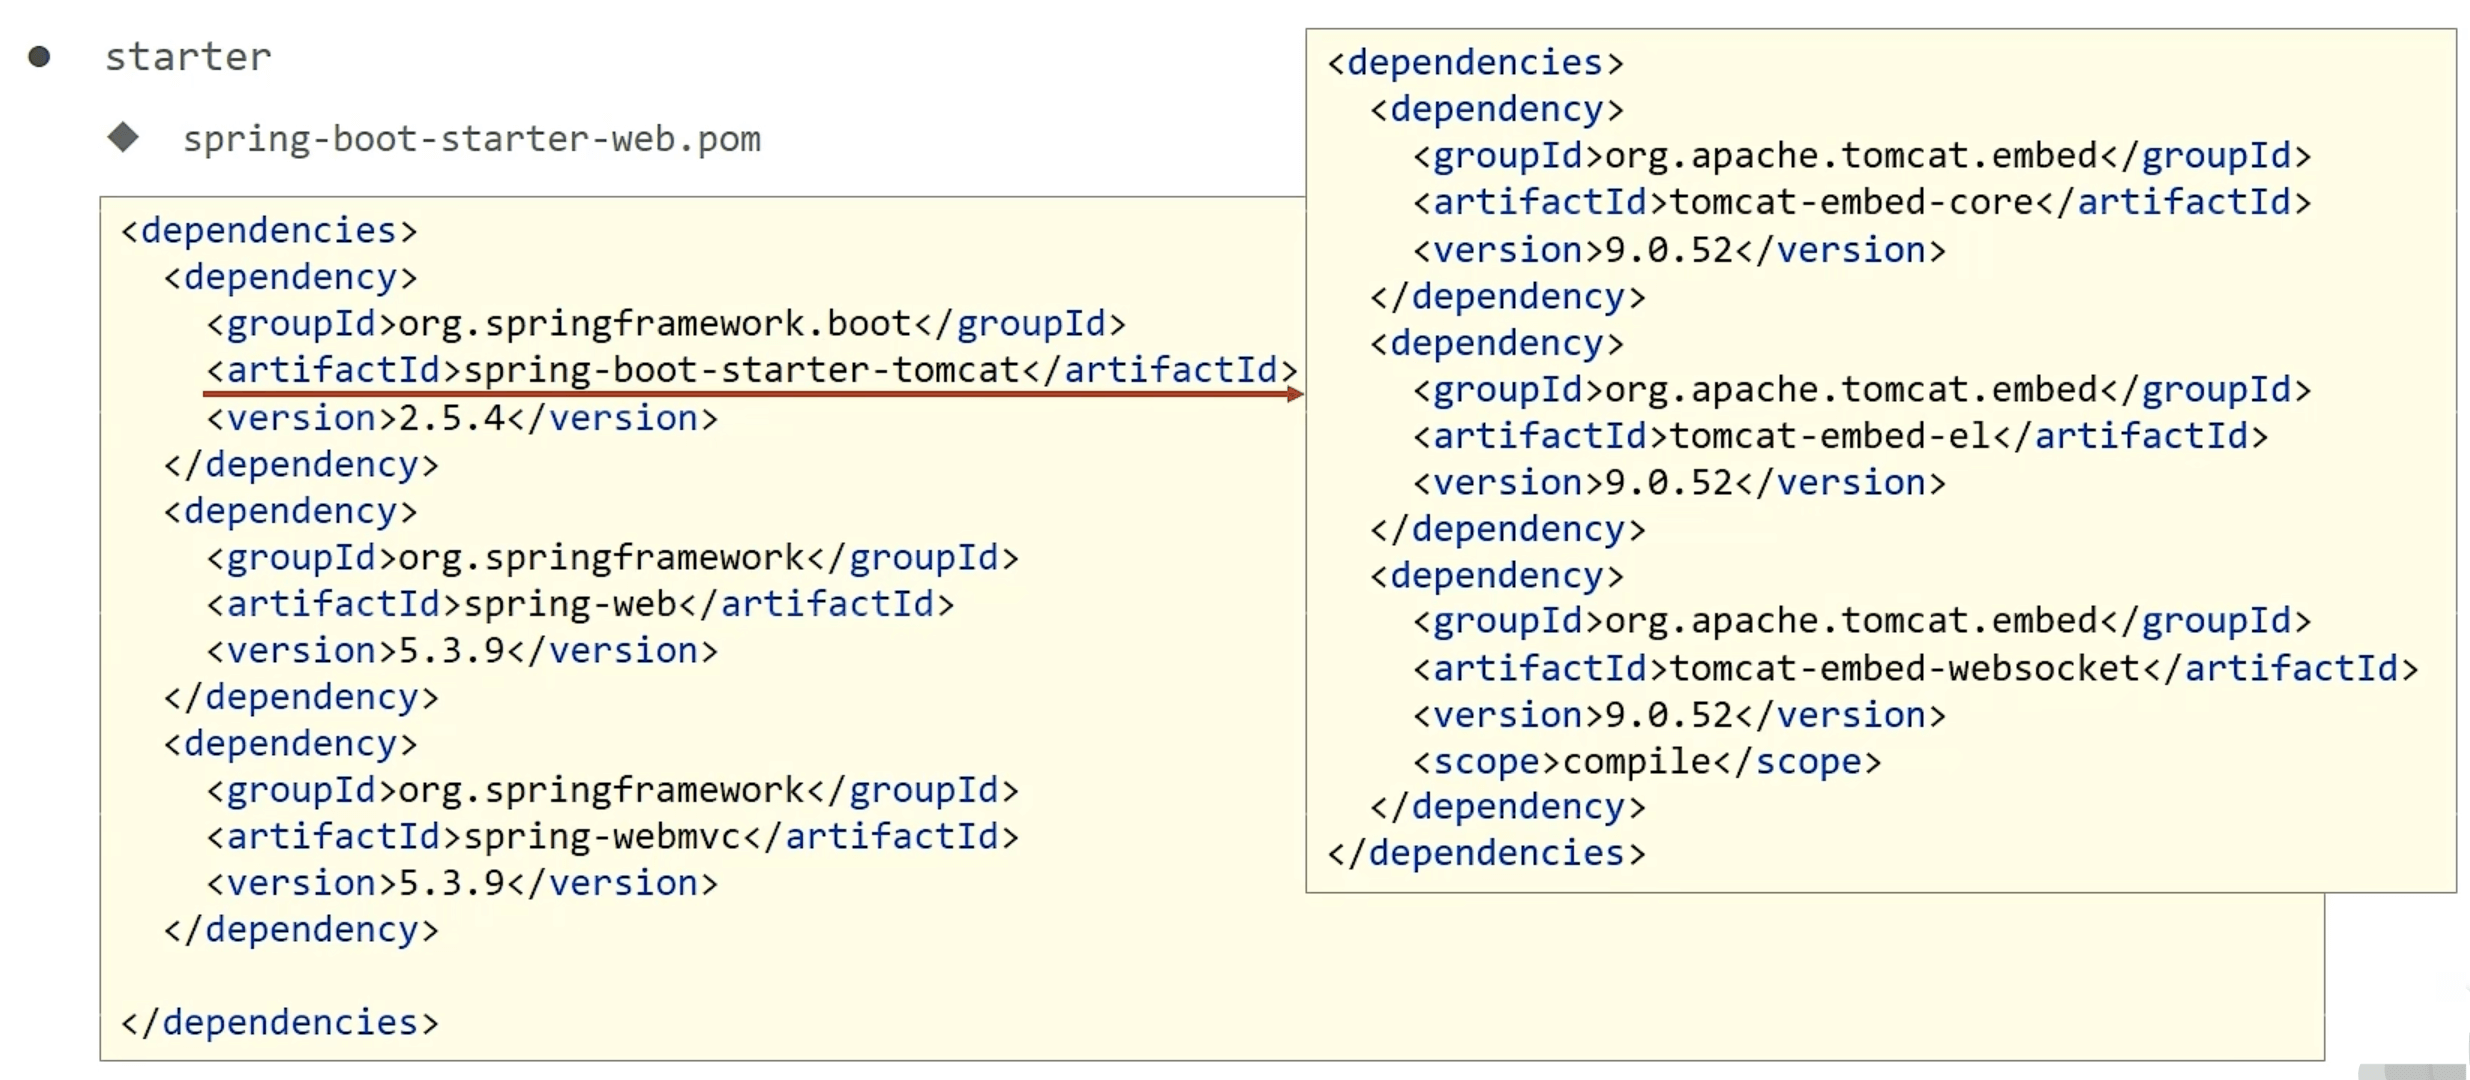
starter
SpringBoot中常见项目名称,定义了当前项目使用的所有依赖坐标,以达到减少依赖配置 的目的
parent
实际开发
使用任意坐标时,仅书写GAV中的G和A,V由SpringBoot提供,除非SpringBoot未提供对应版本V
如发生坐标错误,再指定Version(要小心版本冲突)
复制工程(不建议使用此方式) 原则
在工作空间中复制对应工程,并修改工程名
删除与Idea相关配置文件,仅保留src目录与pom.xml文件
修改pom.xml文件中的artifactId与新工程/模块名相同
删除name标签(可选)
保留备份工程供后期使用
properties开发 spring.main.banner-mode =off logging.level.root =debug
可选内置属性查询
Properties文件多环境启动
主启动配置文件application.properties:
spring.profiles.active =pro
环境分类配置文件application-pro.properties:
环境分类配置文件application-dev.properties:
环境分类配置文件application-test.properties:
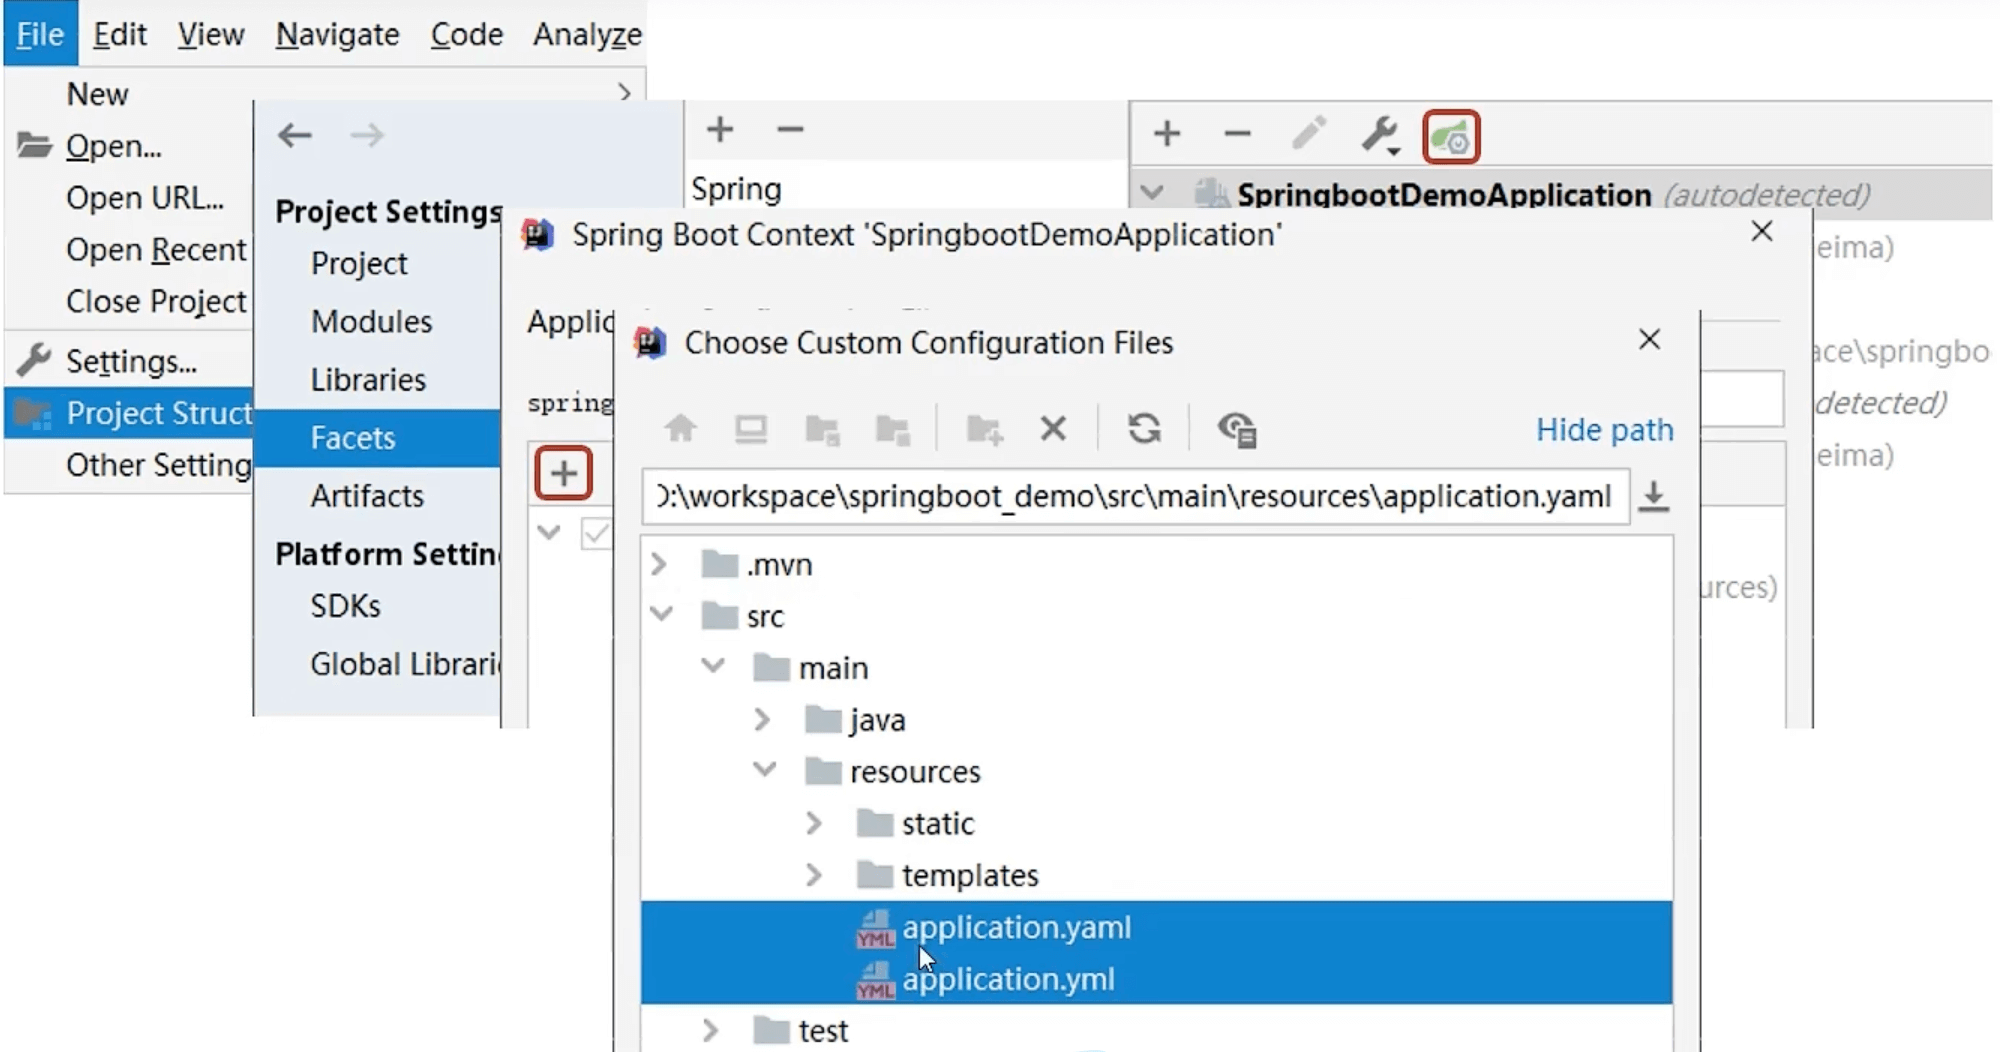
yaml开发 自动提示功能消失解决方案
加载优先级
application.properties > application.yml > application.yaml
不同配置文件中相同配置按照加载优先级相互覆盖,不同配置文件中不同配置全部保留
yaml的格式
语法规则
核心规则:数据前面要加空格与冒号隔开
字面值表示方式 boolean: TRUE float: 3.14 int: 123 null: ~ string: HelloWorld string2: "Hello World" date: 2018-02-17 datetime: 2018-02-17T15:02:31+08:00
数组表示方式 subject: - Java - 前端 - 大数据 enterprise: name: itcast age: 16 subject: - Java - 前端 - 大数据 likes: [王者荣耀 ,刺激战场 ] users: - name: Tom age: 4 - name: Jerry age: 5 users: - name: Tom age: 4 - name: Jerry age: 5 users2: [ { name:Tom , age:4 } , { name:Jerry , age:5 } ]
yaml数据读取方式(3种) 在配置文件中可以使用属性名引用方式引用属性
baseDir: /usr/local/fire
center:
	dataDir: ${baseDir}/data
	tmpDir: ${baseDir}/tmp
	logDir: ${baseDir}/log
	msgDir: ${baseDir}/msgDir
属性值中如果出现转义字符,需要使用双引号包裹
lesson: "Spring\tboot\nlesson"
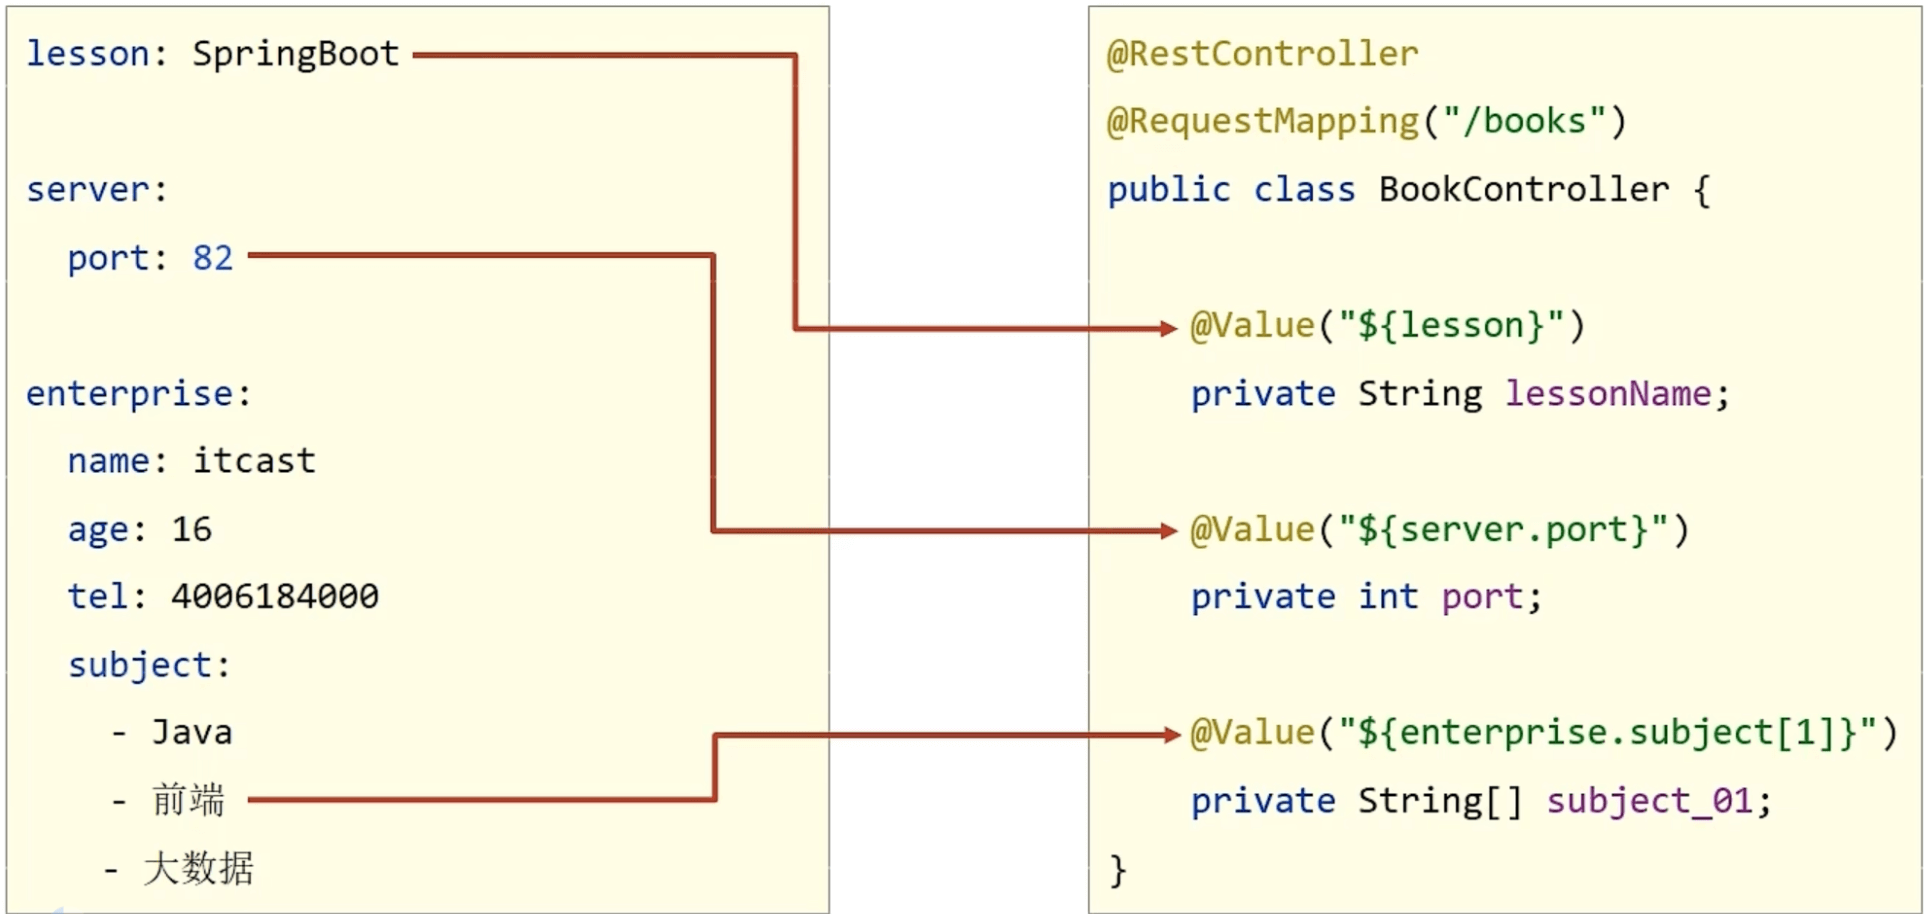
1.使用 @Value("表达式") 注解可以从配合文件中读取数据,注解中用于读取属性名引用方式是:${一级属性名.二级属性名……}
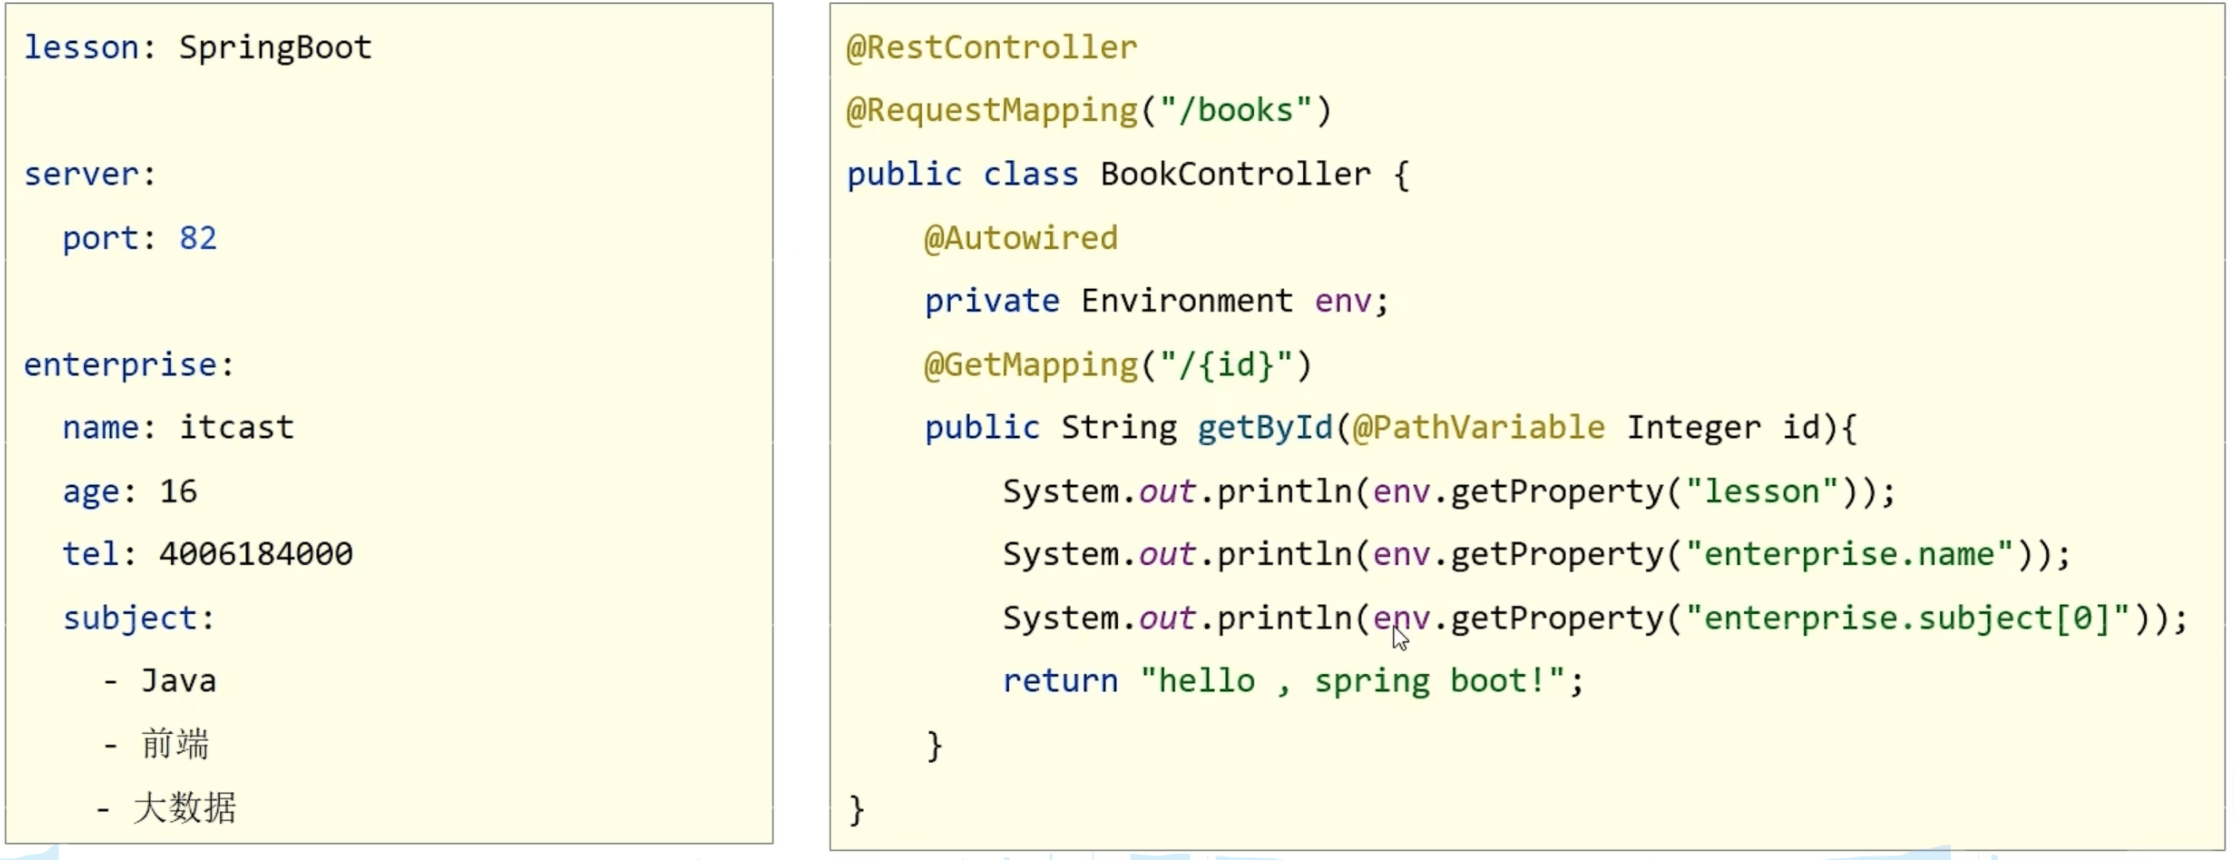
2.封装全部数据到Environment对象
3.自定义对象封装指定数据
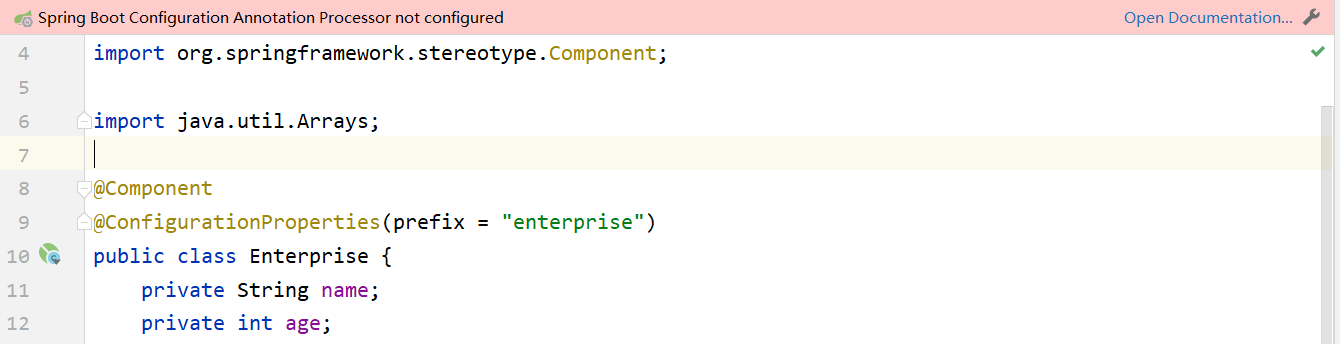
在实体类上有如下警告提示
警告解决方案:
<dependency > <groupId > org.springframework.boot</groupId > <artifactId > spring-boot-configuration-processor</artifactId > <optional > true</optional > </dependency >
yaml文件实现多环境启动 单文件 spring: profiles: active: dev spring: config: activate: on-profile: pro --- spring: profiles: dev server: port: 80 --- spring: profiles: pro server: port: 81 --- spring: profiles: test server: port: 82 ---
多文件 主启动配置文件application.yml
spring:
  profiles:
    active: pro
环境分类配置文件application-pro.yml
环境分类配置文件application-dev.yml
环境分类配置文件application-test.yml
多文件方式2 根据功能对配置文件中的信息进行拆分,并制作成独立的配置文件,命名规则如下:
application-devDB.yml
application-devRedis.yml
application-devMVC.yml
使用incloud属性在激活指定环境的情况下,同时对多个环境进行加载使其生效,多个环境间使用逗号分隔
spring: profiles: active: dev include: devDB,devRedis,devMVC
当主环境dev与其他环境有相同属性时,主环境属性生效;其他环境中有相同属性时,最后加载的环境属性生效。
从Spring2.4开始使用group属性替代include属性
使用group属性定义多种主环境与子环境的包含关系
spring: profiles: active: dev group: "dev" : devDB,devRedis,devMVC "pro" : proDB,proRedis,proMVC "test" : testDB,testRedis,testMVC
多环境开发使用group属性设置配置文件分组,便于线上维护管理
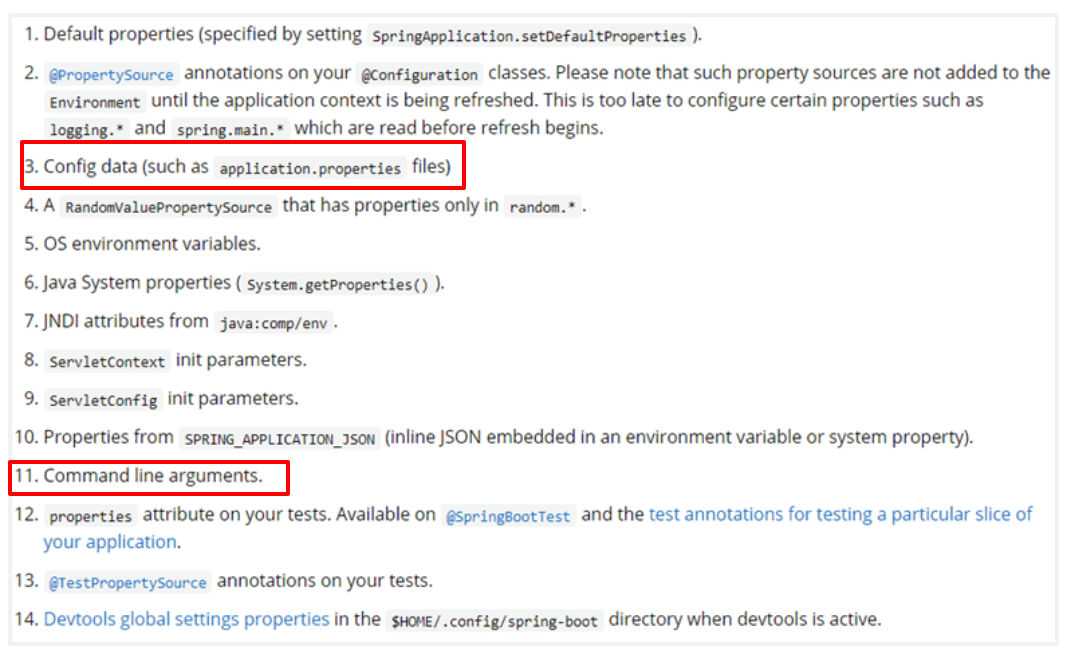
属性加载优先顺序 从上到下,由低到高
https://docs.spring.io/spring-boot/docs/current/reference/html/spring-boot-features.html#boot-features-external-config
Default properties (specified by setting SpringApplication.setDefaultProperties).
@PropertySource@Configuration classes. Please note that such property sources are not added to the Environment until the application context is being refreshed. This is too late to configure certain properties such as logging.* and spring.main.* which are read before refresh begins.Config data (such as application.properties files).
A RandomValuePropertySource that has properties only in random.*.
OS environment variables.
Java System properties (System.getProperties()).
JNDI attributes from java:comp/env.
ServletContext init parameters.ServletConfig init parameters.Properties from SPRING_APPLICATION_JSON (inline JSON embedded in an environment variable or system property).
Command line arguments.
properties attribute on your tests. Available on @SpringBootTesttest annotations for testing a particular slice of your application .@TestPropertySourceDevtools global settings properties in the $HOME/.config/spring-boot directory when devtools is active.
Maven与SpringBoot多环境兼容
①:Maven中设置多环境属性
<profiles > <profile > <id > dev_env</id > <properties > <profile.active > dev</profile.active > </properties > // 激活 <activation > <activeByDefault > true</activeByDefault > </activation > </profile > <profile > <id > pro_env</id > <properties > <profile.active > pro</profile.active > </properties > </profile > <profile > <id > test_env</id > <properties > <profile.active > test</profile.active > </properties > </profile > </profiles > <build > <plugins > <plugin > <groupId > org.springframework.boot</groupId > <artifactId > spring-boot-maven-plugin</artifactId > </plugin > <plugin > <groupId > org.apache.maven.plugins</groupId > <artifactId > maven-resources-plugin</artifactId > <version > 3.2.0</version > <configuration > <encoding > UTF-8</encoding > <useDefaultDelimiters > true</useDefaultDelimiters > </configuration > </plugin > </plugins > </build >
②:SpringBoot中引用Maven属性
spring: profiles: active: ${profile.active} --- spring: profiles: dev server: port: 80 --- spring: profiles: pro server: port: 81 --- spring: profiles: test server: port: 82
或者用@:
spring: profiles: active: @profile.active@
③:执行Maven打包指令,并在生成的boot打包文件.jar文件中查看对应信息
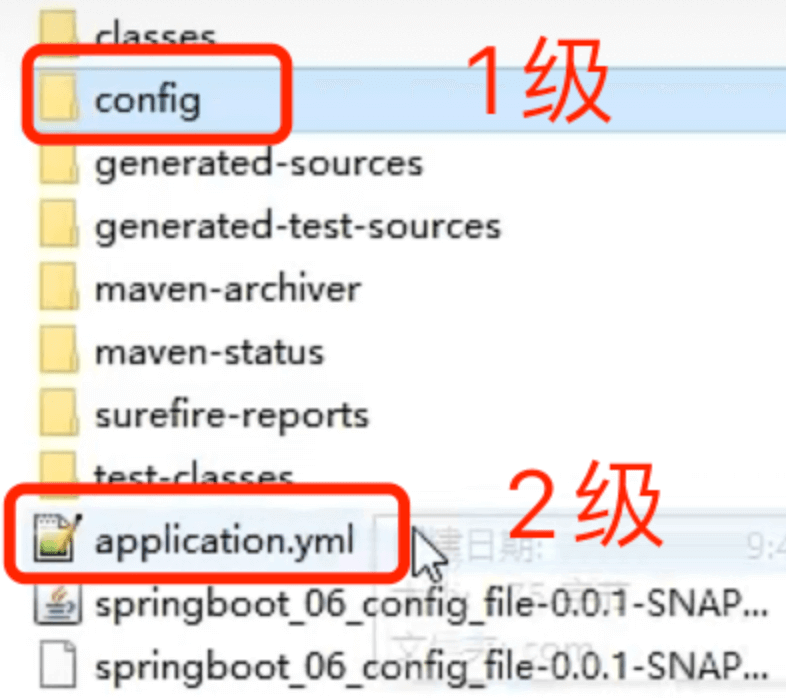
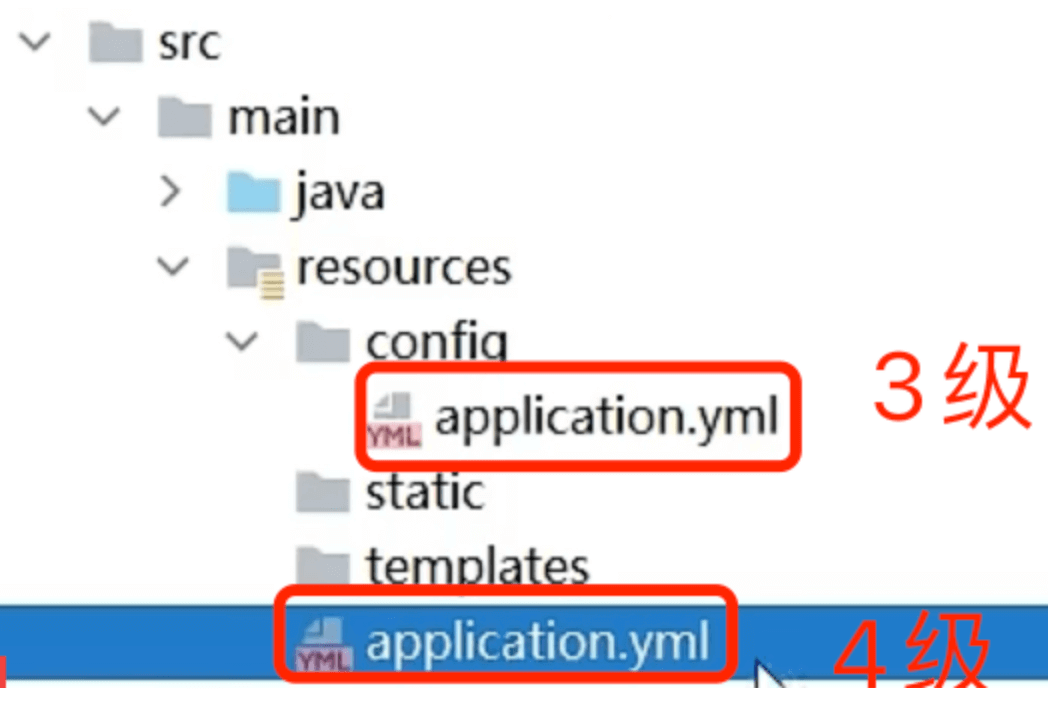
SpringBoot中4级配置文件 1级: file :config/application.yml 【最高】—– config目录中配置文件:服务于运维经理整体调控
作用
1级与2级留做系统打包后设置通用属性,1级常用于运维经理进行线上整体项目部署方案调控
3级与4级用于系统开发阶段设置通用属性,3级常用于项目经理进行整体项目属性调控
多层级配置文件间的属性采用叠加并覆盖的形式作用于程序
示例:
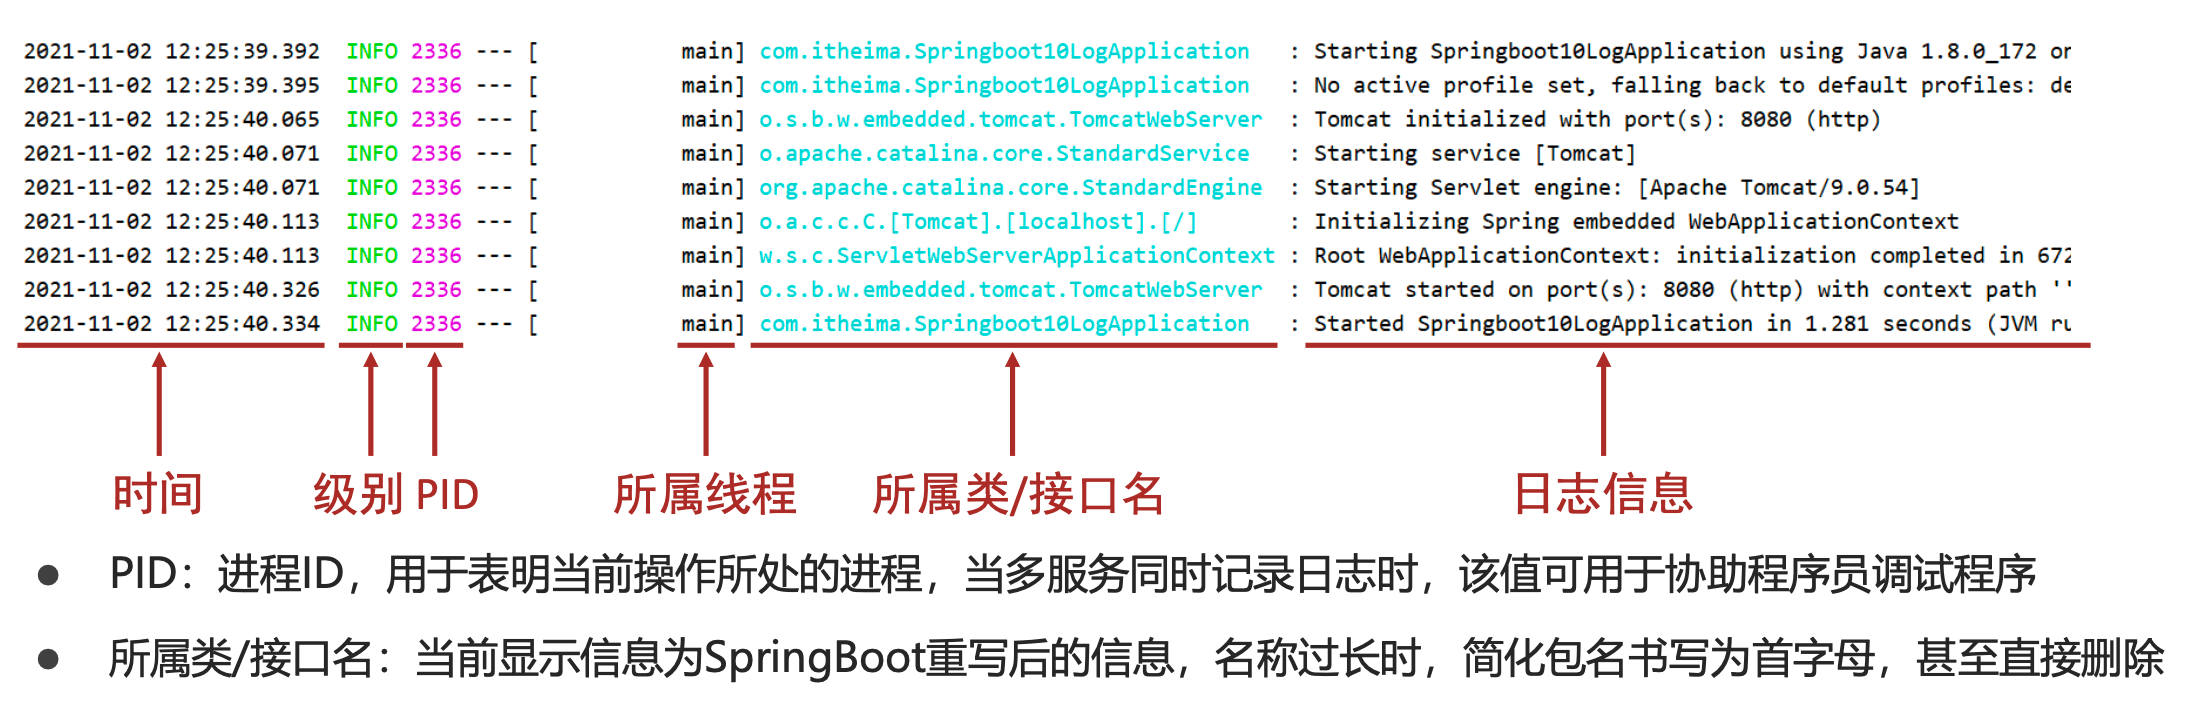
日志 日志级别
TRACE:运行堆栈信息,使用率低
DEBUG:程序员调试代码使用
INFO:记录运维过程数据
WARN:记录运维过程报警数据
ERROR:记录错误堆栈信息
FATAL:灾难信息,合并计入ERROR
设置日志输出级别 debug: true logging: level: root: debug
设置日志组,控制指定包对应的日志输出级别,也可以直接控制指定包对应的日志输出级别
logging: group: ebank: com.itheima.controller level: root: warn ebank: debug com.itheima.controller: debug
基于lombok提供的@Slf4j注解为类快速添加日志对象
日志输出格式控制
设置日志输出格式
logging: pattern: console: "%d %clr(%p) --- [%16t] %clr(%-40.40c){cyan} : %m %n"
设置日志文件
logging: file: name: server.log logback: rollingpolicy: max-file-size: 3KB file-name-pattern: server.%d{yyyy-MM-dd}.%i.log
SpringBoot整合第三方技术 整合Junit 可对比:Spring整合Junit
@RunWith(SpringJUnit4ClassRunner.class) @SpringBootTest class Springboot07TestApplicationTests { @Autowired private BookService bookService; @Test public void save () { bookService.save(); } }
这里的引导类所在包必须是测试类所在包及其子包。
例如:
引导类所在包是 com.itheima
测试类所在包是 com.itheima
如果不满足这个要求的话,就需要在使用 @SpringBootTest 注解时,使用 classes 属性指定引导类的字节码对象。如 @SpringBootTest(classes = Springboot07TestApplication.class)
@RunWith就是一个运行器
@RunWith(JUnit4.class)就是指用JUnit4来运行
–@RunWith(SpringJUnit4ClassRunner.class),让测试运行于Spring测试环 境,以便在测试开始的时候自动创建Spring的应用上下文
@RunWith(Suite.class)的话就是一套测试集合
标准测试类里是要有@RunWith的,作用是告诉java你这个类通过用什么运行环境运行,例如启动和创建spring的应用上下文。否则你需要为此在启动时写一堆的环境配置代码 。
你在IDEA里去掉@RunWith仍然能跑是因为在IDEA里识别为一个JUNIT的运行环境,相当于就是一个自识别的RUNWITH环境配置 。但在其他IDE里并没有。
所以,为了你的代码能在其他IDE里边正常跑,建议还是加@RunWith 。
整合MyBatis 可对比:Spring整合MyBatis
基于SpringBoot实现SSM
SpringBoot整合Spring(不存在)
SpringBoot整合SpringMVC(不存在)
SpringBoot整合MyBatis(主要)
<dependencies > <dependency > <groupId > com.alibaba</groupId > <artifactId > druid</artifactId > <version > 1.1.16</version > </dependency > <dependency > <groupId > org.mybatis</groupId > <artifactId > mybatis</artifactId > <version > 3.5.6</version > </dependency > <dependency > <groupId > mysql</groupId > <artifactId > mysql-connector-java</artifactId > <version > 5.1.47</version > </dependency > <dependency > <groupId > org.mybatis</groupId > <artifactId > mybatis-spring</artifactId > <version > 1.3.0</version > </dependency > <dependency > <groupId > org.springframework</groupId > <artifactId > spring-jdbc</artifactId > <version > 5.2.10.RELEASE</version > </dependency > </dependencies >
设置数据源参数
spring: datasource: driver-class-name: com.mysql.cj.jdbc.Driver url: jdbc:mysql://localhost:3306/ssm_db?serverTimezone=UTC username: root password: root type: com.alibaba.druid.pool.DruidDataSource
SpringBoot 版本低于2.4.3(不含),Mysql驱动版本大于8.0时,需要在url连接串中配置时区 jdbc:mysql://localhost:3306/ssm_db?serverTimezone=UTC,或在MySQL数据库端配置时区解决此问题
定义数据层接口与映射配置 @Mapper
@Mapper public interface BookDao @Select ("select * from tbl_book where id = #{id}" ) public Book getById (Integer id) ; }
整合MyBatis-plus 具体参考:MyBatisPlus
<dependency > <groupId > com.baomidou</groupId > <artifactId > mybatis-plus-boot-starter</artifactId > <version > 3.4.3</version > </dependency >
starter所属
命名规则
示例
官方提供
spring-boot-starter-技术名称
spring-boot-starter-web
第三方提供
第三方技术名称-spring-boot-starter
druid-spring-boot-starter
第三方提供
第三方技术名称-boot-starter(第三方技术名称过长,简化命名)
mybatis-plus-boot-starter
mybatis-plus: global-config: db-config: table-prefix: tbl_
spring: datasource: driver-class-name: com.mysql.cj.jdbc.Driver url: jdbc:mysql://localhost:3306/ssm_db?serverTimezone=Asia/Shanghai username: root password: root
@Mapper public interface BookDao extends BaseMapper <Book> {}
整合Duird <dependencies > <dependency > <groupId > com.alibaba</groupId > <artifactId > druid</artifactId > <version > 1.1.16</version > </dependency > </dependencies >
修改配置,在数据源配置中有一个type属性,专用于指定数据源类型
spring: datasource: driver-class-name: com.mysql.cj.jdbc.Driver url: jdbc:mysql://localhost:3306/ssm_db?serverTimezone=UTC username: root password: root type: com.alibaba.druid.pool.DruidDataSource
第二种整合方式(推荐):
<dependencies > <dependency > <groupId > com.alibaba</groupId > <artifactId > druid-spring-boot-starter</artifactId > <version > 1.2.6</version > </dependency > </dependencies >
spring: datasource: druid: driver-class-name: com.mysql.cj.jdbc.Driver url: jdbc:mysql://localhost:3306/ssm_db?serverTimezone=UTC username: root password: root
整合jetty Spring容器移除tomcat,并更换为jetty
使用Maven依赖管理变更起步依赖项
<dependency > <groupId > org.springframework.boot</groupId > <artifactId > spring-boot-starter-web</artifactId > <exclusions > <exclusion > <artifactId > spring-boot-starter-tomcat</artifactId > <groupId > org.springframework.boot</groupId > </exclusion > </exclusions > </dependency > <dependency > <groupId > org.springframework.boot</groupId > <artifactId > spring-boot-starter-jetty</artifactId > </dependency >
Jetty比Tomcat更轻量级、扩展性更强,谷歌搜索引擎(GAE)已全面切换为Jetty
整合Eureka 服务端配置
<dependency > <groupId > org.springframework.cloud</groupId > <artifactId > spring-cloud-starter-netflix-eureka-server</artifactId > </dependency >
@SpringBootApplication @EnableEurekaServer public class EurekaApplication { public static void main (String[] args) { SpringApplication.run(EurekaApplication.class, args); } }
server: port: 10086 spring: application: name: eurekaserver eureka: client: service-url: defaultZone: http://127.0.0.1:10086/eureka
客户端配置
<dependency > <groupId > org.springframework.cloud</groupId > <artifactId > spring-cloud-starter-netflix-eureka-client</artifactId > </dependency >
spring: application: name: userservice eureka: client: service-url: defaultZone: http://127.0.0.1:10086/eureka
基于SpringBoot的SSM整合案例 具体参考:
实体类开发————使用Lombok快速制作实体类
Dao开发————整合MyBatisPlus,制作数据层测试
Service开发————基于MyBatisPlus进行增量开发,制作业务层测试类
Controller开发————基于Restful开发,使用PostMan测试接口功能
Controller开发————前后端开发协议制作
页面开发————基于VUE+ElementUI制作,前后端联调,页面数据处理,页面消息处理
列表/分页/CRU
项目异常处理
按条件查询————页面功能调整、Controller修正功能、Service修正功能
表结构
DROP TABLE IF EXISTS `tbl_book`;CREATE TABLE `tbl_book` ( `id` int (11 ) NOT NULL AUTO_INCREMENT, `type` varchar (20 ) CHARACTER SET utf8 COLLATE utf8_general_ci NULL DEFAULT NULL , `name` varchar (50 ) CHARACTER SET utf8 COLLATE utf8_general_ci NULL DEFAULT NULL , `description` varchar (255 ) CHARACTER SET utf8 COLLATE utf8_general_ci NULL DEFAULT NULL , PRIMARY KEY (`id`) USING BTREE ) ENGINE = InnoDB AUTO_INCREMENT = 51 CHARACTER SET = utf8 COLLATE = utf8_general_ci ROW_FORMAT = Dynamic ; INSERT INTO `tbl_book` VALUES (1 , '计算机理论' , 'Spring实战 第5版' , 'Spring入门经典教程,深入理解Spring原理技术内幕' );INSERT INTO `tbl_book` VALUES (2 , '计算机理论' , 'Spring 5核心原理与30个类手写实战' , '十年沉淀之作,手写Spring精华思想' );INSERT INTO `tbl_book` VALUES (3 , '计算机理论' , 'Spring 5 设计模式' , '深入Spring源码剖析Spring源码中蕴含的10大设计模式' );INSERT INTO `tbl_book` VALUES (4 , '计算机理论' , 'Spring MVC+MyBatis开发从入门到项目实战' , '全方位解析面向Web应用的轻量级框架,带你成为Spring MVC开发高手' );INSERT INTO `tbl_book` VALUES (5 , '计算机理论' , '轻量级Java Web企业应用实战' , '源码级剖析Spring框架,适合已掌握Java基础的读者' );INSERT INTO `tbl_book` VALUES (6 , '计算机理论' , 'Java核心技术 卷I 基础知识(原书第11版)' , 'Core Java 第11版,Jolt大奖获奖作品,针对Java SE9、10、11全面更新' );INSERT INTO `tbl_book` VALUES (7 , '计算机理论' , '深入理解Java虚拟机' , '5个维度全面剖析JVM,大厂面试知识点全覆盖' );INSERT INTO `tbl_book` VALUES (8 , '计算机理论' , 'Java编程思想(第4版)' , 'Java学习必读经典,殿堂级著作!赢得了全球程序员的广泛赞誉' );INSERT INTO `tbl_book` VALUES (9 , '计算机理论' , '零基础学Java(全彩版)' , '零基础自学编程的入门图书,由浅入深,详解Java语言的编程思想和核心技术' );INSERT INTO `tbl_book` VALUES (10 , '市场营销' , '直播就该这么做:主播高效沟通实战指南' , '李子柒、李佳琦、薇娅成长为网红的秘密都在书中' );INSERT INTO `tbl_book` VALUES (11 , '市场营销' , '直播销讲实战一本通' , '和秋叶一起学系列网络营销书籍' );INSERT INTO `tbl_book` VALUES (12 , '市场营销' , '直播带货:淘宝、天猫直播从新手到高手' , '一本教你如何玩转直播的书,10堂课轻松实现带货月入3W+' );
pom.xml
配置起步依赖,必要的资源坐标(druid)
application.yml
设置数据源、端口等
配置类
全部删除
dao
设置@Mapper
测试类
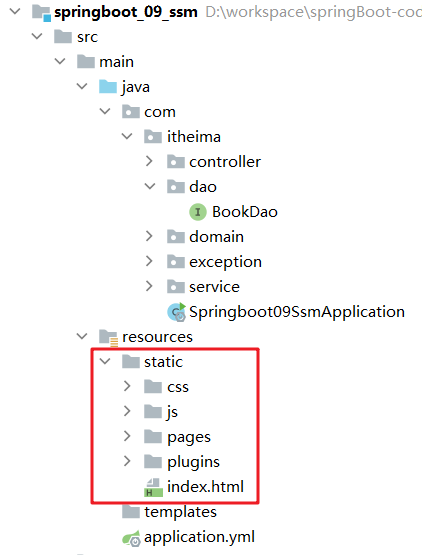
页面
放置在resources目录下的static目录中
SpringBoot工程启动 普通启动 1.对SpringBoot项目打包(执行Maven构建指令package)
需要Maven插件
<plugin > <groupId > org.springframework.boot</groupId > <artifactId > spring-boot-maven-plugin</artifactId > </plugin >
2.执行启动指令
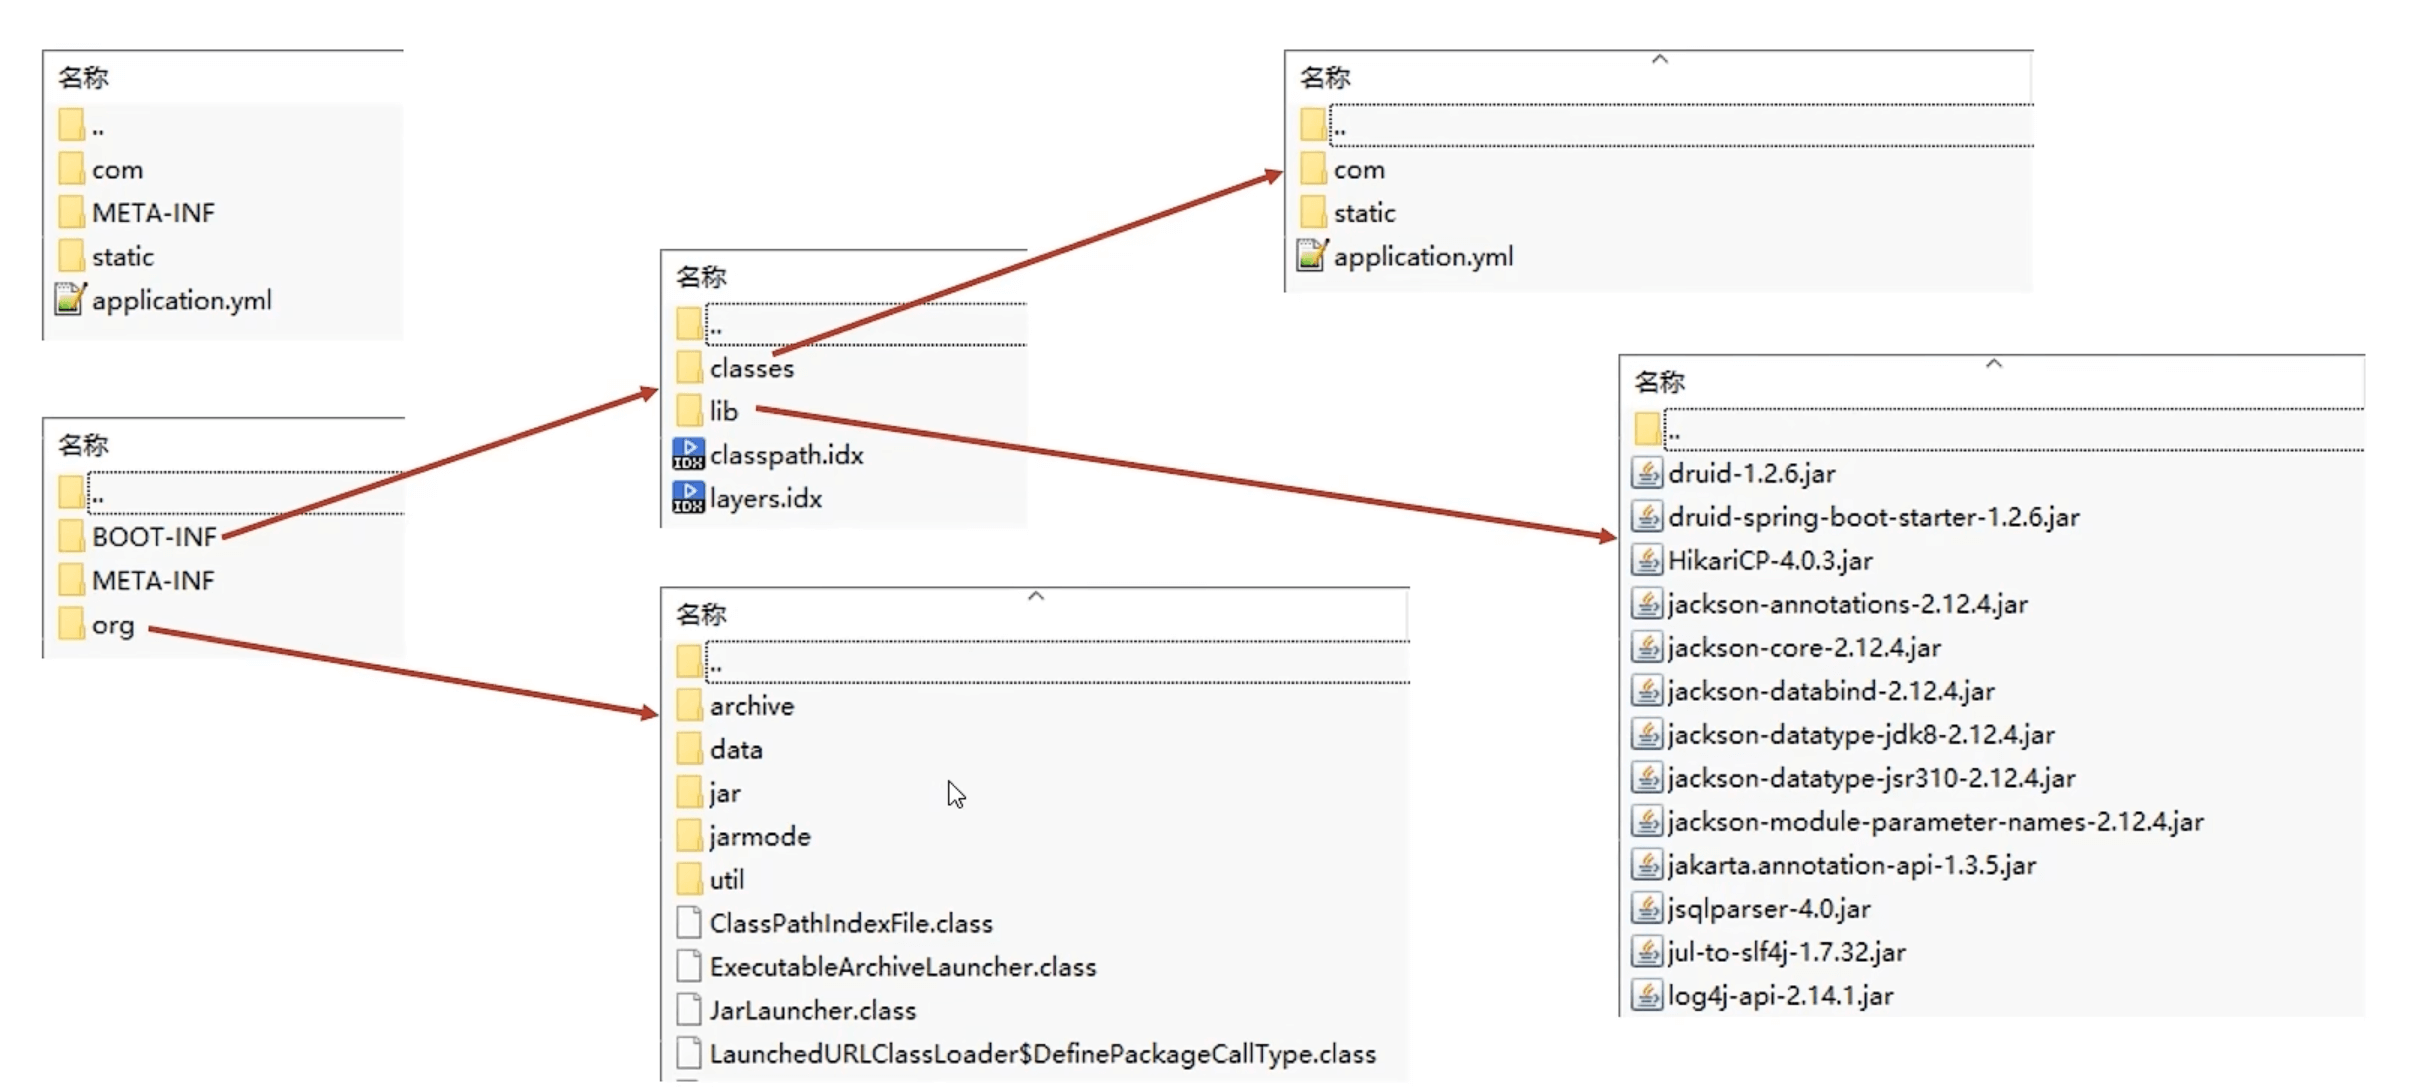
可执行jar包目录结构
jar包描述文件(MANIFEST.MF)
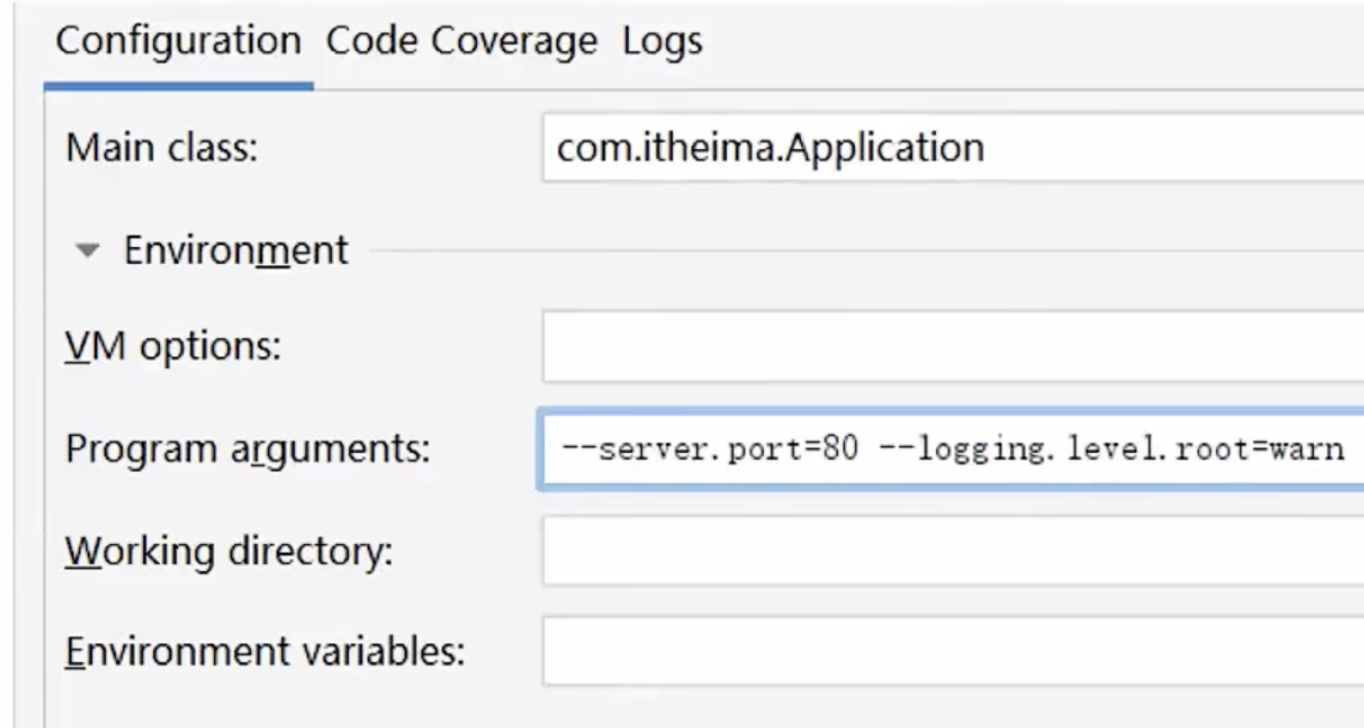
多环境命令行启动参数设置 带参数启动SpringBoot
java -jar springboot.jar --server.port =88 --spring.profiles.active =test
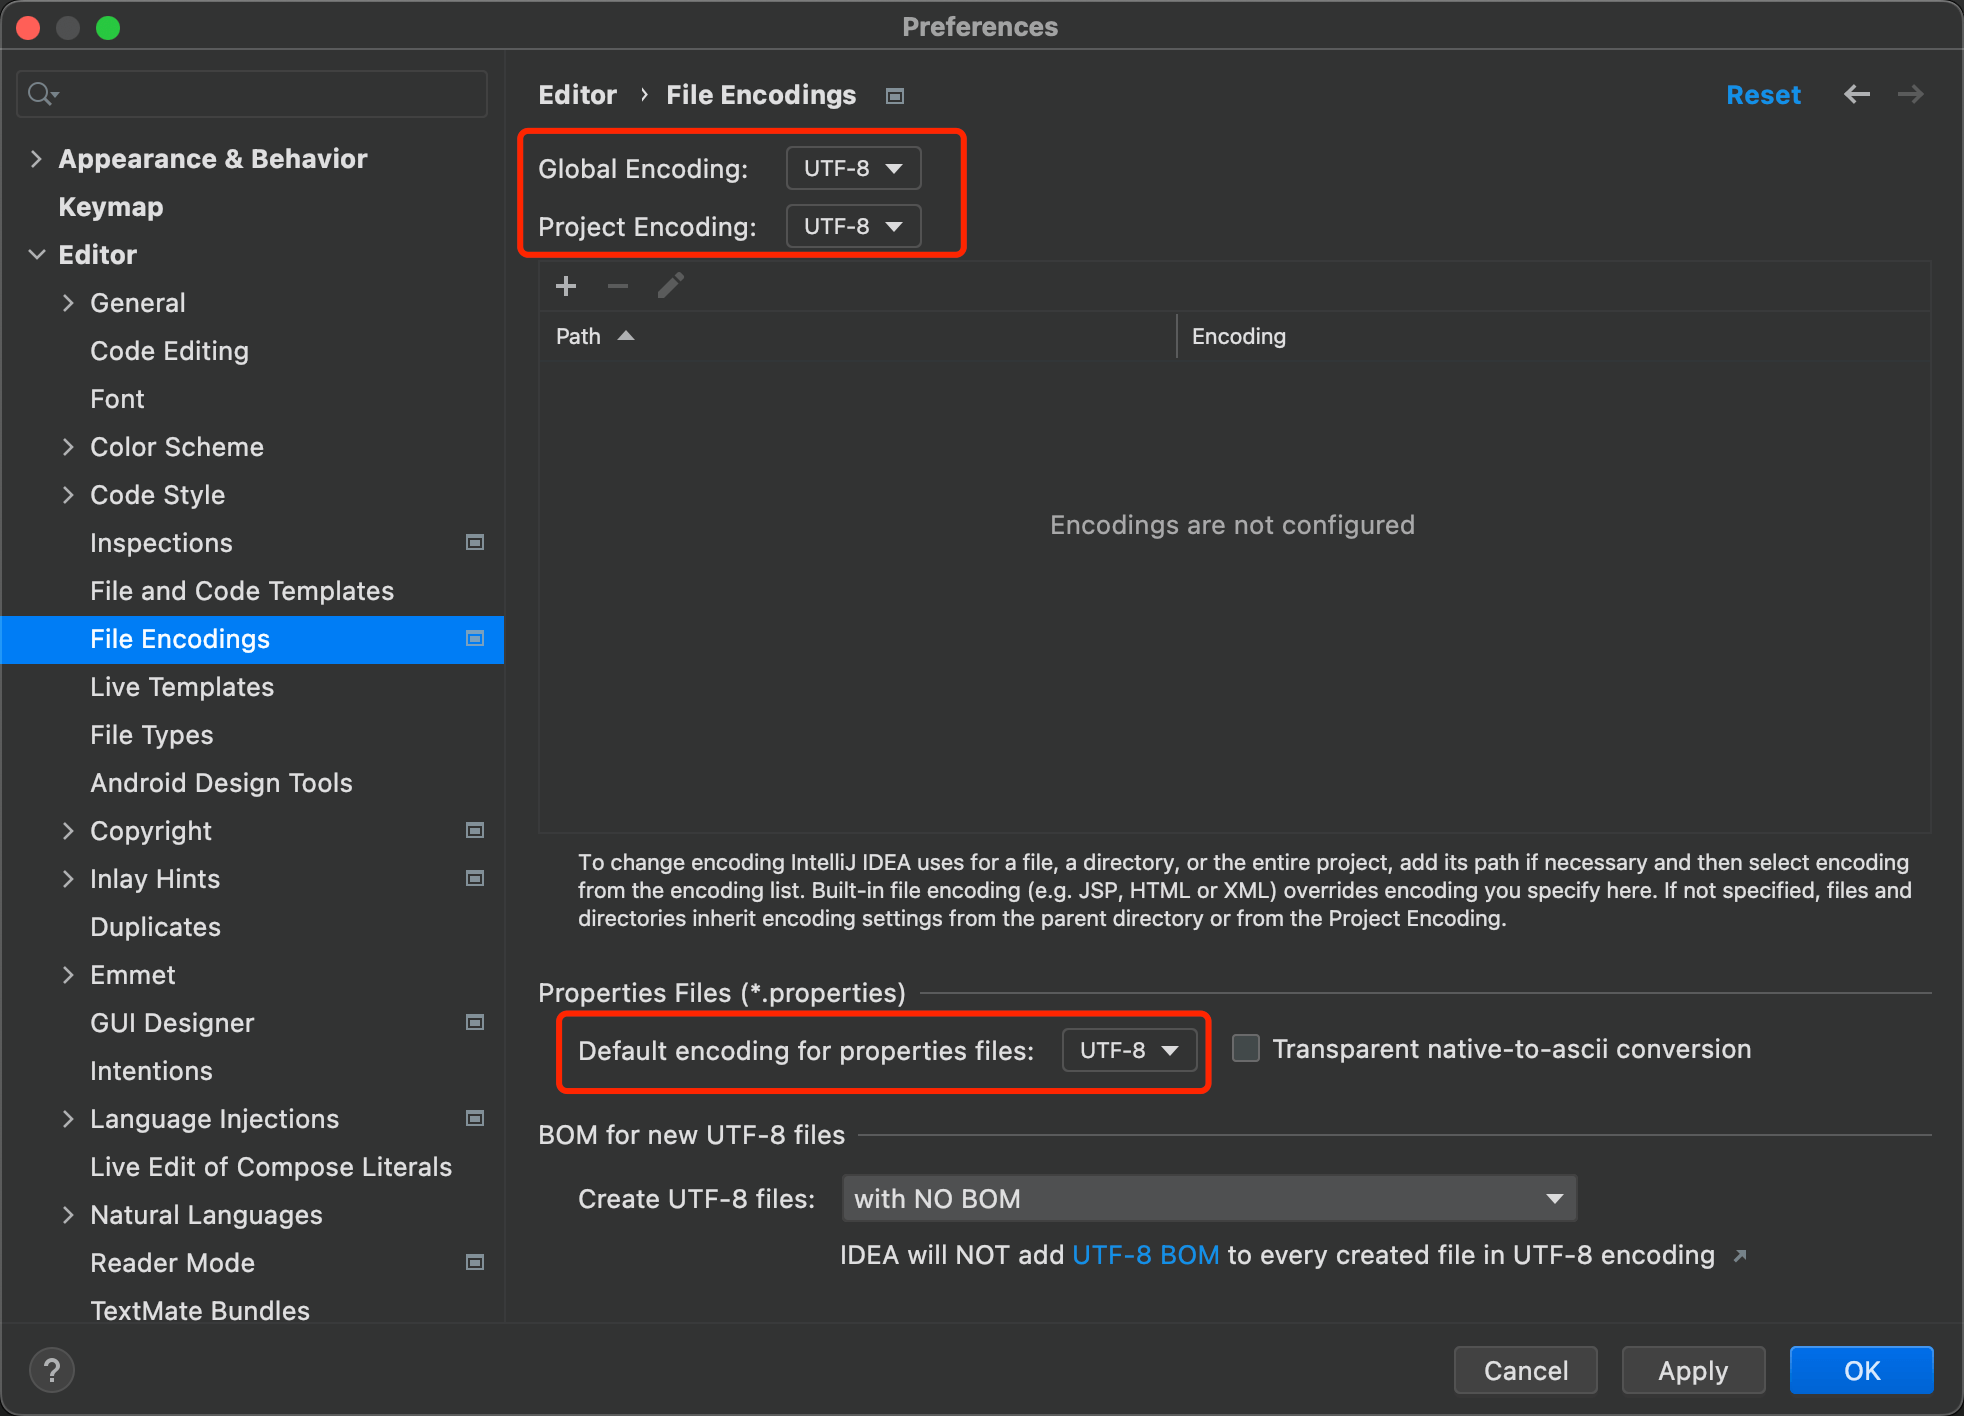
防坑:执行package之前先clean
打包可能乱码,解决方案:
idea工具带参运行
通过编程形式添加参数
public static void main (String[] args) { String[] arg = new String [1 ]; arg[0 ] = "--server.port=8080" ; SpringApplication.run(Application.class, arg); }
不携带参考启动
public static void main (String[] args) { SpringApplication.run(Application.class); }
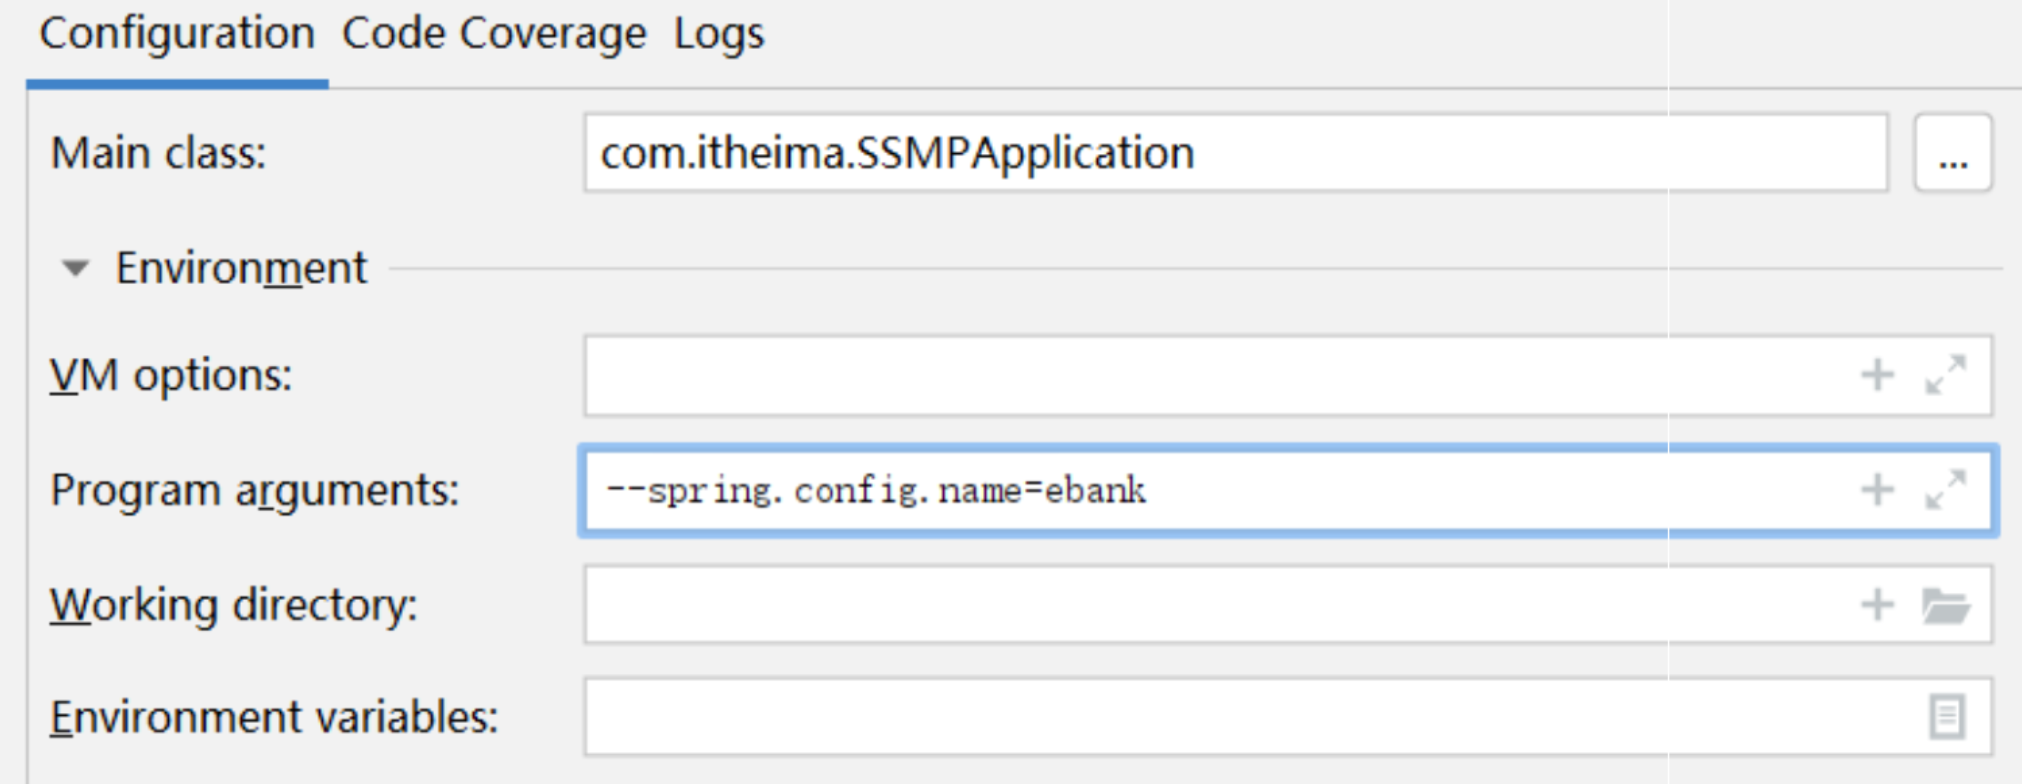
指定配置文件
properties与yaml均支持
类路径方式:
--spring.config.location =classpath:/ebank.properties
多参数:
--spring.config.location=classpath :/ebank.properties,classpath:/ ebank-server.properties
多配置文件常用于将配置进行分类,进行独立管理,或将可选配置单独制作便于上线更新维护
单服务器项目:使用自定义配置文件需求较低
多服务器项目:使用自定义配置文件需求较高,将所有配置放置在一个目录中,统一管理
基于SpringCloud技术,所有的服务器将不再设置配置文件,而是通过配置中心进行设定,动态加载配置信息
idea热部署 开启开发者工具
<dependency > <groupId > org.springframework.boot</groupId > <artifactId > spring-boot-devtools</artifactId > <optional > true</optional > </dependency >
激活热部署Build:Ctrl/command + F9
关于热部署
重启(Restart):自定义开发代码,包含类、页面、配置文件等,加载位置restart类加载器
重载(Reload):jar包,加载位置base类加载器
热部署仅仅加载当前开发者自定义开发的资源,不加载jar资源
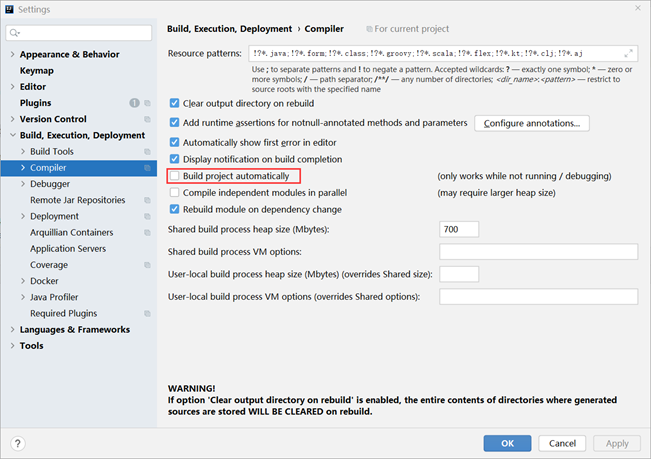
idea热部署自动构建 步骤① :设置自动构建项目
打开【File】,选择【settings…】,在面板左侧的菜单中找到【Compile】选项,然后勾选【Build project automatically】,意思是自动构建项目
自动构建项目选项勾选后
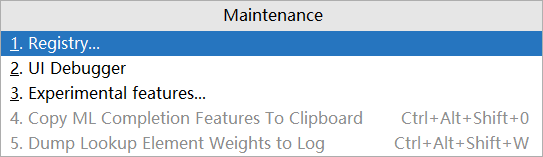
步骤② :允许在程序运行时进行自动构建
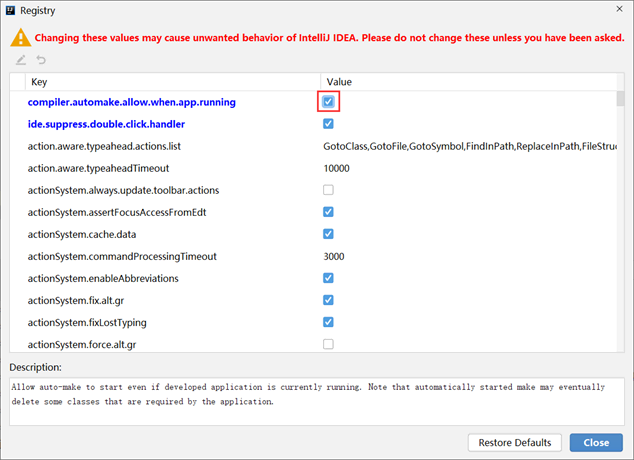
使用快捷键【Ctrl】+【Alt】+【Shit】+【/】打开维护面板,选择第1项【Registry…】
在选项中搜索compile,然后勾选对应项即可
这样程序在运行的时候就可以进行自动构建了,实现了热部署的效果。
热部署范围配置 配置中默认不参与热部署的目录信息如下
/META-INF/maven
/META-INF/resources
/resources
/static
/public
/templates
自定义不参与重启排除项
spring: devtools: restart: exclude: static/**,public/**,config/application.yml
关闭热部署功能 禁用热部署
配制文件中
spring: devtools: restart: enabled: false
如果当心配置文件层级过多导致相符覆盖最终引起配置失效,可以提高配置的层级,在更高层级中配置关闭热部署。例如在启动容器前通过系统属性设置关闭热部署功能。
参见: 属性加载优先顺序
@SpringBootApplication public class HotDeployApplication { public static void main (String[] args) { System.setProperty("spring.devtools.restart.enabled" , "false" ); SpringApplication.run(HotDeployApplication.class); } }
第三方bean属性绑定
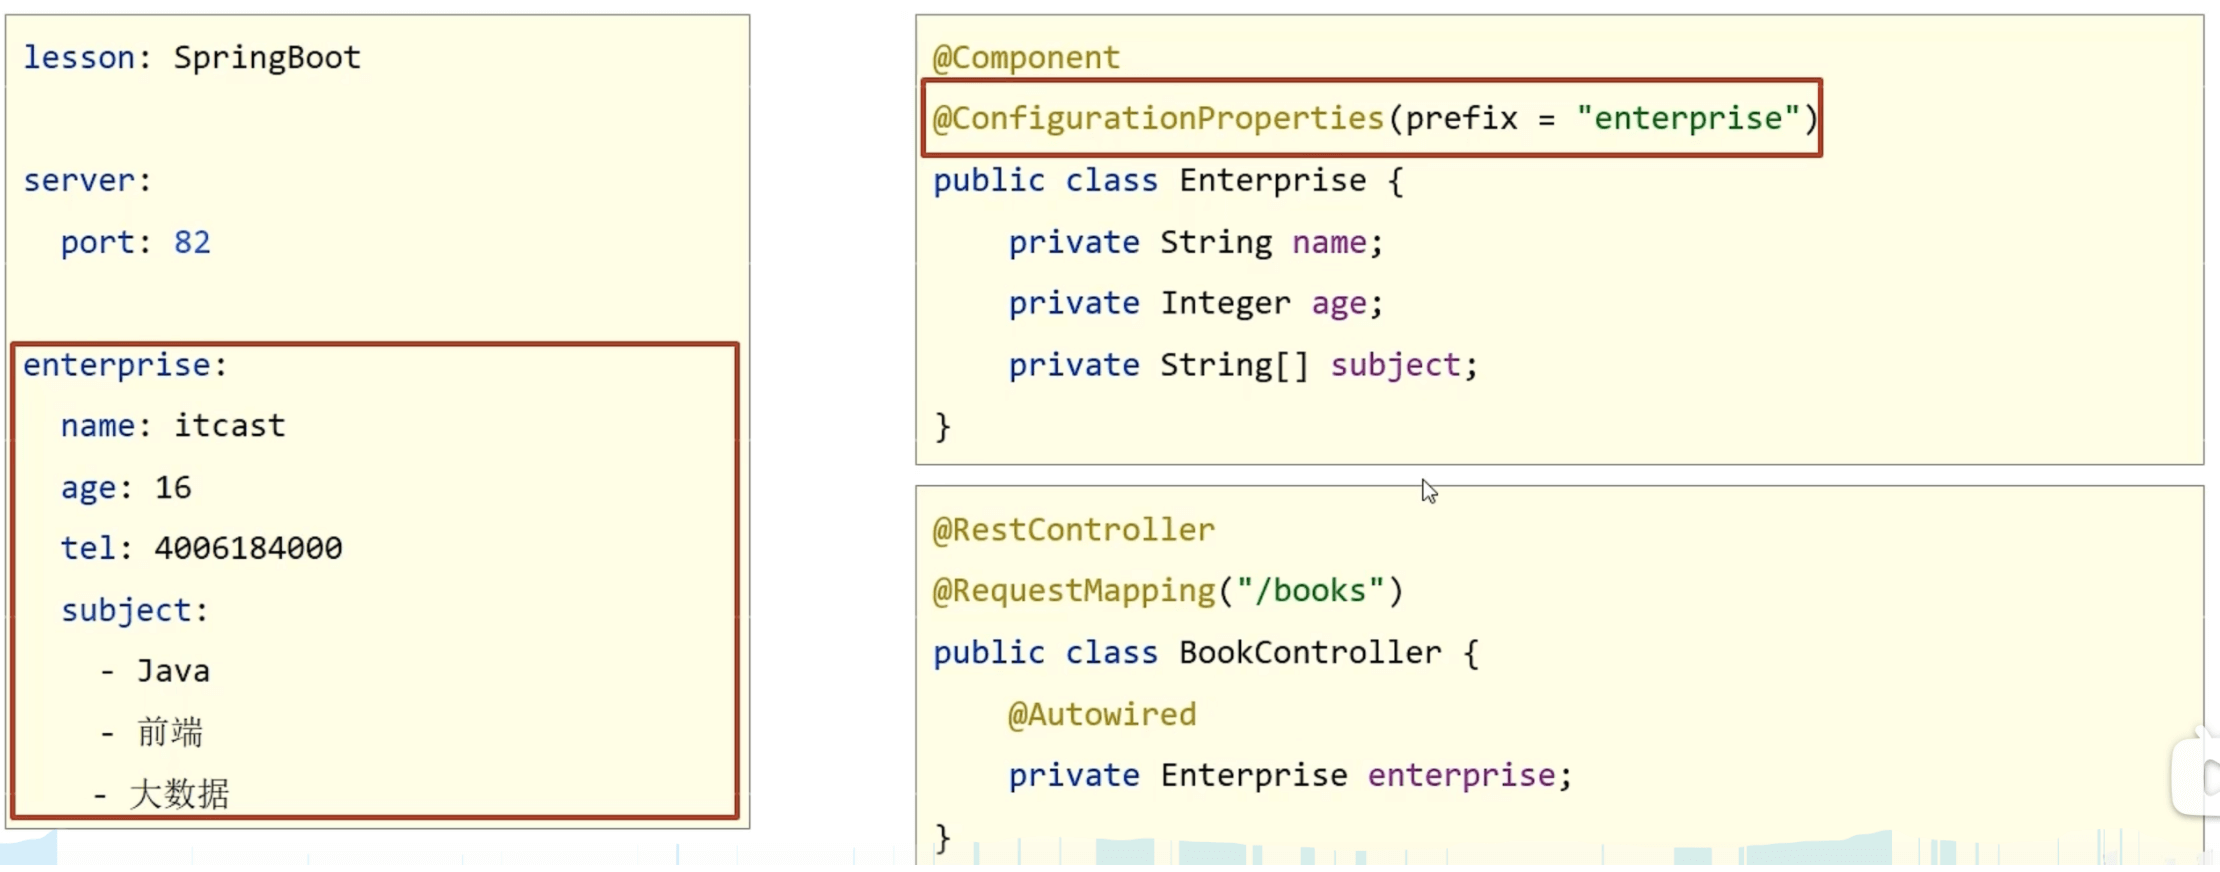
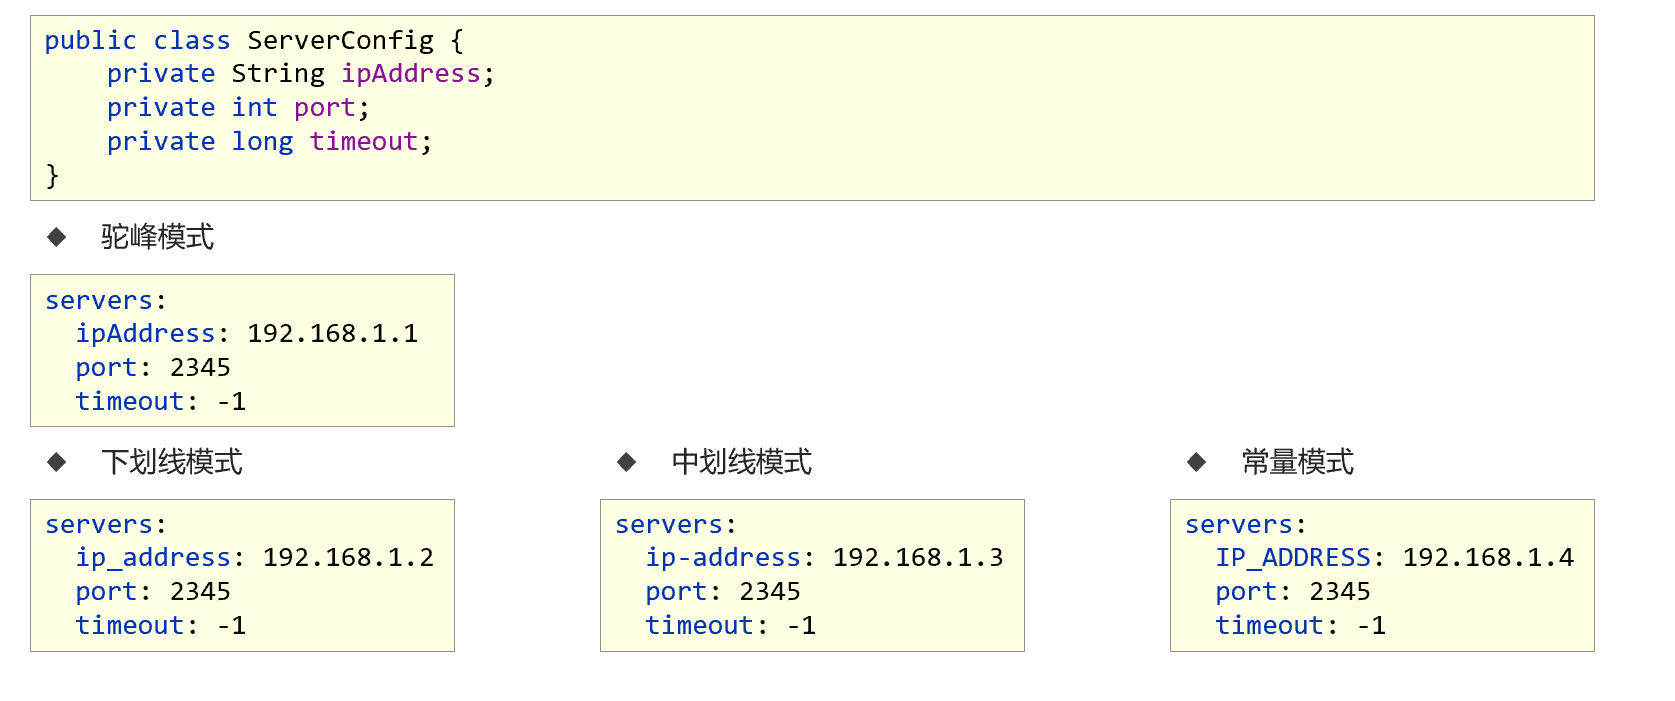
@ConfigurationProperties注解,此注解的作用是用来为bean绑定属性的。开发者可以在yml配置文件中以对象的格式添加若干属性
servers: ip-address: 192.168 .0 .1 port: 2345 timeout: -1
然后再开发一个用来封装数据的实体类,注意要提供属性对应的setter方法
使用@ConfigurationProperties注解就可以将配置中的属性值关联到开发的模型类上
@Component @Data @ConfigurationProperties(prefix = "servers") public class ServerConfig { private String ipAddress; private int port; private long timeout; }
使用@ConfigurationProperties为第三方bean绑定属性 步骤① :使用@Bean注解定义第三方bean
@Bean public DruidDataSource datasource () { DruidDataSource ds = new DruidDataSource (); return ds; }
步骤② :在yml中定义要绑定的属性,注意datasource此时全小写
datasource: driverClassName: com.mysql.jdbc.Driver
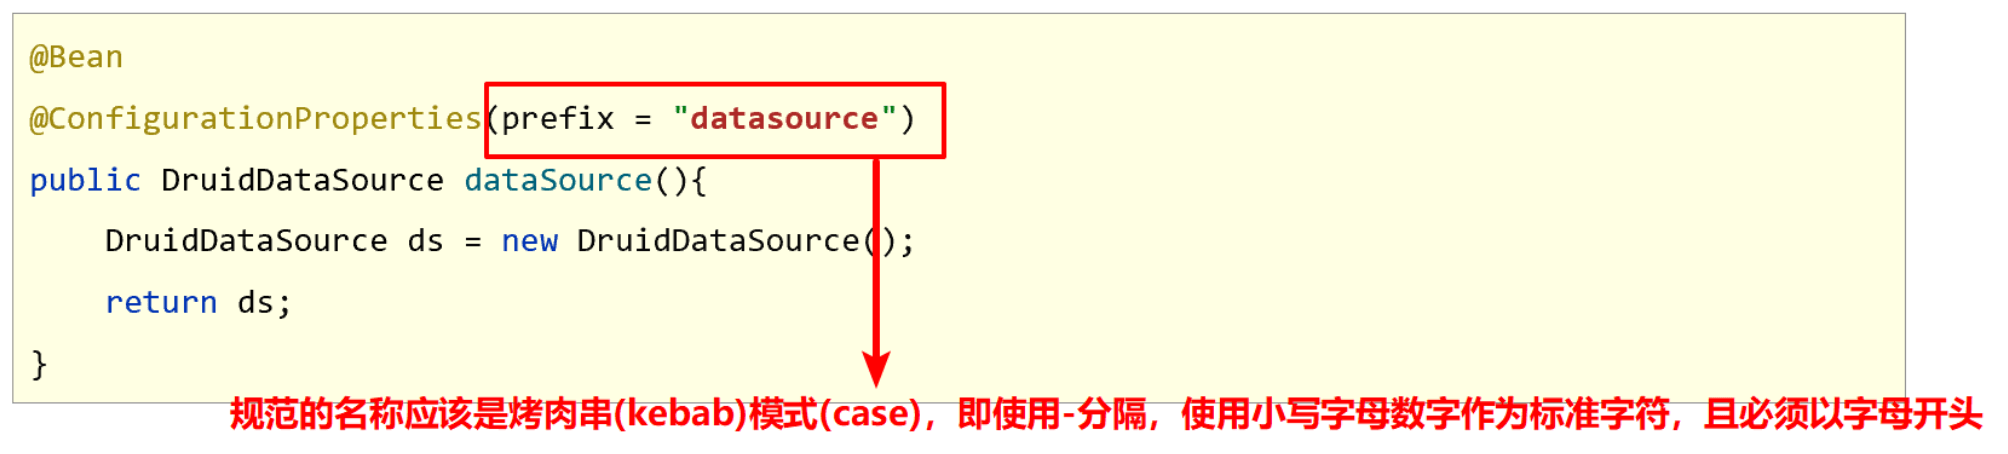
步骤③ :使用@ConfigurationProperties注解为第三方bean进行属性绑定,注意前缀是全小写的datasource
@Bean @ConfigurationProperties(prefix = "datasource") public DruidDataSource datasource () { DruidDataSource ds = new DruidDataSource (); return ds; }
测试:
@SpringBootApplication public class Springboot13ConfigurationApplication { @Bean @ConfigurationProperties(prefix = "datasource") public DruidDataSource datasource () { DruidDataSource ds = new DruidDataSource (); return ds; } public static void main (String[] args) { ConfigurableApplicationContext run = SpringApplication.run(Springboot13ConfigurationApplication.class, args); ServerConfig bean = run.getBean(ServerConfig.class); System.out.println(bean); DruidDataSource druidDataSource = run.getBean(DruidDataSource.class); System.out.println(druidDataSource.getDriverClassName()); } }
@EnableConfigurationProperties 作用: 标注使用@ConfigurationProperties注解绑定属性的bean是哪些
步骤① :在配置类上开启@EnableConfigurationProperties注解,并标注要使用@ConfigurationProperties注解绑定属性的类
@SpringBootApplication @EnableConfigurationProperties(ServerConfig.class) public class Springboot13ConfigurationApplication {}
步骤② :在对应的类上直接使用@ConfigurationProperties进行属性绑定
@Data @ConfigurationProperties(prefix = "servers") public class ServerConfig { private String ipAddress; private int port; private long timeout; }
当使用@EnableConfigurationProperties注解时,spring会默认将其标注的类定义为bean,因此无需再次声明@Component注解了
注意:
@EnableConfigurationProperties与@Component不能同时使用
解除使用@ConfigurationProperties注释警告
出现这个提示后只需要添加一个坐标此提醒就消失了
<dependency > <groupId > org.springframework.boot</groupId > <artifactId > spring-boot-configuration-processor</artifactId > </dependency >
小结:
使用@ConfigurationProperties可以为使用@Bean声明的第三方bean绑定属性
当使用@EnableConfigurationProperties声明进行属性绑定的bean后,无需使用@Component注解再次进行bean声明
松散绑定 即配置文件中的命名格式与变量名的命名格式可以进行格式上的最大化兼容
@ConfigurationProperties绑定属性支持属性名宽松绑定
servers: ip-address: 192.168 .0 .3
@Bean @ConfigurationProperties(prefix = "data-source") public DruidDataSource datasource () { DruidDataSource ds = new DruidDataSource (); return ds; }
注意:松散绑定不支持注解@Value引用单个属性的方式
@Value和@ConfigurationProperties比较
项目
@ConfigurationProperties @Value
功能
批量注入配置文件中的属性
分别指定
松散绑定(松散语法)
支持
不支持
SpEL
不支持
支持
JSR-303数据校验
支持
不支持
复杂类型封装
支持
不支持
无论配置文件是 yml 还是 properties 他们都能获取到值。
如果说,我们只是在某个业务逻辑中需要获取一下配置文件中的某项值,使用 @Value。
如果说,我们专门编写了一个 JavaBean 来和配置文件进行映射,我们就直接使用@ConfigurationProperties。
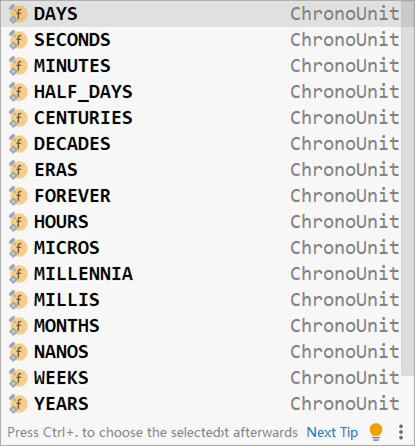
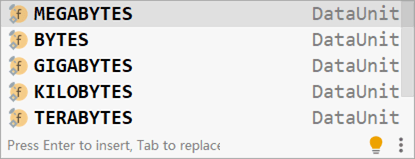
常用计量单位应用 SpringBoot支持JDK8提供的时间与空间计量单位
@Component @Data @ConfigurationProperties(prefix = "servers") public class ServerConfig { private String ipAddress; private int port; private long timeout; @DurationUnit(ChronoUnit.MINUTES) private Duration serverTimeOut; @DataSizeUnit(DataUnit.MEGABYTES) private DataSize dataSize; }
Duration :表示时间间隔,可以通过@DurationUnit注解描述时间单位,例如上例中描述的单位分钟(ChronoUnit.MINUTES)
DataSize :表示存储空间,可以通过@DataSizeUnit注解描述存储空间单位,例如上例中描述的单位为MB(DataUnit.MEGABYTES)
Druation常用单位如下:
DataSize常用单位如下:
bean属性校验 开启数据校验有助于系统安全性,J2EE规范中JSR303规范定义了一组有关数据校验相关的API
开启Bean数据校验
步骤① :开启校验框架
<dependency > <groupId > javax.validation</groupId > <artifactId > validation-api</artifactId > </dependency > <dependency > <groupId > org.hibernate.validator</groupId > <artifactId > hibernate-validator</artifactId > </dependency >
步骤② :在需要开启校验功能的类上使用注解@Validated开启校验功能
@Component @Data @ConfigurationProperties(prefix = "servers") @Validated public class ServerConfig {}
步骤③ :对具体的字段设置校验规则
@Component @Data @ConfigurationProperties(prefix = "servers") @Validated public class ServerConfig { @Max(value = 8888,message = "最大值不能超过8888") @Min(value = 202,message = "最小值不能低于202") private int port; }
非法时报错信息演示:
Binding to target org. springframework. boot. context. proper Property: servers. port Value: 20 Origin: class path resource application. yml - 6:9 Reason:最小值不能低于202
进制数据转换规则 yaml语法规则
字面值表达方式
boolean: TRUE float: 3.14 int: 123 string: HelloWorld string2: "Hello World" date: 2018-02-17 datetime: 2018-02-17T15:02:31+08:00
二进制前缀 0b00X
进制基数(radix)
前缀
示例
二进制 binary
0b 0B
0b11 = 2+1=3
八进制 octal
0o 0O 0
0o11 = 8+1=9
十进制 decimal
无前缀
11 = 11
十六进制 hex
0x 0X
0x11
注意在配制文件中 字符串的书写 加上引号包裹,养成习惯,遇到0开头的数据多注意。
项目测试 加载测试专用属性 加载测试专用属性
在启动测试环境时可以通过properties参数设置测试环境专用的属性 @SpringBootTest(properties = {"test.prop=testValue1"}) class PropertiesAndArgsTest { @Value("${test.prop}") private String msg; @Test void contextLoads () { System.out.println(msg); } }
优势:比多环境开发中的测试环境影响范围更小,仅对当前测试类有效
在启动测试环境时可以通过args参数设置测试环境专用的传入参数 @SpringBootTest(args={"--test.prop=testValue2"}) public class PropertiesAndArgsTest { @Value("${test.prop}") private String msg; @Test void testProperties () { System.out.println(msg); } }
当 args参数 与 properties参数 设置共存时, args属性配置优先于properties属性配置加载。
加载测试专用配置 步骤① :在测试包test中创建专用的测试环境配置类
@Configuration public class MsgConfig { @Bean public String msg () { return "bean msg" ; } }
上述配置仅用于演示当前实验效果,实际开发可不能这么注入String类型的数据
步骤② :在启动测试环境时,导入测试环境专用的配置类,使用@Import注解即可实现
@SpringBootTest @Import({MsgConfig.class}) public class ConfigurationTest { @Autowired private String msg; @Test void testConfiguration () { System.out.println(msg); } }
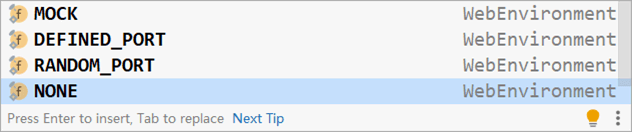
测试类中启动web环境 模拟端口 每一个springboot的测试类上方都会标准@SpringBootTest注解,而注解带有一个属性,叫做webEnvironment。通过该属性就可以设置在测试用例中启动web环境,具体如下:
@SpringBootTest(webEnvironment = SpringBootTest.WebEnvironment.RANDOM_PORT) public class WebTest { @Test void testRandomPort () { } }
测试类中启动web环境时,可以指定启动的Web环境对应的端口,springboot提供了4种设置值,分别如下:
MOCK:根据当前设置确认是否启动web环境,例如使用了Servlet的API就启动web环境,属于适配性的配置
DEFINED_PORT:使用自定义的端口作为web服务器端口
RANDOM_PORT:使用随机端口作为web服务器端口
NONE:不启动web环境
发送虚拟请求 新建 BookController
@RestController @RequestMapping("/books") public class BookController { @GetMapping public String getById () { System.out.println("getById is running ....." ); return "springboot" ; } }
虚拟请求测试
@SpringBootTest(webEnvironment = SpringBootTest.WebEnvironment.RANDOM_PORT) @AutoConfigureMockMvc public class WebTest { @Test void testRandomPort () { } @Test public void testWeb (@Autowired MockMvc mvc) throws Exception { MockHttpServletRequestBuilder builder = MockMvcRequestBuilders.get("/books" ); ResultActions actions = mvc.perform(builder); } }
匹配响应执行状态 虚拟请求状态匹配
@Test public void testStatus (@Autowired MockMvc mvc) throws Exception { MockHttpServletRequestBuilder builder = MockMvcRequestBuilders.get("/books" ); ResultActions actions = mvc.perform(builder); StatusResultMatchers status = MockMvcResultMatchers.status(); ResultMatcher ok = status.isOk(); actions.andExpect(ok); }
匹配失败的信息提示如:
java .lang.AssertionError: Status expected:<200 > but was:<404 >Expected :200 Actual :404 <Click to see difference>
匹配响应体(非json数据格式) @Test void testBody (@Autowired MockMvc mvc) throws Exception { MockHttpServletRequestBuilder builder = MockMvcRequestBuilders.get("/books" ); ResultActions action = mvc.perform(builder); ContentResultMatchers content = MockMvcResultMatchers.content(); ResultMatcher result = content.string("springboot2" ); action.andExpect(result); }
匹配失败的信息提示如:
MockHttpServletResponse: Status = 200 Error message = null Headers = [Content-Type:"text/plain;charset=UTF-8" , Content-Length:"10" ] Content type = text/plain;charset =UTF-8 Body = springboot Forwarded URL = null Redirected URL = null Cookies = [] java.lang.AssertionError: Response content expected:<springboot2> but was:<springboot> Expected :springboot2 Actual :springboot <Click to see difference>
匹配响应体(json) 创建 book 实体类
@Data public class Book { private Integer id; private String type; private String name; private String description; }
修改 BookController
@RestController @RequestMapping("/books") public class BookController { @GetMapping public String getById () { System.out.println("getById is running ....." ); return "springboot" ; } @GetMapping("{id}") public Book getById1 (@PathVariable int id) { System.out.println("getById is running ....." ); Book book = new Book (); book.setId(1 ); book.setName("springboot" ); book.setType("springboot" ); book.setDescription("springboot" ); return book; } }
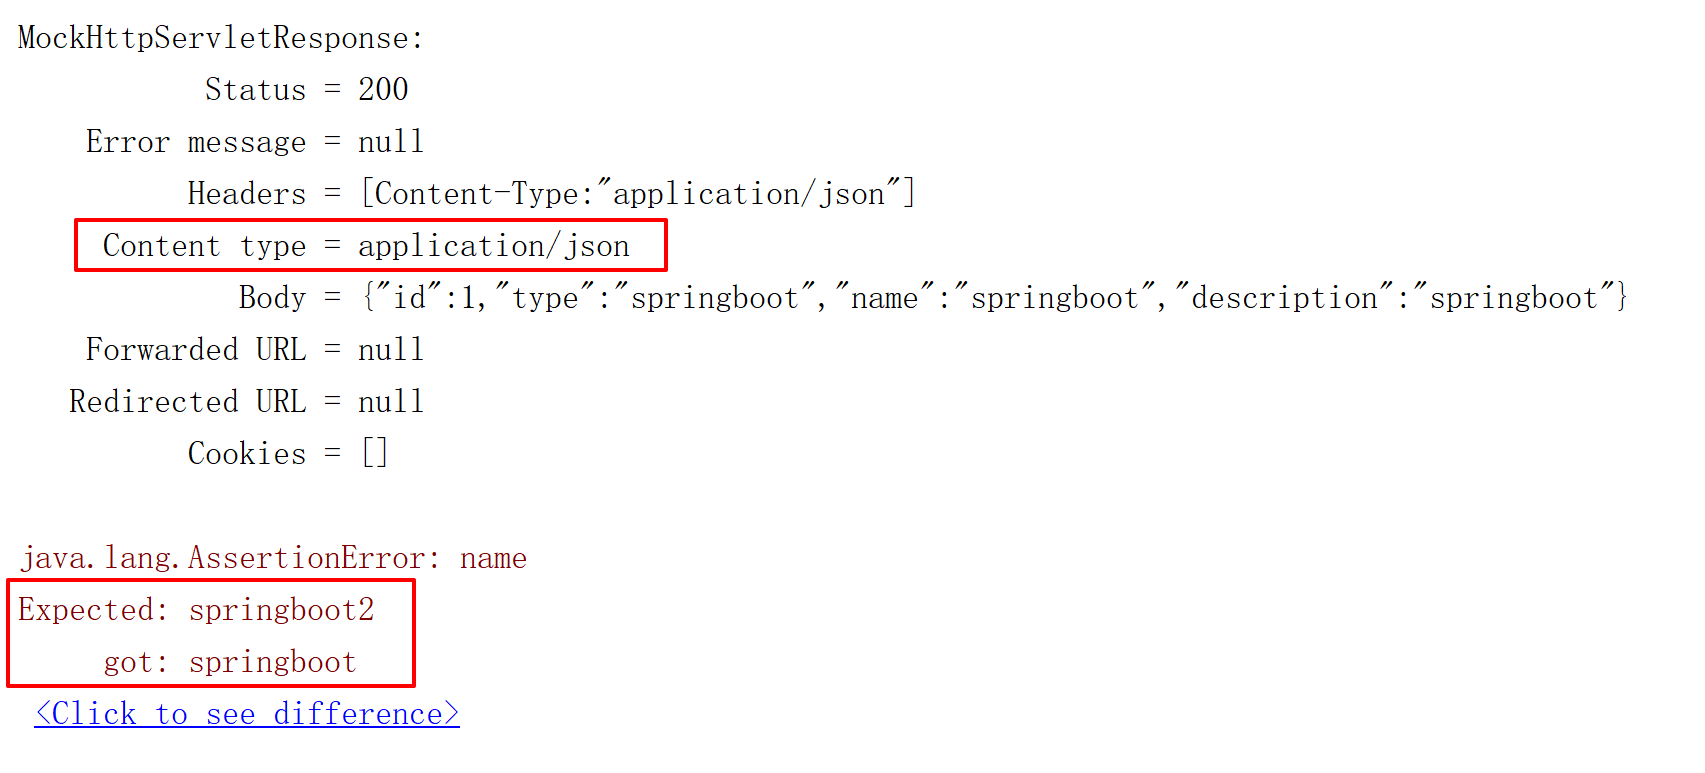
测试方法
@Test void testJson (@Autowired MockMvc mvc) throws Exception { MockHttpServletRequestBuilder builder = MockMvcRequestBuilders.get("/books/1" ); ResultActions action = mvc.perform(builder); ContentResultMatchers content = MockMvcResultMatchers.content(); ResultMatcher result = content.json("{\"id\":1,\"name\":\"springboot2\",\"type\":\"springboot\"}" ); action.andExpect(result); }
匹配失败的信息提示如:
匹配响应头 虚拟请求响应头匹配
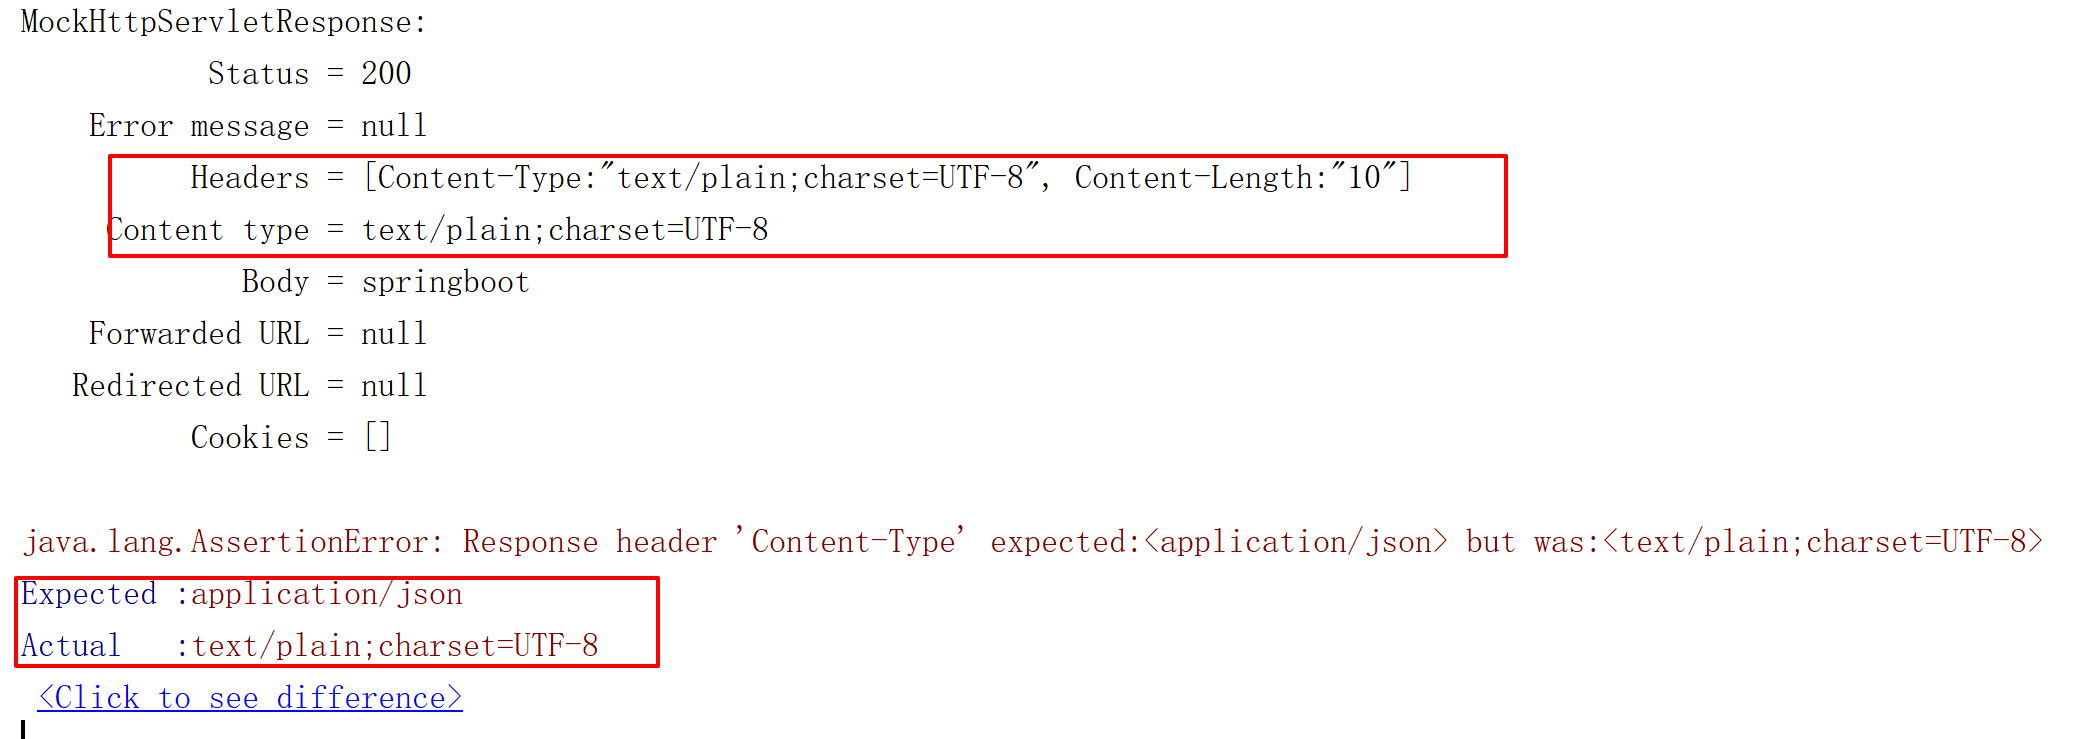
@Test void testContentType (@Autowired MockMvc mvc) throws Exception { MockHttpServletRequestBuilder builder = MockMvcRequestBuilders.get("/books" ); ResultActions action = mvc.perform(builder); HeaderResultMatchers header = MockMvcResultMatchers.header(); ResultMatcher contentType = header.string("Content-Type" , "application/json" ); action.andExpect(contentType); }
匹配失败的信息提示如:
完整匹配校验 @Test void testGetById (@Autowired MockMvc mvc) throws Exception { MockHttpServletRequestBuilder builder = MockMvcRequestBuilders.get("/books/1" ); ResultActions action = mvc.perform(builder); StatusResultMatchers status = MockMvcResultMatchers.status(); ResultMatcher ok = status.isOk(); action.andExpect(ok); HeaderResultMatchers header = MockMvcResultMatchers.header(); ResultMatcher contentType = header.string("Content-Type" , "application/json" ); action.andExpect(contentType); ContentResultMatchers content = MockMvcResultMatchers.content(); ResultMatcher result = content.json("{\"id\":1,\"name\":\"springboot\",\"type\":\"springboot\"}" ); action.andExpect(result); }
业务层测试事务回滚 为测试用例添加事务,SpringBoot会对测试用例对应的事务提交操作进行回滚
@SpringBootTest @Transactional public class DaoTest { @Autowired private BookService bookService; @Test void testSave () { Book book = new Book (); book.setName("springboot3" ); book.setType("springboot3" ); book.setDescription("springboot3" ); bookService.save(book); } }
如果想在测试用例中提交事务,可以通过@Rollback注解设置回滚状态为false即可正常提交事务
@SpringBootTest @Transactional @Rollback(false) public class DaoTest {}
测试用例设置随机数据 测试用例数据通常采用随机值进行测试,使用SpringBoot提供的随机数为其赋值
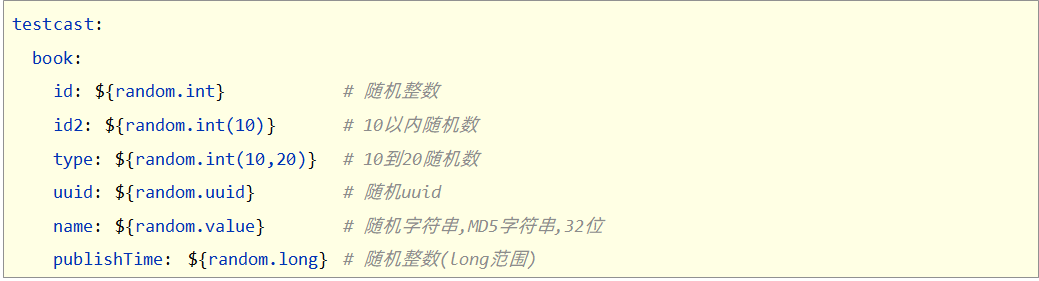
①yml中设置随机值
testcase: book: id: ${random.int} id2: ${random.int(10)} type: ${random.int!5,10!} name: ${random.value} uuid: ${random.uuid} publishTime: ${random.long}
②创建 BookCase 类封装数据
@Component @ConfigurationProperties(prefix = "testcase.book") @Data public class BookCase { private int id; private int id2; private int type; private String name; private String uuid; private long publishTime; }
③测试
@SpringBootTest public class BookCaseRandom { @Autowired private BookCase bookCase; @Test void testProperties () { System.out.println(bookCase); } }
对于随机值的产生,还有一些小的限定规则,比如产生的数值性数据可以设置范围等,具体如下:
其中()可以是任意字符,例如[],!!均可
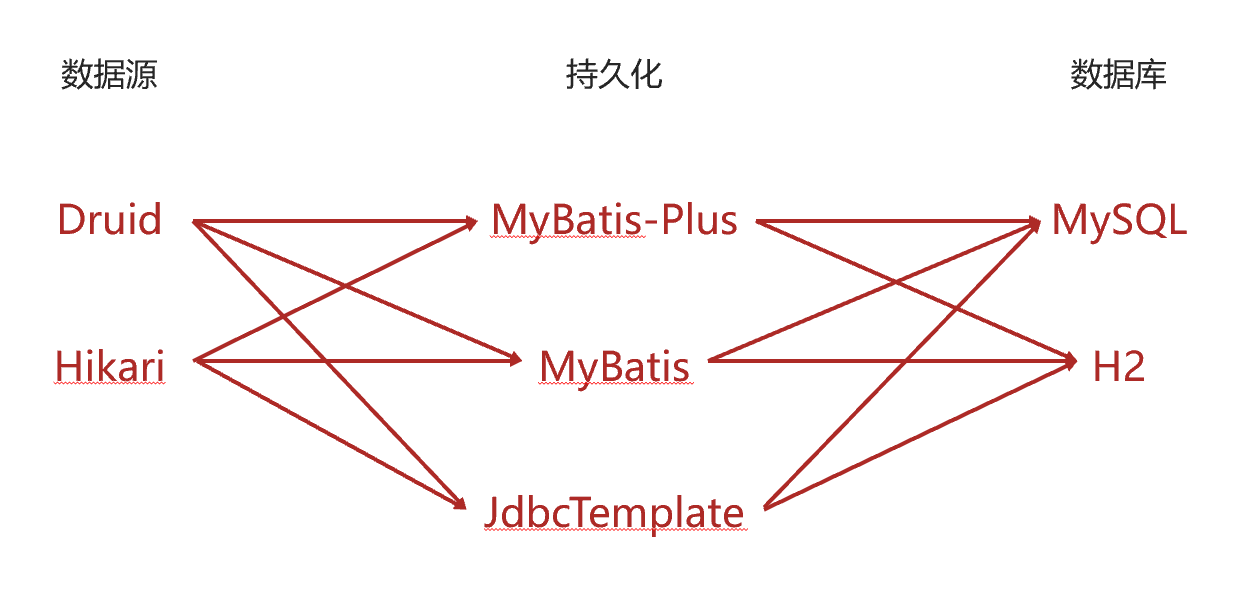
数据源、数据库 内置数据源Hikari 1.现有数据层解决方案技术选型 Mysql+Druid+MyBatisPlus
数据源:DruidDataSource
持久化技术:MyBatis-Plus / MyBatis
数据库:MySQL
目前我们使用的数据源技术是Druid,运行时可以在日志中看到对应的数据源初始化信息,具体如下:
INFO 28600 --- [ main] c.a.d.s.b.a.DruidDataSourceAutoConfigure : Init DruidDataSource INFO 28600 --- [ main] com.alibaba.druid.pool.DruidDataSource : {dataSource-1 } inited
如果不配制数据源默认是 HikariDataSource
2.数据源配置格式
格式一 (通用配制未声明数据源技术)默认是 hikari 数据源
spring: datasource: driver-class-name: com.mysql.cj.jdbc.Driver url: jdbc:mysql://localhost:3306/springboot_db?serverTimezone=UTC username: root password: 123456
格式二 (配制指定的数据源需要导入对应的 starter 整合Duird )
spring: datasource: druid: driver-class-name: com.mysql.cj.jdbc.Driver url: jdbc:mysql://localhost:3306/springboot_db?serverTimezone=UTC username: root password: 123456
spring: datasource: url: jdbc:mysql://localhost:3306/ssm_db?serverTimezone=UTC hikari: driver-class-name: com.mysql.cj.jdbc.Driver username: root password: root
3.数据源配置
springboot提供了3款内嵌数据源技术,分别如下:
HikariCP:默认内置数据源对象
Tomcat提供DataSource:HikariCP不可用的情况下,且在web环境中,将使用tomcat服务器配置的数据源对象
Commons DBCP:Hikari不可用,tomcat数据源也不可用,将使用dbcp数据源
4.通用配置无法设置具体的数据源配置信息,仅提供基本的连接相关配置,如需配置,在下一级配置中设置具体设定
spring: datasource: driver-class-name: com.mysql.cj.jdbc.Driver url: jdbc:mysql://localhost:3306/springboot_db?serverTimezone=UTC username: root password: 123456 hikari: maximum-pool-size: 50
JdbcTemplate 内置持久化解决方案——JdbcTemplate
步骤① :导入jdbc对应的坐标,记得是starter
<dependency > <groupId > org.springframework.boot</groupId > <artifactId > spring-boot-starter-jdbc</artifactId > </dependency >
步骤② :自动装配JdbcTemplate对象
@SpringBootTest class Springboot15SqlApplicationTests { @Test void testJdbcTemplate (@Autowired JdbcTemplate jdbcTemplate) { } }
步骤③ :使用JdbcTemplate实现查询操作(非实体类封装数据的查询操作)
@Test void testJdbcTemplate (@Autowired JdbcTemplate jdbcTemplate) { String sql = "select * from tbl_book" ; List<Map<String, Object>> maps = jdbcTemplate.queryForList(sql); System.out.println(maps); }
步骤④ :使用JdbcTemplate实现查询操作(实体类封装数据的查询操作)
@Test void testJdbcTemplate (@Autowired JdbcTemplate jdbcTemplate) { String sql = "select * from tbl_book" ; RowMapper<Book> rm = new RowMapper <Book>() { @Override public Book mapRow (ResultSet rs, int rowNum) throws SQLException { Book temp = new Book (); temp.setId(rs.getInt("id" )); temp.setName(rs.getString("name" )); temp.setType(rs.getString("type" )); temp.setDescription(rs.getString("description" )); return temp; } }; List<Book> list = jdbcTemplate.query(sql, rm); System.out.println(list); }
步骤⑤ :使用JdbcTemplate实现增删改操作
@Test void testJdbcTemplateSave (@Autowired JdbcTemplate jdbcTemplate) { String sql = "insert into tbl_book values(3,'springboot1','springboot2','springboot3')" ; jdbcTemplate.update(sql); }
如果想对JdbcTemplate对象进行相关配置,可以在yml文件中进行设定,具体如下:
spring: jdbc: template: query-timeout: -1 max-rows: 500 fetch-size: -1
小结
SpringBoot内置JdbcTemplate持久化解决方案
使用JdbcTemplate需要导入spring-boot-starter-jdbc的坐标
H2数据库 SpringBoot提供了3种内嵌数据库供开发者选择,提高开发测试效率
内嵌数据库(H2)
步骤① :导入H2数据库对应的坐标,一共2个
<dependency > <groupId > com.h2database</groupId > <artifactId > h2</artifactId > </dependency > <dependency > <groupId > org.springframework.boot</groupId > <artifactId > spring-boot-starter-data-jpa</artifactId > </dependency >
步骤② :将工程设置为web工程,启动工程时启动H2数据库
<dependency > <groupId > org.springframework.boot</groupId > <artifactId > spring-boot-starter-web</artifactId > </dependency >
步骤③ :通过配置开启H2数据库控制台访问程序,也可以使用其他的数据库连接软件操作
spring: h2: console: enabled: true path: /h2
web端访问路径/h2,访问密码123456,如果访问失败,先配置下列数据源,启动程序运行后再次访问/h2路径就可以正常访问了
datasource: url: jdbc:h2:~/test hikari: driver-class-name: org.h2.Driver username: sa password: 123456
运行报错
org.h2.jdbc.JdbcSQLInvalidAuthorizationSpecException: Wrong user name or password [28000-200]
原因: 我们之前创建过该数据库,H2数据库会初始化用户名和密码,配置文件又中重新定义了数据库的用户名和密码,造成了冲突。
解决:
处理方案一:删除原来的数据库 (C:\Users\你的用户名)
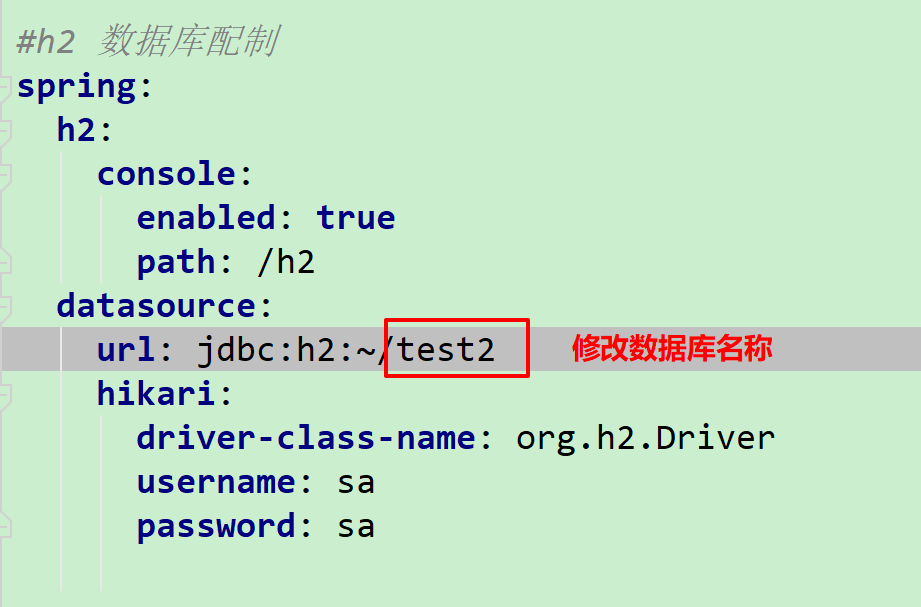
处理方案二:修改一个不存在的数据库名称
操作数据库(创建表)
create table tbl_book (id int ,name varchar ,type varchar ,description varchar )
步骤④ :使用JdbcTemplate或MyBatisPlus技术操作数据库
记得测试的时候 要web服务器给关了,不然会报如下错误
Caused by: org.h2.jdbc.JdbcSQLNonTransientConnectionException: Database may be already in use: null. Possible solutions: close all other connection(s); use the server mode [90020-200]
Caused by: java.lang.IllegalStateException: The file is locked: nio:C:/Users/Chen/test.mv.db [1.4.200/7]
@SpringBootTest class Springboot15SqlApplicationTests { @Autowired private BookDao bookDao; @Test void contextLoads () { Book book = bookDao.selectById(1 ); System.out.println(book); } @Test void testJdbcTemplate (@Autowired JdbcTemplate jdbcTemplate) { String sql = "select * from tbl_book" ; List<Map<String, Object>> maps = jdbcTemplate.queryForList(sql); System.out.println(maps); } @Test void testJdbcTemplate1 (@Autowired JdbcTemplate jdbcTemplate) { String sql = "select * from tbl_book" ; RowMapper<Book> rm = new RowMapper <Book>() { @Override public Book mapRow (ResultSet rs, int rowNum) throws SQLException { Book temp = new Book (); temp.setId(rs.getInt("id" )); temp.setName(rs.getString("name" )); temp.setType(rs.getString("type" )); temp.setDescription(rs.getString("description" )); return temp; } }; List<Book> list = jdbcTemplate.query(sql, rm); System.out.println(list); } @Test void testJdbcTemplateSave (@Autowired JdbcTemplate jdbcTemplate) { String sql = "insert into tbl_book values(3,'springboot1','springboot2','springboot3')" ; jdbcTemplate.update(sql); } }
SpringBoot可以根据url地址自动识别数据库种类,在保障驱动类存在的情况下,可以省略配置
spring: h2: console: enabled: true path: /h2 datasource: url: jdbc:h2:~/test hikari: username: sa password: sa
H2数据库控制台仅用于开发阶段,线上项目请务必关闭控制台功能
server: port: 80 spring: h2: console: path: /h2 enabled: false
数据源、持久化、数据库
数据源:DruidDataSource、HikariCP、Tomcat提供DataSource、Commons DBCP
持久化:MyBatis-Plus、MyBatis、JdbcTemplate
数据库:H2、HSQL、Derby
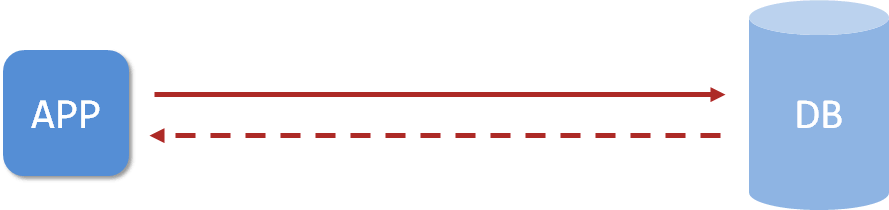
缓存 缓存的作用 企业级应用主要作用是信息处理,当需要读取数据时,由于受限于数据库的访问效率,导致整体系统性能偏低。
应用程序直接与数据库打交道,访问效率低
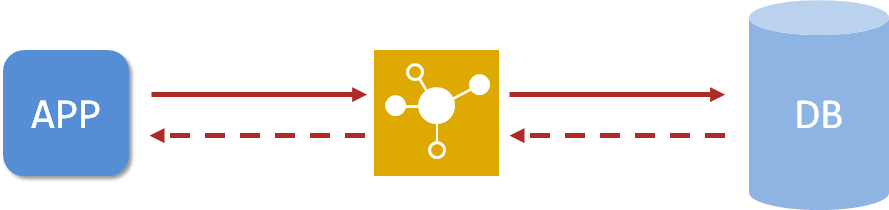
为了改善上述现象,开发者通常会在应用程序与数据库之间建立一种临时的数据存储机制,该区域中的数据在内存中保存,读写速度较快,可以有效解决数据库访问效率低下的问题。这一块临时存储数据的区域就是缓存。
使用缓存后,应用程序与缓存打交道,缓存与数据库打交道,数据访问效率提高
缓存是一种介于数据永久存储介质与数据应用之间的数据临时存储介质
使用缓存可以有效的减少低速数据读取过程的次数(例如磁盘IO),提高系统性能
缓存不仅可以用于提高永久性存储介质的数据读取效率,还可以提供临时的数据存储空间
自定义缓存
@Autowired private BookDao bookDao;private HashMap<Integer,Book> cache = new HashMap <Integer,Book>();@Override public Book getById (Integer id) { Book book = cache.get(id); if (book == null ){ book = bookDao.selectById(id); cache.put(id,book); } return book; }
提供临时的数据存储空间
private HashMap<String ,String> cache = new HashMap <String,String>();@Override public String get (String tele) { String code = tele.substring(tele.length() - 6 ); cache.put(tele,code); return code; } @Override public boolean check (String tele, String code) { String queryCode = cache.get(tele); return code.equals(queryCode); }
Spring缓存使用方式 springboot技术提供有内置的缓存解决方案,可以帮助开发者快速开启缓存技术,并使用缓存技术进行数据的快速操作,例如读取缓存数据和写入数据到缓存。
步骤① :导入springboot提供的缓存技术对应的starter
<dependency > <groupId > org.springframework.boot</groupId > <artifactId > spring-boot-starter-cache</artifactId > </dependency >
步骤② :启用缓存,在引导类上方标注注解@EnableCaching配置springboot程序中可以使用缓存
@SpringBootApplication @EnableCaching public class Springboot19CacheApplication { public static void main (String[] args) { SpringApplication.run(Springboot19CacheApplication.class, args); } }
步骤③ :设置操作的数据是否使用缓存
@Service public class BookServiceImpl implements BookService { @Autowired private BookDao bookDao; @Cacheable(value="cacheSpace",key="#id") public Book getById (Integer id) { return bookDao.selectById(id); } }
在业务方法上面使用注解@Cacheable声明当前方法的返回值放入缓存中,其中要指定缓存的存储位置,以及缓存中保存当前方法返回值对应的名称。上例中value属性描述缓存的存储位置,可以理解为是一个存储空间名,key属性描述了缓存中保存数据的名称,使用#id读取形参中的id值作为缓存名称。
使用@Cacheable注解后,执行当前操作,如果发现对应名称在缓存中没有数据,就正常读取数据,然后放入缓存;如果对应名称在缓存中有数据,就终止当前业务方法执行,直接返回缓存中的数据。
SpringBoot提供的缓存技术除了提供默认的缓存方案,还可以对其他缓存技术进行整合,统一接口,方便缓存技术的开发与管理
Generic
JCache
Ehcache Hazelcast
Infinispan
Couchbase
Redis Caffenine
Simple(默认)
Memcached
手机验证码案例-生成验证码
需求
输入手机号获取验证码,组织文档以短信形式发送给用户(页面模拟)
输入手机号和验证码验证结果
需求分析
提供controller,传入手机号,业务层通过手机号计算出独有的6位验证码数据,存入缓存后返回此数据
提供controller,传入手机号与验证码,业务层通过手机号从缓存中读取验证码与输入验证码进行比对,返回比对结果
注意: 启用缓存,在引导类上方标注注解@EnableCaching配置springboot程序中可以使用缓存
步骤① :定义验证码对应的实体类,封装手机号与验证码两个属性
@Data
public class SMSCode {
    private String tele;
    private String code;
}
步骤② :定义验证码功能的业务层接口与实现类
public interface SMSCodeService { public String sendCodeToSMS (String tele) ; public boolean checkCode (SMSCode smsCode) ; } @Service public class SMSCodeServiceImpl implements SMSCodeService { @Autowired private CodeUtils codeUtils; @CachePut(value = "smsCode", key = "#tele") public String sendCodeToSMS (String tele) { String code = codeUtils.generator(tele); return code; } public boolean checkCode (SMSCode smsCode) { return false ; } }
获取验证码后,当验证码失效时必须重新获取验证码,因此在获取验证码的功能上不能使用@Cacheable注解,@Cacheable注解是缓存中没有值则放入值,缓存中有值则取值。此处的功能仅仅是生成验证码并放入缓存,并不具有从缓存中取值的功能,因此不能使用@Cacheable注解,应该使用仅具有向缓存中保存数据的功能,使用@CachePut注解即可。
步骤③ :定义验证码的生成策略与根据手机号读取验证码的功能
@Component public class CodeUtils { private String [] patch = {"000000" ,"00000" ,"0000" ,"000" ,"00" ,"0" ,"" }; public String generator (String tele) { int hash = tele.hashCode(); int encryption = 20206666 ; long result = hash ^ encryption; long nowTime = System.currentTimeMillis(); result = result ^ nowTime; long code = result % 1000000 ; code = code < 0 ? -code : code; String codeStr = code + "" ; int len = codeStr.length(); return patch[len] + codeStr; } }
步骤④ :定义验证码功能的web层接口,一个方法用于提供手机号获取验证码,一个方法用于提供手机号和验证码进行校验
@RestController @RequestMapping("/sms") public class SMSCodeController { @Autowired private SMSCodeService smsCodeService; @GetMapping public String getCode (String tele) { String code = smsCodeService.sendCodeToSMS(tele); return code; } @PostMapping public boolean checkCode (SMSCode smsCode) { return smsCodeService.checkCode(smsCode); } }
手机验证码案例-验证码校验 获取缓存中的验证码
@Component public class CodeUtils { private String[] patch = {"000000" , "00000" , "0000" , "000" , "00" , "0" , "" }; public String generator (String tele) { int hash = tele.hashCode(); int encryption = 20206666 ; long result = hash ^ encryption; long nowTime = System.currentTimeMillis(); result = result ^ nowTime; long code = result % 1000000 ; code = code < 0 ? -code : code; String codeStr = code + "" ; int len = codeStr.length(); return patch[len] + codeStr; } @Cacheable(value = "smsCode", key = "#tele") public String get (String tele) { return null ; } }
校验
public boolean checkCode (SMSCode smsCode) { String code = smsCode.getCode(); String cacheCode = codeUtils.get(smsCode.getTele()); return code.equals(cacheCode); }
变更缓存供应商Ehcache 步骤① :导入Ehcache的坐标
<dependency > <groupId > net.sf.ehcache</groupId > <artifactId > ehcache</artifactId > </dependency >
此处为什么不是导入Ehcache的starter,而是导入技术坐标呢?其实springboot整合缓存技术做的是通用格式,不管你整合哪种缓存技术,只是实现变化了,操作方式一样。这也体现出springboot技术的优点,统一同类技术的整合方式。
步骤② :配置缓存技术实现使用Ehcache
spring: cache: type: ehcache ehcache: config: classpath:/ehcache.xml
配置缓存的类型type为ehcache,此处需要说明一下,当前springboot可以整合的缓存技术中包含有ehcach,所以可以这样书写。其实这个type不可以随便写的,不是随便写一个名称就可以整合的。
由于ehcache的配置有独立的配置文件格式,因此还需要指定ehcache的配置文件,以便于读取相应配置
注意: 配制文件的路径要从 classpath: 开始
新建 resources/ehcache.xml
<?xml version="1.0" encoding="UTF-8" ?> <ehcache xmlns:xsi ="http://www.w3.org/2001/XMLSchema-instance" xsi:noNamespaceSchemaLocation ="http://ehcache.org/ehcache.xsd" updateCheck ="false" > <diskStore path ="D:\ehcache" /> <defaultCache eternal ="false" diskPersistent ="false" maxElementsInMemory ="1000" overflowToDisk ="false" timeToIdleSeconds ="60" timeToLiveSeconds ="60" memoryStoreEvictionPolicy ="LRU" /> <cache name ="smsCode" eternal ="false" diskPersistent ="false" maxElementsInMemory ="1000" overflowToDisk ="false" timeToIdleSeconds ="10" timeToLiveSeconds ="10" memoryStoreEvictionPolicy ="LRU" /> </ehcache >
注意前面的案例中,设置了数据保存的位置是smsCode
@CachePut(value = "smsCode", key = "#tele") public String sendCodeToSMS (String tele) { String code = codeUtils.generator(tele); return code; }
这个设定需要保障ehcache中有一个缓存空间名称叫做smsCode的配置,前后要统一。在企业开发过程中,通过设置不同名称的cache来设定不同的缓存策略,应用于不同的缓存数据。
到这里springboot整合Ehcache就做完了,可以发现一点,原始代码没有任何修改,仅仅是加了一组配置就可以变更缓存供应商了,这也是springboot提供了统一的缓存操作接口的优势,变更实现并不影响原始代码的书写。
数据淘汰策略 影响数据淘汰的相关配置
检测易失数据(可能会过期的数据集server.db[i].expires)
volatile-lru: 挑选最近最少使用的数据淘汰
volatile-lfu: 挑选最近使用次数最少的数据淘汰
volatile-ttl: 挑选将要过期的数据淘汰
volatile-random: 任意选择数据淘汰
LFU, Less Frequently Used,就是上面例子中使用的策略,直白一点就是讲一直以来最少被使用的 。
LRU,Least Recently Used,最近最少使用的,缓存的元素有一个时间戳,当缓存容量满了,而又需要腾出地方来缓存新的元素的时候,那么现有缓存元素中时间戳离当前时间最远的元素将被清出缓存 。
变更缓存供应商Redis 步骤① :导入redis的坐标
<dependency > <groupId > org.springframework.boot</groupId > <artifactId > spring-boot-starter-data-redis</artifactId > </dependency >
步骤② :配置缓存技术实现使用redis
spring:
  redis:
    host: localhost
    port: 6379
  cache:
    type: redis
如果需要对redis作为缓存进行配置,注意不是对原始的redis进行配置,而是配置redis作为缓存使用相关的配置,隶属于spring.cache.redis节点下,注意不要写错位置了。
spring: redis: host: localhost port: 6379 cache: type: redis redis: use-key-prefix: false key-prefix: sms_ cache-null-values: false time-to-live: 10s
Redis 客户端相关操作
127 .0 .0 .1 :6379 > keys *1 ) "smsCode::188666688881 "127 .0 .0 .1 :6379 > flushdbOK 127 .0 .0 .1 :6379 > keys *1 ) "188666688881 "127 .0 .0 .1 :6379 > keys *1 ) "sms_smsCode::188666688881 "
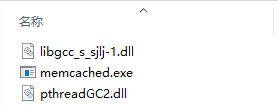
memcached下载与安装 安装
windows版安装包下载
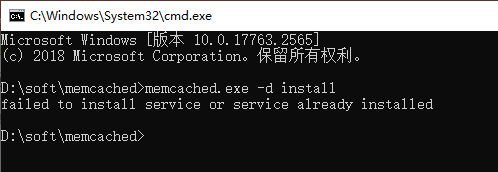
memcached.exe,执行此文件时会报错:
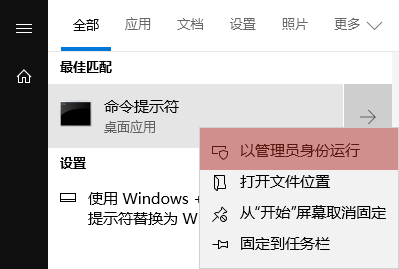
此处出现问题的原因是注册系统服务时需要使用管理员权限,当前账号权限不足导致安装服务失败,切换管理员账号权限启动命令行
然后再次执行安装服务的命令即可,如下:
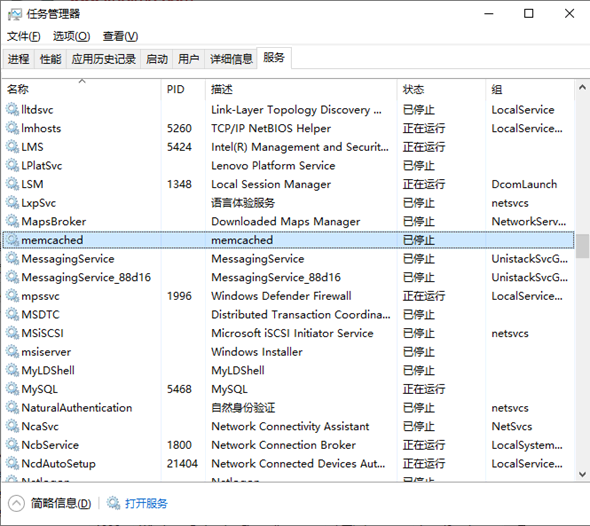
服务安装完毕后可以使用命令启动和停止服务,如下:
memcached.exe -d start		# 启动服务
memcached.exe -d stop		# 停止服务
也可以在任务管理器中进行服务状态的切换
变更缓存供应商memcached
memcached客户端选择
Memcached Client for Java:最早期客户端,稳定可靠,用户群广
SpyMemcached:效率更高
Xmemcached:并发处理更好
SpringBoot未提供对memcached的整合,需要使用硬编码方式实现客户端初始化管理
<dependency > <groupId > com.googlecode.xmemcached</groupId > <artifactId > xmemcached</artifactId > <version > 2.4.7</version > </dependency >
memcached: servers: localhost:11211 poolSize: 10 opTimeout: 3000
@Data
@Component
@ConfigurationProperties(prefix = "memcached")
public class XMemcachedProperties {
    private String servers;
    private int poolSize;
    private long opTimeout;
}
@Configuration public class XMemcachedConfig { @Autowired private XMemcachedProperties xMemcachedProperties; @Bean public MemcachedClient getMemcachedClient () throws IOException { MemcachedClientBuilder memcachedClientBuilder = new XMemcachedClientBuilder (xMemcachedProperties.getServers()); memcachedClientBuilder.setConnectionPoolSize(xMemcachedProperties.getPoolSize()); memcachedClientBuilder.setOpTimeout(xMemcachedProperties.getOpTimeout()); MemcachedClient memcachedClient = memcachedClientBuilder.build(); return memcachedClient; } }
@Service public class SMSCodeServiceImpl implements SMSCodeService { @Autowired private CodeUtils codeUtils; @Autowired private MemcachedClient memcachedClient; public String sendCodeToSMS (String tele) { String code = codeUtils.generator(tele); try { memcachedClient.set(tele,10 ,code); } catch (Exception e) { e.printStackTrace(); } return code; } public boolean checkCode (SMSCode smsCode) { String code = null ; try { code = memcachedClient.get(smsCode.getTele()).toString(); } catch (Exception e) { e.printStackTrace(); } return smsCode.getCode().equals(code); } }
jetcache远程缓存方案 jetCache对SpringCache进行了封装,在原有功能基础上实现了多级缓存、缓存统计、自动刷新、异步调用、数据报表等功能
jetCache设定了本地缓存与远程缓存的多级缓存解决方案
步骤① :导入springboot整合jetcache对应的坐标starter,当前坐标默认使用的远程方案是redis
<dependency > <groupId > com.alicp.jetcache</groupId > <artifactId > jetcache-starter-redis</artifactId > <version > 2.6.2</version > </dependency >
步骤② :远程方案基本配置
jetcache:
  remote:
    default:
      type: redis
      host: localhost
      port: 6379
      poolConfig:
        maxTotal: 50
其中poolConfig是必配项,否则会报错
步骤③ :启用缓存,在引导类上方标注注解@EnableCreateCacheAnnotation配置springboot程序中可以使用注解的形式创建缓存
@SpringBootApplication @EnableCreateCacheAnnotation public class Springboot20JetCacheApplication { public static void main (String[] args) { SpringApplication.run(Springboot20JetCacheApplication.class, args); } }
步骤④ :创建缓存对象Cache,并使用注解@CreateCache标记当前缓存的信息,然后使用Cache对象的API操作缓存,put写缓存,get读缓存。
@Service public class SMSCodeServiceImpl implements SMSCodeService { @Autowired private CodeUtils codeUtils; @CreateCache(name="jetCache_",expire = 10,timeUnit = TimeUnit.SECONDS) private Cache<String ,String> jetCache; public String sendCodeToSMS (String tele) { String code = codeUtils.generator(tele); jetCache.put(tele,code); return code; } public boolean checkCode (SMSCode smsCode) { String code = jetCache.get(smsCode.getTele()); return smsCode.getCode().equals(code); } }
通过上述jetcache使用远程方案连接redis可以看出,jetcache操作缓存时的接口操作更符合开发者习惯,使用缓存就先获取缓存对象Cache,放数据进去就是put,取数据出来就是get,更加简单易懂。并且jetcache操作缓存时,可以为某个缓存对象设置过期时间,将同类型的数据放入缓存中,方便有效周期的管理。
上述方案中使用的是配置中定义的default缓存,其实这个default是个名字,可以随便写,也可以随便加。例如再添加一种缓存解决方案,参照如下配置进行:
jetcache:
  remote:
    default:
      type: redis
      host: localhost
      port: 6379
      poolConfig:
        maxTotal: 50
    sms:
      type: redis
      host: localhost
      port: 6379
      poolConfig:
        maxTotal: 50
如果想使用名称是sms的缓存,需要再创建缓存时指定参数area,声明使用对应缓存即可
@Service public class SMSCodeServiceImpl implements SMSCodeService { @Autowired private CodeUtils codeUtils; @CreateCache(area="sms",name="jetCache_",expire = 10,timeUnit = TimeUnit.SECONDS) private Cache<String ,String> jetCache; public String sendCodeToSMS (String tele) { String code = codeUtils.generator(tele); jetCache.put(tele,code); return code; } public boolean checkCode (SMSCode smsCode) { String code = jetCache.get(smsCode.getTele()); return smsCode.getCode().equals(code); } }
循环依赖
Description:
The dependencies of some of the beans in the application context form a cycle:
┌─────┐
Action:
Relying upon circular references is discouraged and they are prohibited by default. Update your application to remove the dependency cycle between beans. As a last resort, it may be possible to break the cycle automatically by setting spring.main.allow-circular-references to true.
设置 spring.main.allow-circular-references 为 true 打破循环
spring:
  main:
    allow-circular-references: true
jetcache本地缓存方案 纯本地方案 远程方案中,配置中使用remote表示远程,换成local就是本地,只不过类型不一样而已。
步骤① :导入springboot整合jetcache对应的坐标starter
<dependency > <groupId > com.alicp.jetcache</groupId > <artifactId > jetcache-starter-redis</artifactId > <version > 2.6.2</version > </dependency >
步骤② :本地缓存基本配置
jetcache:
  local:
    default:
      type: linkedhashmap
      keyConvertor: fastjson
为了加速数据获取时key的匹配速度,jetcache要求指定key的类型转换器。简单说就是,如果你给了一个Object作为key的话,我先用key的类型转换器给转换成字符串,然后再保存。等到获取数据时,仍然是先使用给定的Object转换成字符串,然后根据字符串匹配。由于jetcache是阿里的技术,这里推荐key的类型转换器使用阿里的fastjson。
步骤③ :启用缓存
@SpringBootApplication @EnableCreateCacheAnnotation public class Springboot20JetCacheApplication { public static void main (String[] args) { SpringApplication.run(Springboot20JetCacheApplication.class, args); } }
步骤④ :创建缓存对象Cache时,标注当前使用本地缓存
@Service public class SMSCodeServiceImpl implements SMSCodeService { @CreateCache(name="jetCache_",expire = 1000,timeUnit = TimeUnit.SECONDS,cacheType = CacheType.LOCAL) private Cache<String ,String> jetCache; public String sendCodeToSMS (String tele) { String code = codeUtils.generator(tele); jetCache.put(tele,code); return code; } public boolean checkCode (SMSCode smsCode) { String code = jetCache.get(smsCode.getTele()); return smsCode.getCode().equals(code); } }
cacheType控制当前缓存使用本地缓存还是远程缓存,配置cacheType=CacheType.LOCAL即使用本地缓存。
本地+远程方案 本地和远程方法都有了,两种方案一起使用如何配置呢?其实就是将两种配置合并到一起就可以了。
jetcache:
  local:
    default:
      type: linkedhashmap
      keyConvertor: fastjson
  remote:
    default:
      type: redis
      host: localhost
      port: 6379
      poolConfig:
        maxTotal: 50
    sms:
      type: redis
      host: localhost
      port: 6379
      poolConfig:
        maxTotal: 50
在创建缓存的时候,配置cacheType为BOTH即则本地缓存与远程缓存同时使用。
@Service
public class SMSCodeServiceImpl implements SMSCodeService {
    @CreateCache(name="jetCache_",expire = 1000,timeUnit = TimeUnit.SECONDS,cacheType = CacheType.BOTH)
    private Cache<String ,String> jetCache;
}
cacheType如果不进行配置,默认值是REMOTE,即仅使用远程缓存方案。关于jetcache的配置,参考以下信息
属性
默认值
说明
jetcache.statIntervalMinutes
0
统计间隔,0表示不统计
jetcache.hiddenPackages
无
自动生成name时,隐藏指定的包名前缀
jetcache.[local|remote].${area}.type
无
缓存类型,本地支持linkedhashmap、caffeine,远程支持redis、tair
jetcache.[local|remote].${area}.keyConvertor
无
key转换器,当前仅支持fastjson
jetcache.[local|remote].${area}.valueEncoder
java
仅remote类型的缓存需要指定,可选java和kryo
jetcache.[local|remote].${area}.valueDecoder
java
仅remote类型的缓存需要指定,可选java和kryo
jetcache.[local|remote].${area}.limit
100
仅local类型的缓存需要指定,缓存实例最大元素数
jetcache.[local|remote].${area}.expireAfterWriteInMillis
无穷大
默认过期时间,毫秒单位
jetcache.local.${area}.expireAfterAccessInMillis
0
仅local类型的缓存有效,毫秒单位,最大不活动间隔
jetcache方法缓存方案 jetcache提供了方法缓存方案,只不过名称变更了而已。在对应的操作接口上方使用注解@Cached即可
步骤① :导入springboot整合jetcache对应的坐标starter
<dependency > <groupId > com.alicp.jetcache</groupId > <artifactId > jetcache-starter-redis</artifactId > <version > 2.6.2</version > </dependency >
步骤② :配置缓存
jetcache:
  local:
    default:
      type: linkedhashmap
      keyConvertor: fastjson
  remote:
    default:
      type: redis
      host: localhost
      port: 6379
      keyConvertor: fastjson
      valueEncode: java
      valueDecode: java
      poolConfig:
        maxTotal: 50
    sms:
      type: redis
      host: localhost
      port: 6379
      poolConfig:
        maxTotal: 50
由于redis缓存中不支持保存对象,因此需要对redis设置当Object类型数据进入到redis中时如何进行类型转换。需要配置keyConvertor表示key的类型转换方式,同时标注value的转换类型方式,值进入redis时是java类型,标注valueEncode为java,值从redis中读取时转换成java,标注valueDecode为java。
注意,为了实现Object类型的值进出redis,需要保障进出redis的Object类型的数据必须实现序列化接口 。
@Data
public class Book implements Serializable {
    private Integer id;
    private String type;
    private String name;
    private String description;
}
步骤③ :启用缓存时开启方法缓存功能,并配置basePackages,说明在哪些包中开启方法缓存
@SpringBootApplication @EnableCreateCacheAnnotation @EnableMethodCache(basePackages="com.example") public class Springboot20JetCacheApplication { public static void main (String[] args) { SpringApplication.run(Springboot20JetCacheApplication.class, args); } }
步骤④ :使用注解@Cached标注当前方法使用缓存
@Service public class BookServiceImpl implements BookService { @Autowired private BookDao bookDao; @Override @Cached(name="book_",key="#id",expire = 3600,cacheType = CacheType.REMOTE) public Book getById (Integer id) { return bookDao.selectById(id); } }
远程方案的数据同步 由于远程方案中redis保存的数据可以被多个客户端共享,这就存在了数据同步问题。jetcache提供了3个注解解决此问题,分别在更新、删除操作时同步缓存数据,和读取缓存时定时刷新数据
更新缓存
@CacheUpdate(name="book_",key="#book.id",value="#book") public boolean update (Book book) { return bookDao.updateById(book) > 0 ; }
删除缓存
@CacheInvalidate(name="book_",key = "#id") public boolean delete (Integer id) { return bookDao.deleteById(id) > 0 ; }
定时刷新缓存
@Cached(name="book_",key="#id",expire = 3600,cacheType = CacheType.REMOTE) @CacheRefresh(refresh = 5) public Book getById (Integer id) { return bookDao.selectById(id); }
数据报表 jetcache还提供有简单的数据报表功能,帮助开发者快速查看缓存命中信息,只需要添加一个配置即可
jetcache:
  statIntervalMinutes: 1
设置后,每1分钟在控制台输出缓存数据命中信息
[DefaultExecutor] c.alicp.jetcache.support.StatInfoLogger : jetcache stat from 2022 -02 -28 09 :32 :15 ,892 to 2022 -02 -28 09 :33 :00 ,003 cache | qps| rate| get| hit| fail| expire| avgLoadTime| maxLoadTime ---------+-------+-------+------+-------+-------+---------+--------------+-------------- book_ | 0 .66 | 75 .86 %| 29 | 22 | 0 | 0 | 28 .0 | 188 ---------+-------+-------+------+-------+-------+---------+--------------+--------------
总结
jetcache是一个类似于springcache的缓存解决方案,自身不具有缓存功能,它提供有本地缓存与远程缓存多级共同使用的缓存解决方案
jetcache提供的缓存解决方案受限于目前支持的方案,本地缓存支持两种,远程缓存支持两种
注意数据进入远程缓存时的类型转换问题
jetcache提供方法缓存,并提供了对应的缓存更新与刷新功能
jetcache提供有简单的缓存信息命中报表方便开发者即时监控缓存数据命中情况
j2cache基本操作 jetcache可以在限定范围内构建多级缓存,但是灵活性不足,不能随意搭配缓存,本节介绍一种可以随意搭配缓存解决方案的缓存整合框架,j2cache。下面就来讲解如何使用这种缓存框架,以Ehcache与redis整合为例:
步骤① :导入j2cache、redis、ehcache坐标
<dependency > <groupId > net.oschina.j2cache</groupId > <artifactId > j2cache-core</artifactId > <version > 2.8.4-release</version > </dependency > <dependency > <groupId > net.oschina.j2cache</groupId > <artifactId > j2cache-spring-boot2-starter</artifactId > <version > 2.8.0-release</version > </dependency > <dependency > <groupId > net.sf.ehcache</groupId > <artifactId > ehcache</artifactId > </dependency >
j2cache的starter中默认包含了redis坐标,官方推荐使用redis作为二级缓存,因此此处无需导入redis坐标
步骤② :配置一级与二级缓存,并配置一二级缓存间数据传递方式,配置书写在名称为j2cache.properties的文件中。如果使用ehcache还需要单独添加ehcache的配置文件
application.yml:
j2cache:
  config-location: j2cache.properties
j2cache.properties
j2cache.L1.provider_class = ehcache ehcache.configXml = ehcache.xml j2cache.L2.provider_class = net.oschina.j2cache.cache.support.redis.SpringRedisProvider j2cache.L2.config_section = redis redis.hosts = localhost:6379 j2cache.broadcast = net.oschina.j2cache.cache.support.redis.SpringRedisPubSubPolicy
此处配置不能乱配置,需要参照官方给出的配置说明进行。例如1级供应商选择ehcache,供应商名称仅仅是一个ehcache,但是2级供应商选择redis时要写专用的Spring整合Redis的供应商类名SpringRedisProvider,而且这个名称并不是所有的redis包中能提供的,也不是spring包中提供的。因此配置j2cache必须参照官方文档配置,而且还要去找专用的整合包,导入对应坐标才可以使用。
一级与二级缓存最重要的一个配置就是两者之间的数据沟通方式,此类配置也不是随意配置的,并且不同的缓存解决方案提供的数据沟通方式差异化很大,需要查询官方文档进行设置。
步骤③ :使用缓存
@Service public class SMSCodeServiceImpl implements SMSCodeService { @Autowired private CodeUtils codeUtils; @Autowired private CacheChannel cacheChannel; public String sendCodeToSMS (String tele) { String code = codeUtils.generator(tele); cacheChannel.set("sms" ,tele,code); return code; } public boolean checkCode (SMSCode smsCode) { String code = cacheChannel.get("sms" ,smsCode.getTele()).asString(); return smsCode.getCode().equals(code); } }
j2cache的使用和jetcache比较类似,但是无需开启使用的开关,直接定义缓存对象即可使用,缓存对象名CacheChannel。
总结
j2cache是一个缓存框架,自身不具有缓存功能,它提供多种缓存整合在一起使用的方案
j2cache需要通过复杂的配置设置各级缓存,以及缓存之间数据交换的方式
j2cache操作接口通过CacheChannel实现
j2cache相关配置 j2cache的使用不复杂,配置是j2cache的核心,毕竟是一个整合型的缓存框架。缓存相关的配置过多,可以查阅j2cache-core核心包中的j2cache.properties文件中的说明。如下:
j2cache.broadcast = redis jgroups.channel.name = j2cache jgroups.configXml = /network.xml rabbitmq.exchange = j2cache rabbitmq.host = localhost rabbitmq.port = 5672 rabbitmq.username = guest rabbitmq.password = guest rocketmq.name = j2cache rocketmq.topic = j2cache rocketmq.hosts = 127.0.0.1:9876 j2cache.L1.provider_class = caffeine j2cache.L2.provider_class = redis j2cache.sync_ttl_to_redis = true j2cache.default_cache_null_object = true j2cache.serialization = json caffeine.properties = /caffeine.properties redis.mode = single redis.storage = generic redis.channel = j2cache redis.channel.host =redis.cluster_name = j2cache redis.namespace =redis.hosts = 127.0.0.1:6379 redis.timeout = 2000 redis.password =redis.database = 0 redis.ssl = false redis.maxTotal = 100 redis.maxIdle = 10 redis.maxWaitMillis = 5000 redis.minEvictableIdleTimeMillis = 60000 redis.minIdle = 1 redis.numTestsPerEvictionRun = 10 redis.lifo = false redis.softMinEvictableIdleTimeMillis = 10 redis.testOnBorrow = true redis.testOnReturn = false redis.testWhileIdle = true redis.timeBetweenEvictionRunsMillis = 300000 redis.blockWhenExhausted = false redis.jmxEnabled = false lettuce.mode = single lettuce.namespace =lettuce.storage = hash lettuce.channel = j2cache lettuce.scheme = redis lettuce.hosts = 127.0.0.1:6379 lettuce.password =lettuce.database = 0 lettuce.sentinelMasterId =lettuce.maxTotal = 100 lettuce.maxIdle = 10 lettuce.minIdle = 10 lettuce.timeout = 10000 lettuce.clusterTopologyRefresh = 3000 memcached.servers = 127.0.0.1:11211 memcached.username =memcached.password =memcached.connectionPoolSize = 10 memcached.connectTimeout = 1000 memcached.failureMode = false memcached.healSessionInterval = 1000 memcached.maxQueuedNoReplyOperations = 100 memcached.opTimeout = 100 memcached.sanitizeKeys = false
例如: j2cache.properties
j2cache.L1.provider_class = ehcache ehcache.configXml = ehcache.xml j2cache.l2-cache-open = false j2cache.L2.provider_class = net.oschina.j2cache.cache.support.redis.SpringRedisProvider j2cache.L2.config_section = redis redis.hosts = localhost:6379 j2cache.broadcast = net.oschina.j2cache.cache.support.redis.SpringRedisPubSubPolicy redis.mode = single redis.namespace = j2cache
总结:
spring-cache
simple
ehcache
redis
memcached
jetcache
j2cache
springboot整合quartz
定时任务是企业级应用中的常见操作
市面上流行的定时任务技术
学习springboot整合Quartz前先普及几个Quartz的概念。
工作(Job):用于定义具体执行的工作
工作明细(JobDetail):用于描述定时工作相关的信息
触发器(Trigger):描述了工作明细与调度器的对应关系
调度器(Scheduler):用于描述触发工作的执行规则,通常使用cron表达式定义规则
简单说就是你定时干什么事情,这就是工作,工作不可能就是一个简单的方法,还要设置一些明细信息。工作啥时候执行,设置一个调度器,可以简单理解成设置一个工作执行的时间。工作和调度都是独立定义的,它们两个怎么配合到一起呢?用触发器。完了,就这么多。下面开始springboot整合Quartz。
步骤① :导入springboot整合Quartz的starter
<dependency > <groupId > org.springframework.boot</groupId > <artifactId > spring-boot-starter-quartz</artifactId > </dependency >
步骤② :定义任务Bean,按照Quartz的开发规范制作,继承QuartzJobBean
public class MyQuartz extends QuartzJobBean { @Override protected void executeInternal (JobExecutionContext context) throws JobExecutionException { System.out.println("quartz task run..." ); } }
步骤③ :创建Quartz配置类,定义工作明细(JobDetail)与触发器的(Trigger)bean
@Configuration public class QuartzConfig { @Bean public JobDetail printJobDetail () { return JobBuilder.newJob(MyQuartz.class).storeDurably().build(); } @Bean public Trigger printJobTrigger () { ScheduleBuilder schedBuilder = CronScheduleBuilder.cronSchedule("0/5 * * * * ?" ); return TriggerBuilder.newTrigger().forJob(printJobDetail()).withSchedule(schedBuilder).build(); } }
工作明细中要设置对应的具体工作,使用newJob()操作传入对应的工作任务类型即可。
触发器需要绑定任务,使用forJob()操作传入绑定的工作明细对象。此处可以为工作明细设置名称然后使用名称绑定,也可以直接调用对应方法绑定。触发器中最核心的规则是执行时间,此处使用调度器定义执行时间,执行时间描述方式使用的是cron表达式。有关cron表达式的规则,各位小伙伴可以去参看相关课程学习,略微复杂,而且格式不能乱设置,不是写个格式就能用的,写不好就会出现冲突问题。
总结
springboot整合Quartz就是将Quartz对应的核心对象交给spring容器管理,包含两个对象,JobDetail和Trigger对象
JobDetail对象描述的是工作的执行信息,需要绑定一个QuartzJobBean类型的对象
Trigger对象定义了一个触发器,需要为其指定绑定的JobDetail是哪个,同时要设置执行周期调度器
springboot整合task 步骤① :开启定时任务功能,在引导类上开启定时任务功能的开关,使用注解@EnableScheduling
@SpringBootApplication @EnableScheduling public class Springboot22TaskApplication { public static void main (String[] args) { SpringApplication.run(Springboot22TaskApplication.class, args); } }
步骤② :定义Bean,在对应要定时执行的操作上方,使用注解@Scheduled定义执行的时间,执行时间的描述方式还是cron表达式
@Component public class MyBean { @Scheduled(cron = "0/1 * * * * ?") public void print () { System.out.println(Thread.currentThread().getName()+" :spring task run..." ); } }
完事,这就完成了定时任务的配置。总体感觉其实什么东西都没少,只不过没有将所有的信息都抽取成bean,而是直接使用注解绑定定时执行任务的事情而已。
如何想对定时任务进行相关配置,可以通过配置文件进行
spring: task: scheduling: pool: size: 1 thread-name-prefix: ssm_ shutdown: await-termination: false await-termination-period: 10s
发送简单邮件 springboot整合第三方技术第三部分我们来说说邮件系统,发邮件是java程序的基本操作,springboot整合javamail其实就是简化开发。不熟悉邮件的小伙伴可以先学习完javamail的基础操作,再来看这一部分内容才能感触到springboot整合javamail究竟简化了哪些操作。简化的多码?其实不多,差别不大,只是还个格式而已。
学习邮件发送之前先了解3个概念,这些概念规范了邮件操作过程中的标准。
SMTP(Simple Mail Transfer Protocol):简单邮件传输协议,用于发送 电子邮件的传输协议
POP3(Post Office Protocol - Version 3):用于接收 电子邮件的标准协议
IMAP(Internet Mail Access Protocol):互联网消息协议,是POP3的替代协议
简单说就是SMPT是发邮件的标准,POP3是收邮件的标准,IMAP是对POP3的升级。我们制作程序中操作邮件,通常是发邮件,所以SMTP是使用的重点,收邮件大部分都是通过邮件客户端完成,所以开发收邮件的代码极少。除非你要读取邮件内容,然后解析,做邮件功能的统一处理。例如HR的邮箱收到求职者的简历,可以读取后统一处理。但是为什么不制作独立的投递简历的系统呢?所以说,好奇怪的需求,因为要想收邮件就要规范发邮件的人的书写格式,这个未免有点强人所难,并且极易收到外部攻击,你不可能使用白名单来收邮件。如果能使用白名单来收邮件然后解析邮件,还不如开发个系统给白名单中的人专用呢,更安全,总之就是鸡肋了。下面就开始学习springboot如何整合javamail发送邮件。
步骤① :导入springboot整合javamail的starter
<dependency > <groupId > org.springframework.boot</groupId > <artifactId > spring-boot-starter-mail</artifactId > </dependency >
步骤② :配置邮箱的登录信息
spring:
  mail:
    host: smtp.126.com
    username: test@126.com
    password: test
java程序仅用于发送邮件,邮件的功能还是邮件供应商提供的,所以这里是用别人的邮件服务,要配置对应信息。
host配置的是提供邮件服务的主机协议,当前程序仅用于发送邮件,因此配置的是smtp的协议。
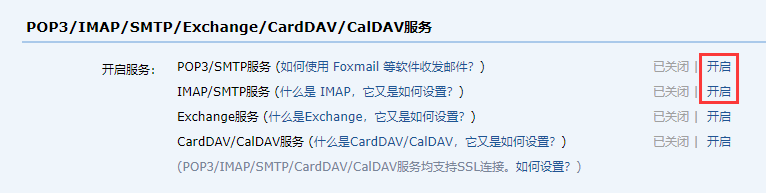
password并不是邮箱账号的登录密码,是邮件供应商提供的一个加密后的密码,也是为了保障系统安全性。不然外部人员通过地址访问下载了配置文件,直接获取到了邮件密码就会有极大的安全隐患。有关该密码的获取每个邮件供应商提供的方式都不一样,此处略过。可以到邮件供应商的设置页面找POP3或IMAP这些关键词找到对应的获取位置。下例仅供参考:
步骤③ :使用JavaMailSender接口发送邮件
@Service public class SendMailServiceImpl implements SendMailService { @Autowired private JavaMailSender javaMailSender; private String from = "test@qq.com" ; private String to = "test@126.com" ; private String subject = "测试邮件" ; private String context = "测试邮件正文内容" ; @Override public void sendMail () { SimpleMailMessage message = new SimpleMailMessage (); message.setFrom(from+"(小甜甜)" ); message.setTo(to); message.setSubject(subject); message.setText(context); javaMailSender.send(message); } }
将发送邮件的必要信息(发件人、收件人、标题、正文)封装到SimpleMailMessage对象中,可以根据规则设置发送人昵称等。
发送多部件邮件 发送简单邮件仅需要提供对应的4个基本信息就可以了,如果想发送复杂的邮件,需要更换邮件对象。使用MimeMessage可以发送特殊的邮件。
发送网页正文邮件
@Service public class SendMailServiceImpl2 implements SendMailService { @Autowired private JavaMailSender javaMailSender; private String from = "test@qq.com" ; private String to = "test@126.com" ; private String subject = "测试邮件" ; private String context = "<img src='ABC.JPG'/><a href='https://www.itcast.cn'>点开有惊喜</a>" ; public void sendMail () { try { MimeMessage message = javaMailSender.createMimeMessage(); MimeMessageHelper helper = new MimeMessageHelper (message); helper.setFrom(to+"(小甜甜)" ); helper.setTo(from); helper.setSubject(subject); helper.setText(context,true ); javaMailSender.send(message); } catch (Exception e) { e.printStackTrace(); } } }
发送带有附件的邮件
@Service public class SendMailServiceImpl2 implements SendMailService { @Autowired private JavaMailSender javaMailSender; @Value("${spring.mail.username}") private String from; private String to = "2564661125@qq.com" ; private String[] tos = {"2564661125@qq.com" , "bingomail@qq.com" }; private String subject = "测试邮件" ; private String context = "<a href='https://blog.csdn.net/qq_42324086'>点开有惊喜</a>" ; @Override public void sendMail () { try { MimeMessage mimeMessage = javaMailSender.createMimeMessage(); MimeMessageHelper helper = new MimeMessageHelper (mimeMessage, true ); helper.setFrom(from + "(小甜甜)" ); helper.setTo(tos); helper.setSubject(subject); helper.setText(context, true ); File f1 = new File ("D:\\code\\Java\\IdeaProjects\\springboot-study\\springboot_23_mail\\target\\springboot_23_mail-0.0.1-SNAPSHOT.jar" ); File f2 = new File ("D:\\code\\Java\\IdeaProjects\\springboot-study\\springboot_23_mail\\src\\main\\resources\\logo.png" ); helper.addAttachment(f1.getName(), f1); helper.addAttachment("样图.png" , f2); javaMailSender.send(mimeMessage); } catch (Exception e) { e.printStackTrace(); } } }
总结 : springboot整合javamail其实就是简化了发送邮件的客户端对象JavaMailSender的初始化过程,通过配置的形式加载信息简化开发过程
监控的意义 监控的意义
监控服务状态是否宕机
监控服务运行指标(内存、虚拟机、线程、请求等)
监控日志
管理服务(服务下线)
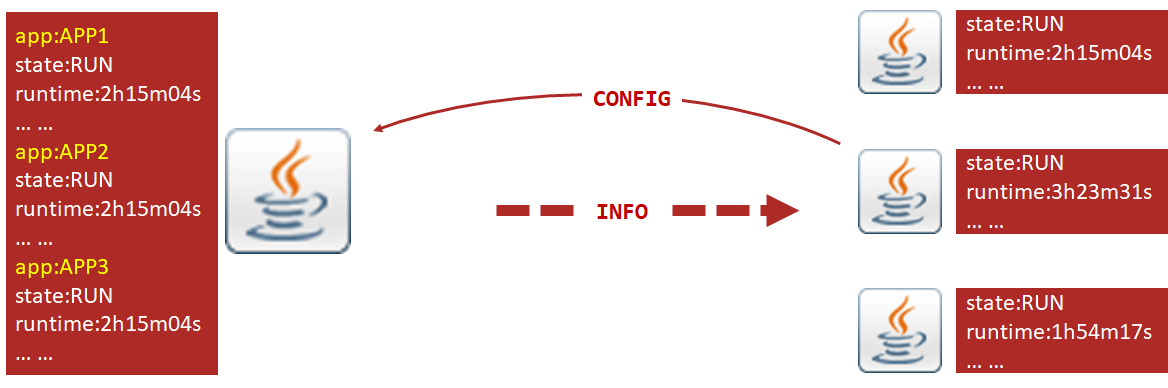
监控的实施方式
显示监控信息的服务器:用于获取服务信息,并显示对应的信息
运行的服务:启动时主动上报,告知监控服务器自己需要受到监控
小结:
监控是一个非常重要的工作,是保障程序正常运行的基础手段
监控的过程通过一个监控程序进行,它汇总所有被监控的程序的信息集中统一展示
被监控程序需要主动上报自己被监控,同时要设置哪些指标被监控
SpringBootAdmin Spring Boot Admin,这是一个开源社区项目,用于管理和监控SpringBoot应用程序。这个项目中包含有客户端和服务端两部分,而监控平台指的就是服务端。我们做的程序如果需要被监控,将我们做的程序制作成客户端,然后配置服务端地址后,服务端就可以通过HTTP请求的方式从客户端获取对应的信息,并通过UI界面展示对应信息。
下面就来开发这套监控程序,先制作服务端,其实服务端可以理解为是一个web程序,收到一些信息后展示这些信息。
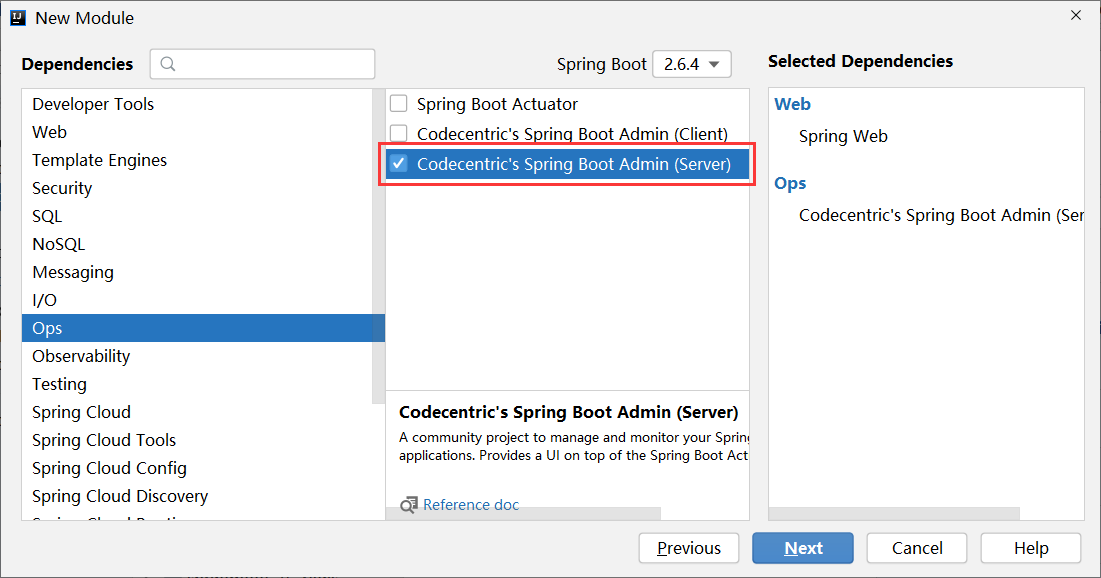
服务端开发 步骤① :导入springboot admin对应的starter,版本与当前使用的springboot版本保持一致,并将其配置成web工程
<dependency > <groupId > de.codecentric</groupId > <artifactId > spring-boot-admin-starter-server</artifactId > <version > 2.5.4</version > </dependency > <dependency > <groupId > org.springframework.boot</groupId > <artifactId > spring-boot-starter-web</artifactId > </dependency >
上述过程可以通过创建项目时使用勾选的形式完成。
步骤② :在引导类上添加注解@EnableAdminServer,声明当前应用启动后作为SpringBootAdmin的服务器使用
@SpringBootApplication @EnableAdminServer public class Springboot25AdminServerApplication { public static void main (String[] args) { SpringApplication.run(Springboot25AdminServerApplication.class, args); } }
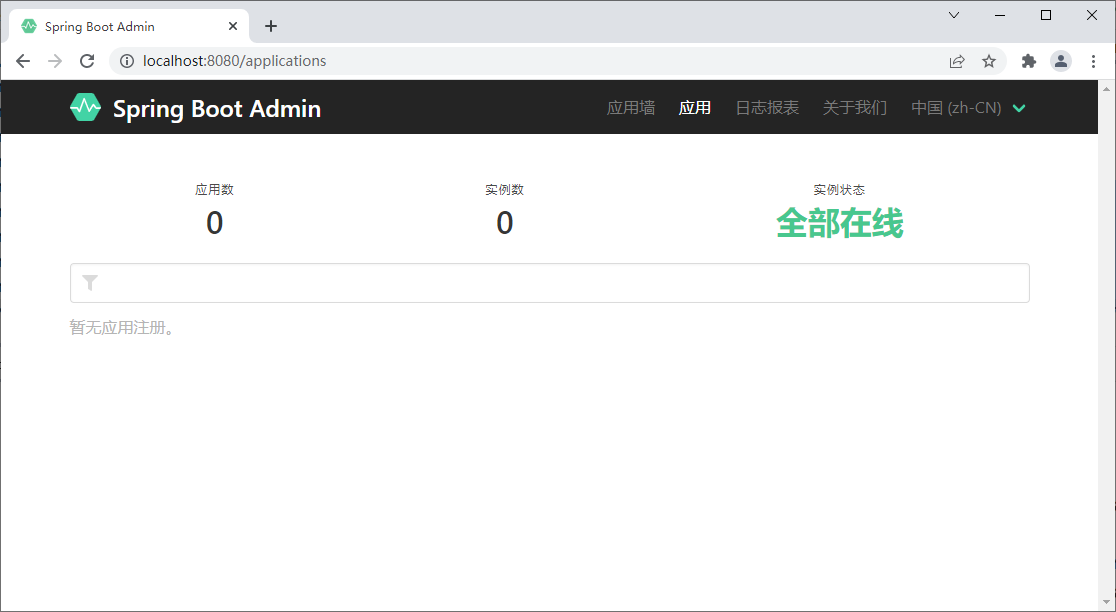
做到这里,这个服务器就开发好了,启动后就可以访问当前程序了,界面如下。
由于目前没有启动任何被监控的程序,所以里面什么信息都没有。下面制作一个被监控的客户端程序。
客户端开发 客户端程序开发其实和服务端开发思路基本相似,多了一些配置而已。
步骤① :导入springboot admin对应的starter,版本与当前使用的springboot版本保持一致,并将其配置成web工程
<dependency > <groupId > de.codecentric</groupId > <artifactId > spring-boot-admin-starter-client</artifactId > <version > 2.5.4</version > </dependency > <dependency > <groupId > org.springframework.boot</groupId > <artifactId > spring-boot-starter-web</artifactId > </dependency >
上述过程也可以通过创建项目时使用勾选的形式完成,不过一定要小心,端口配置成不一样的,否则会冲突。
步骤② :设置当前客户端将信息上传到哪个服务器上,通过yml文件配置
spring:
  boot:
    admin:
      client:
        url: http://localhost:8080
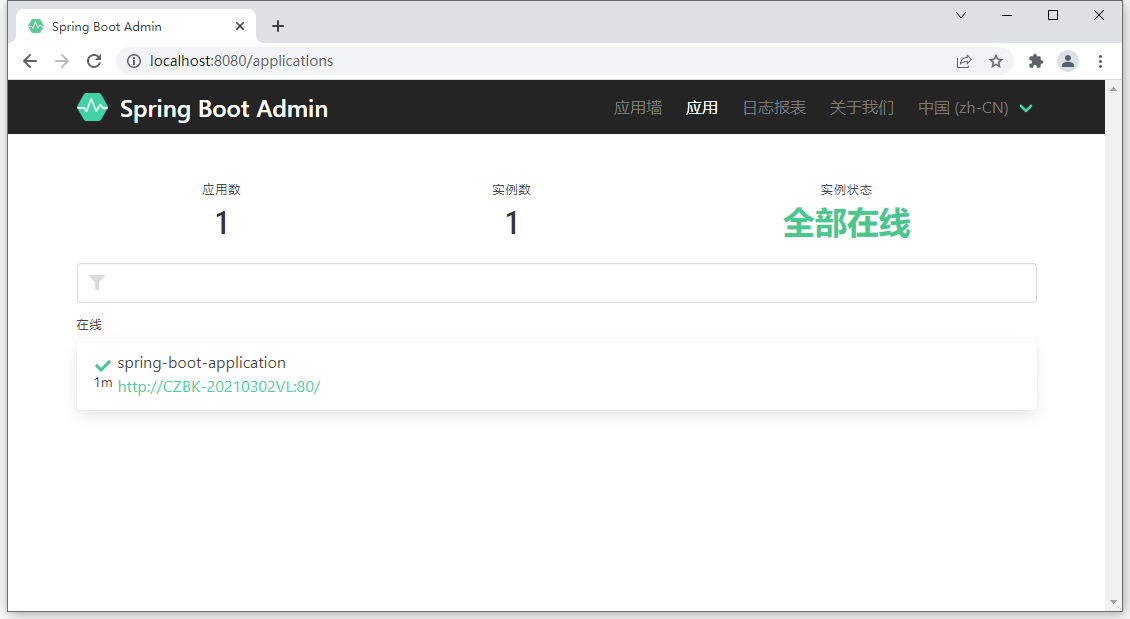
做到这里,这个客户端就可以启动了。启动后再次访问服务端程序,界面如下。
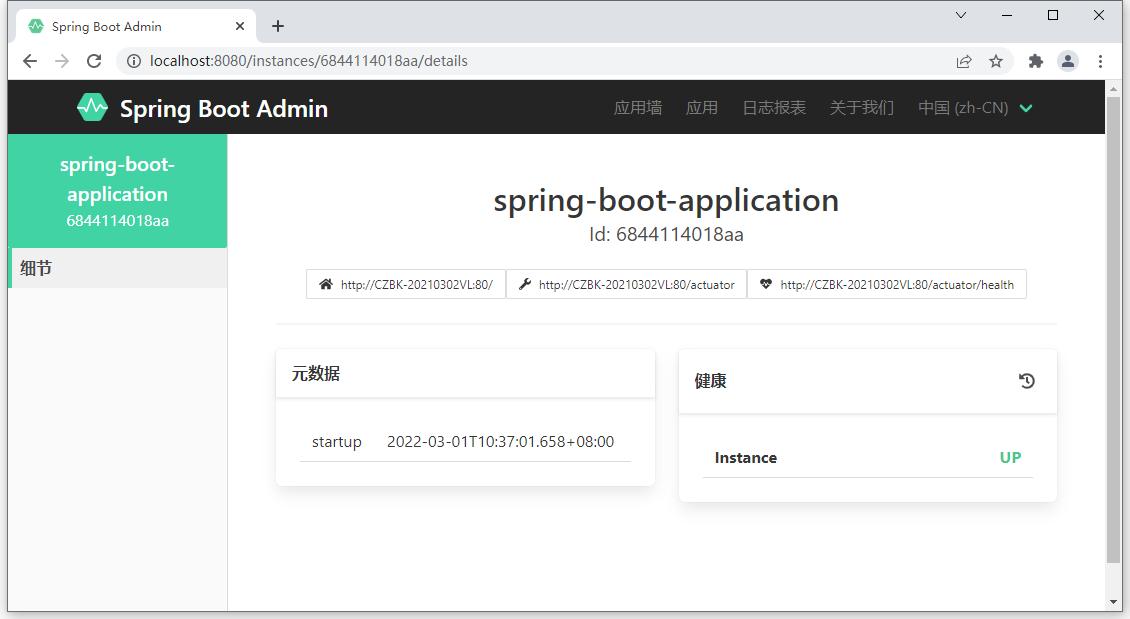
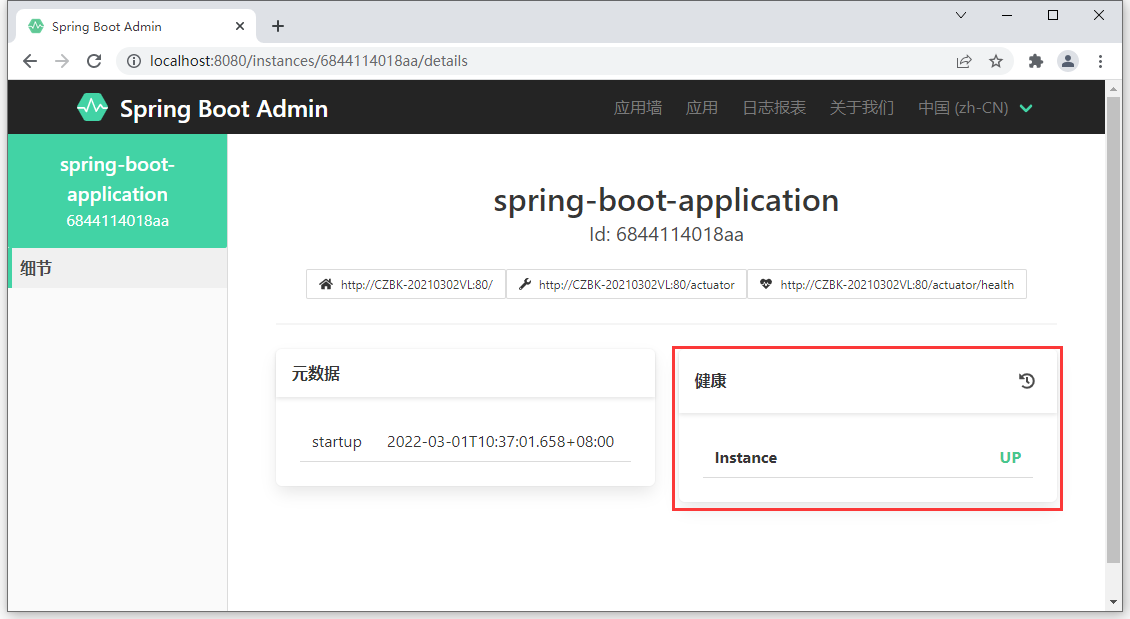
可以看到,当前监控了1个程序,点击进去查看详细信息。
由于当前没有设置开放哪些信息给监控服务器,所以目前看不到什么有效的信息。下面需要做两组配置就可以看到信息了。
开放指定信息给服务器看
允许服务器以HTTP请求的方式获取对应的信息
配置如下:
server:
  port: 80
spring:
  boot:
    admin:
      client:
        url: http://localhost:8080
management:
  endpoint:
    health:
      show-details: always
  endpoints:
    web:
      exposure:
        include: "*"
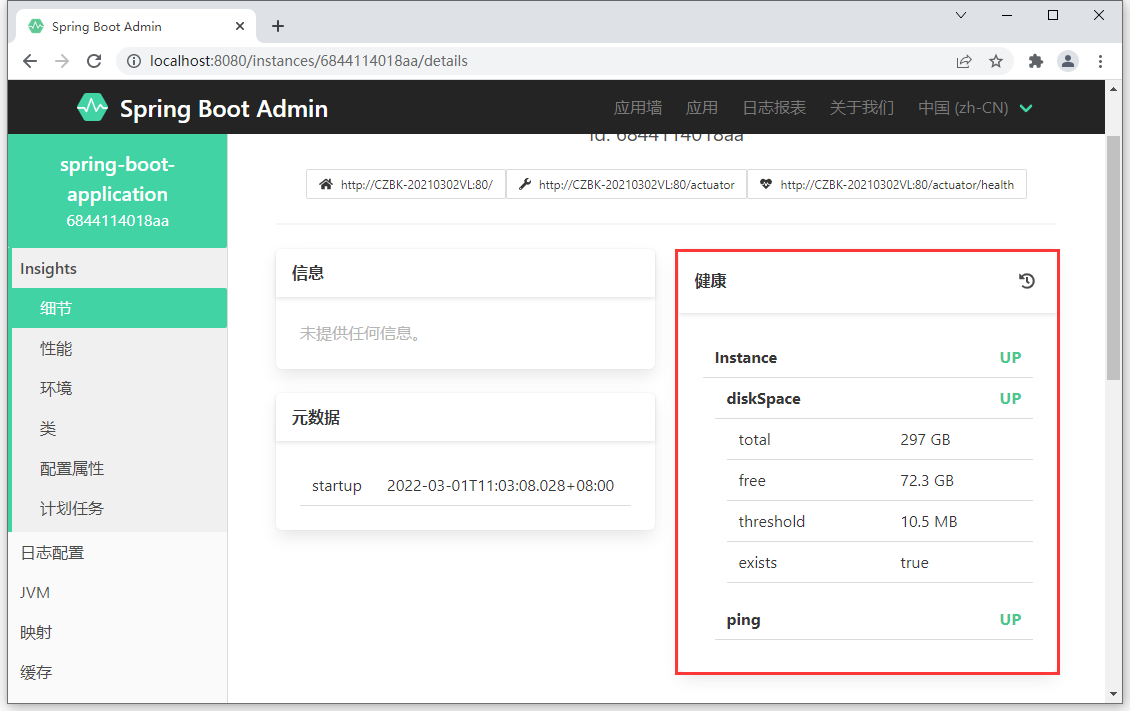
上述配置对于初学者来说比较容易混淆。简单解释一下,到下一节再做具体的讲解。springbootadmin的客户端默认开放了13组信息给服务器,但是这些信息除了一个之外,其他的信息都不让通过HTTP请求查看。所以你看到的信息基本上就没什么内容了,只能看到一个内容,就是下面的健康信息。
但是即便如此我们看到健康信息中也没什么内容,原因在于健康信息中有一些信息描述了你当前应用使用了什么技术等信息,如果无脑的对外暴露功能会有安全隐患。通过配置就可以开放所有的健康信息明细查看了。
management:
  endpoint:
    health:
      show-details: always
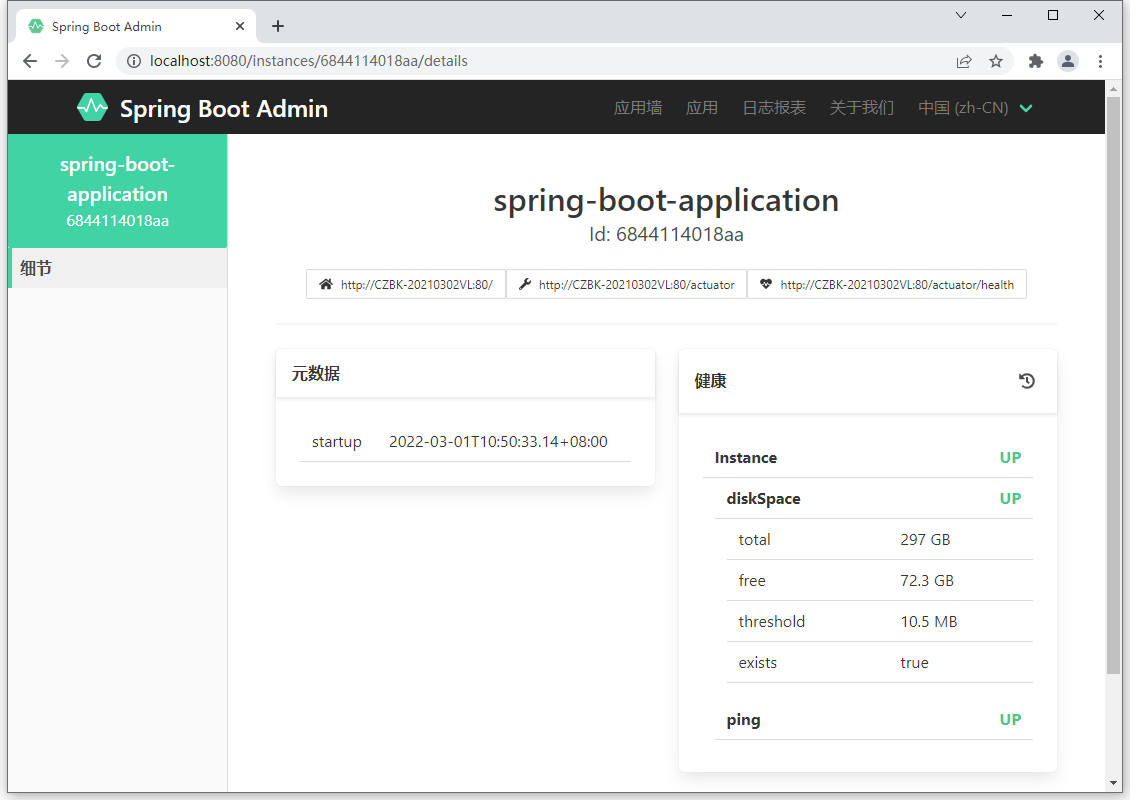
健康明细信息如下:
目前除了健康信息,其他信息都查阅不了。原因在于其他12种信息是默认不提供给服务器通过HTTP请求查阅的,所以需要开启查阅的内容项,使用*表示查阅全部。记得带引号。
endpoints:
  web:
    exposure:
      include: "*"
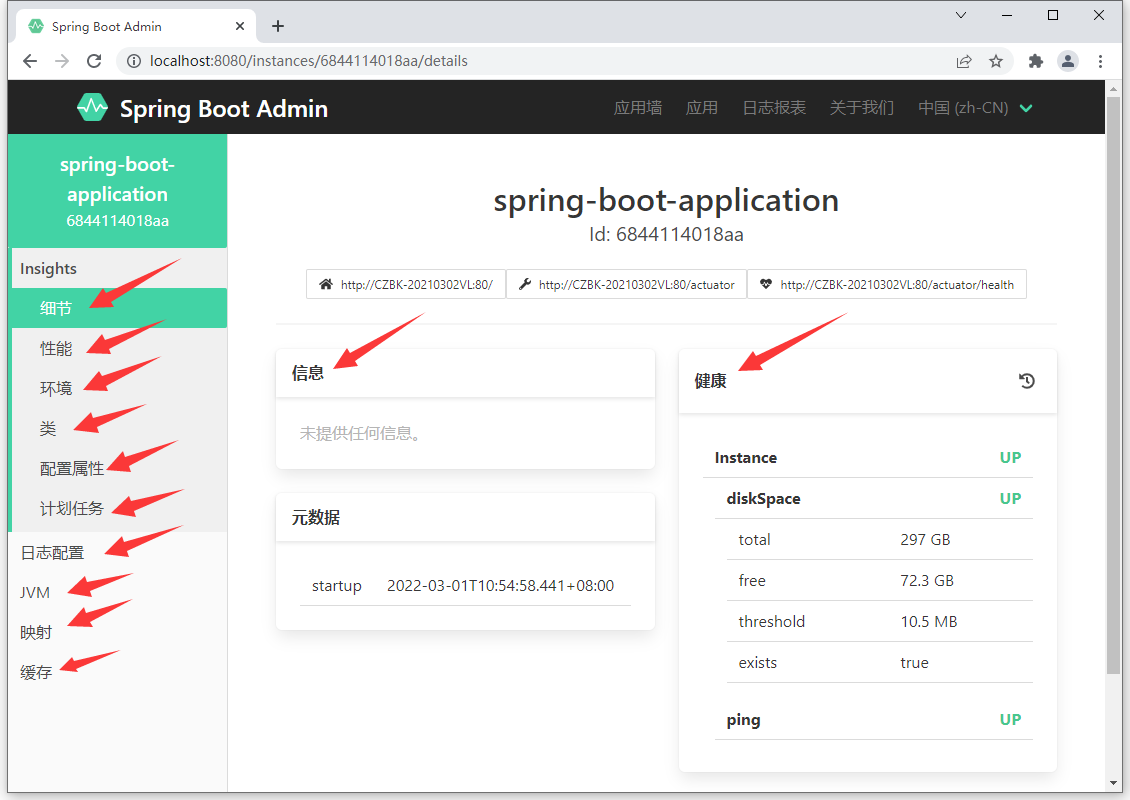
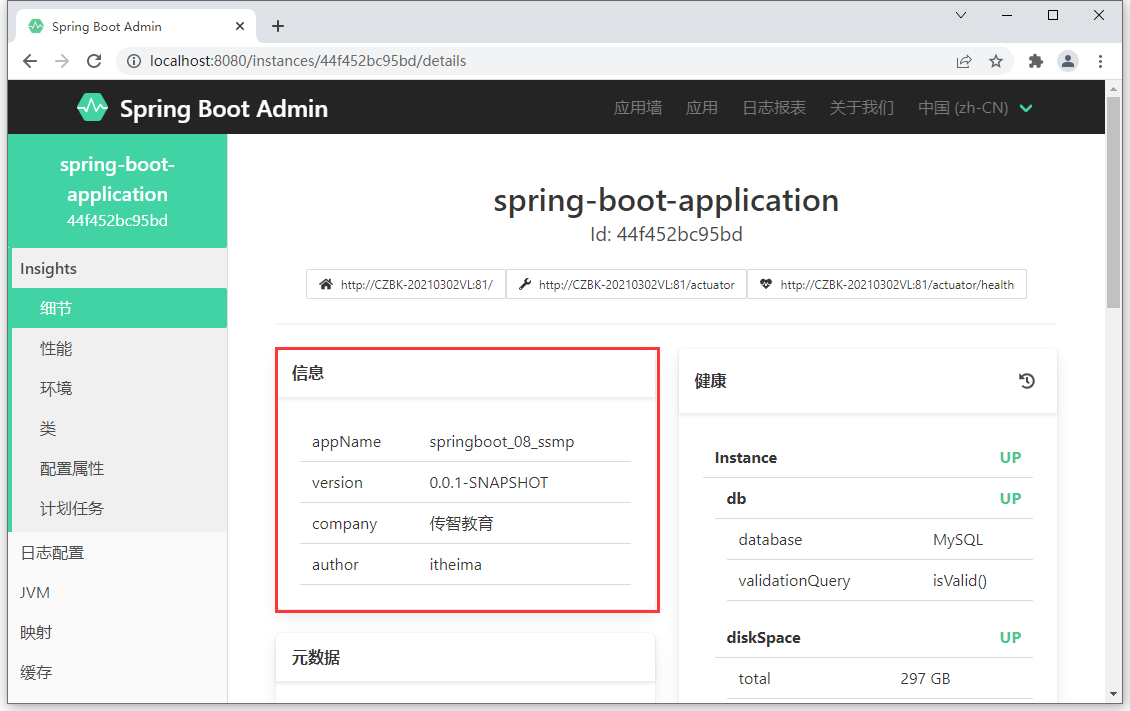
配置后再刷新服务器页面,就可以看到所有的信息了。
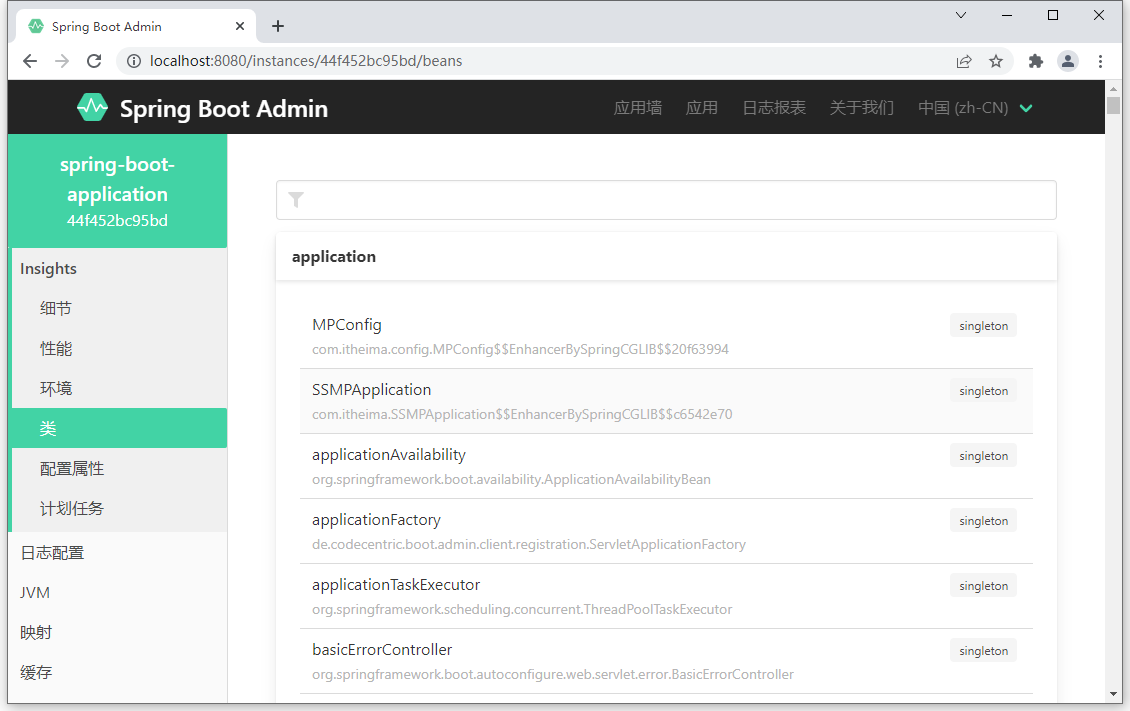
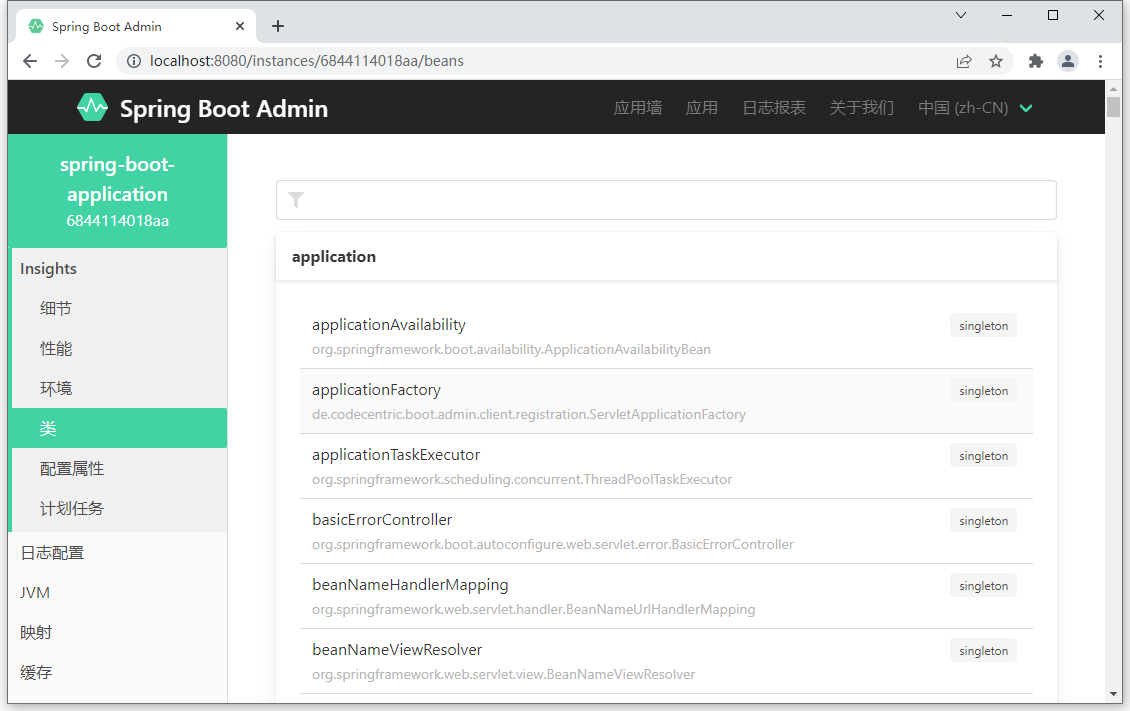
以上界面中展示的信息量就非常大了,包含了13组信息,有性能指标监控,加载的bean列表,加载的系统属性,日志的显示控制等等。
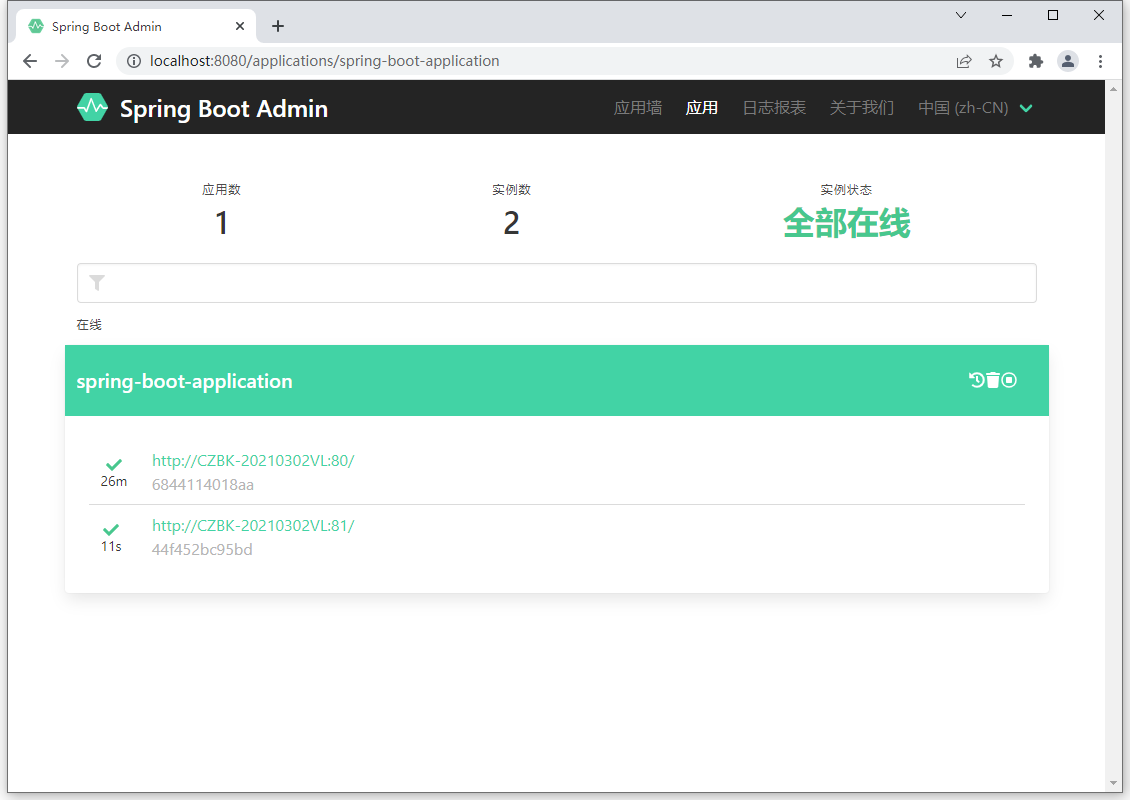
配置多个客户端
可以通过配置客户端的方式在其他的springboot程序中添加客户端坐标,这样当前服务器就可以监控多个客户端程序了。每个客户端展示不同的监控信息。
进入监控面板,如果你加载的应用具有功能,在监控面板中可以看到3组信息展示的与之前加载的空工程不一样。
总结
开发监控服务端需要导入坐标,然后在引导类上添加注解@EnableAdminServer,并将其配置成web程序即可
开发被监控的客户端需要导入坐标,然后配置服务端服务器地址,并做开放指标的设定即可
在监控平台中可以查阅到各种各样被监控的指标,前提是客户端开放了被监控的指标
actuator
Actuator提供了SpringBoot生产就绪功能,通过端点的配置与访问,获取端点信息
端点描述了一组监控信息,SpringBoot提供了多个内置端点,也可以根据需要自定义端点信息
访问当前应用所有端点信息:/actuator
访问端点详细信息:/actuator /端点名称
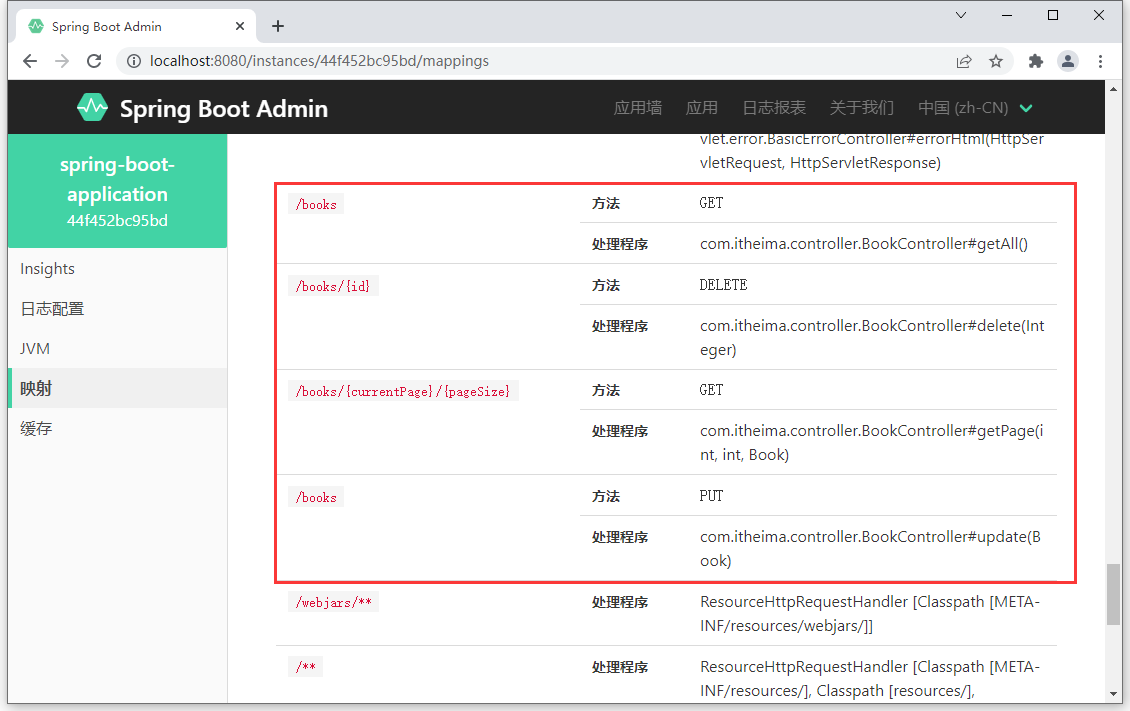
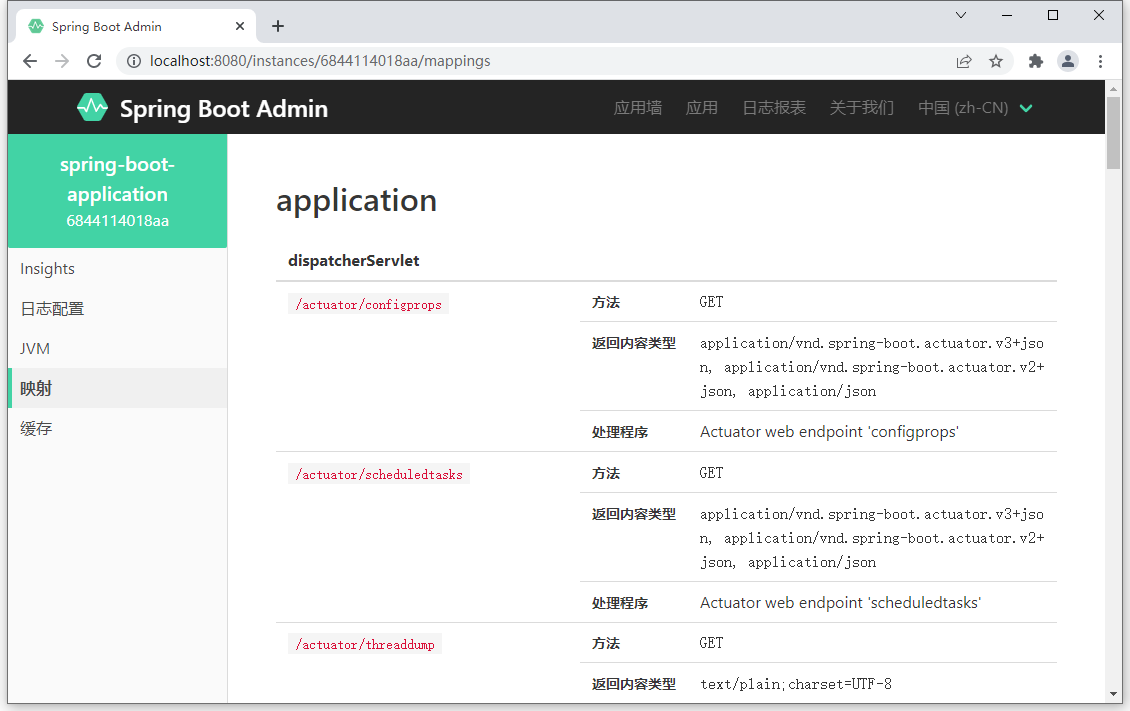
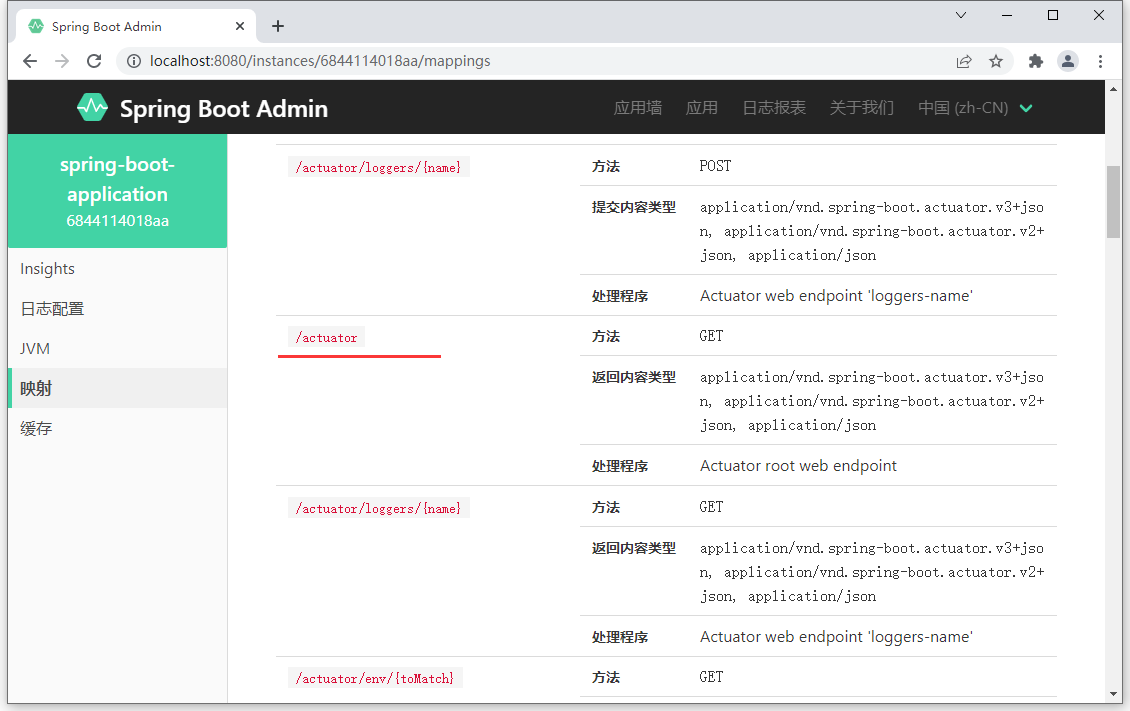
通过查阅监控中的映射指标,可以看到当前系统中可以运行的所有请求路径,其中大部分路径以/actuator开头
首先这些请求路径不是开发者自己编写的,其次这个路径代表什么含义呢?既然这个路径可以访问,就可以通过浏览器发送该请求看看究竟可以得到什么信息。
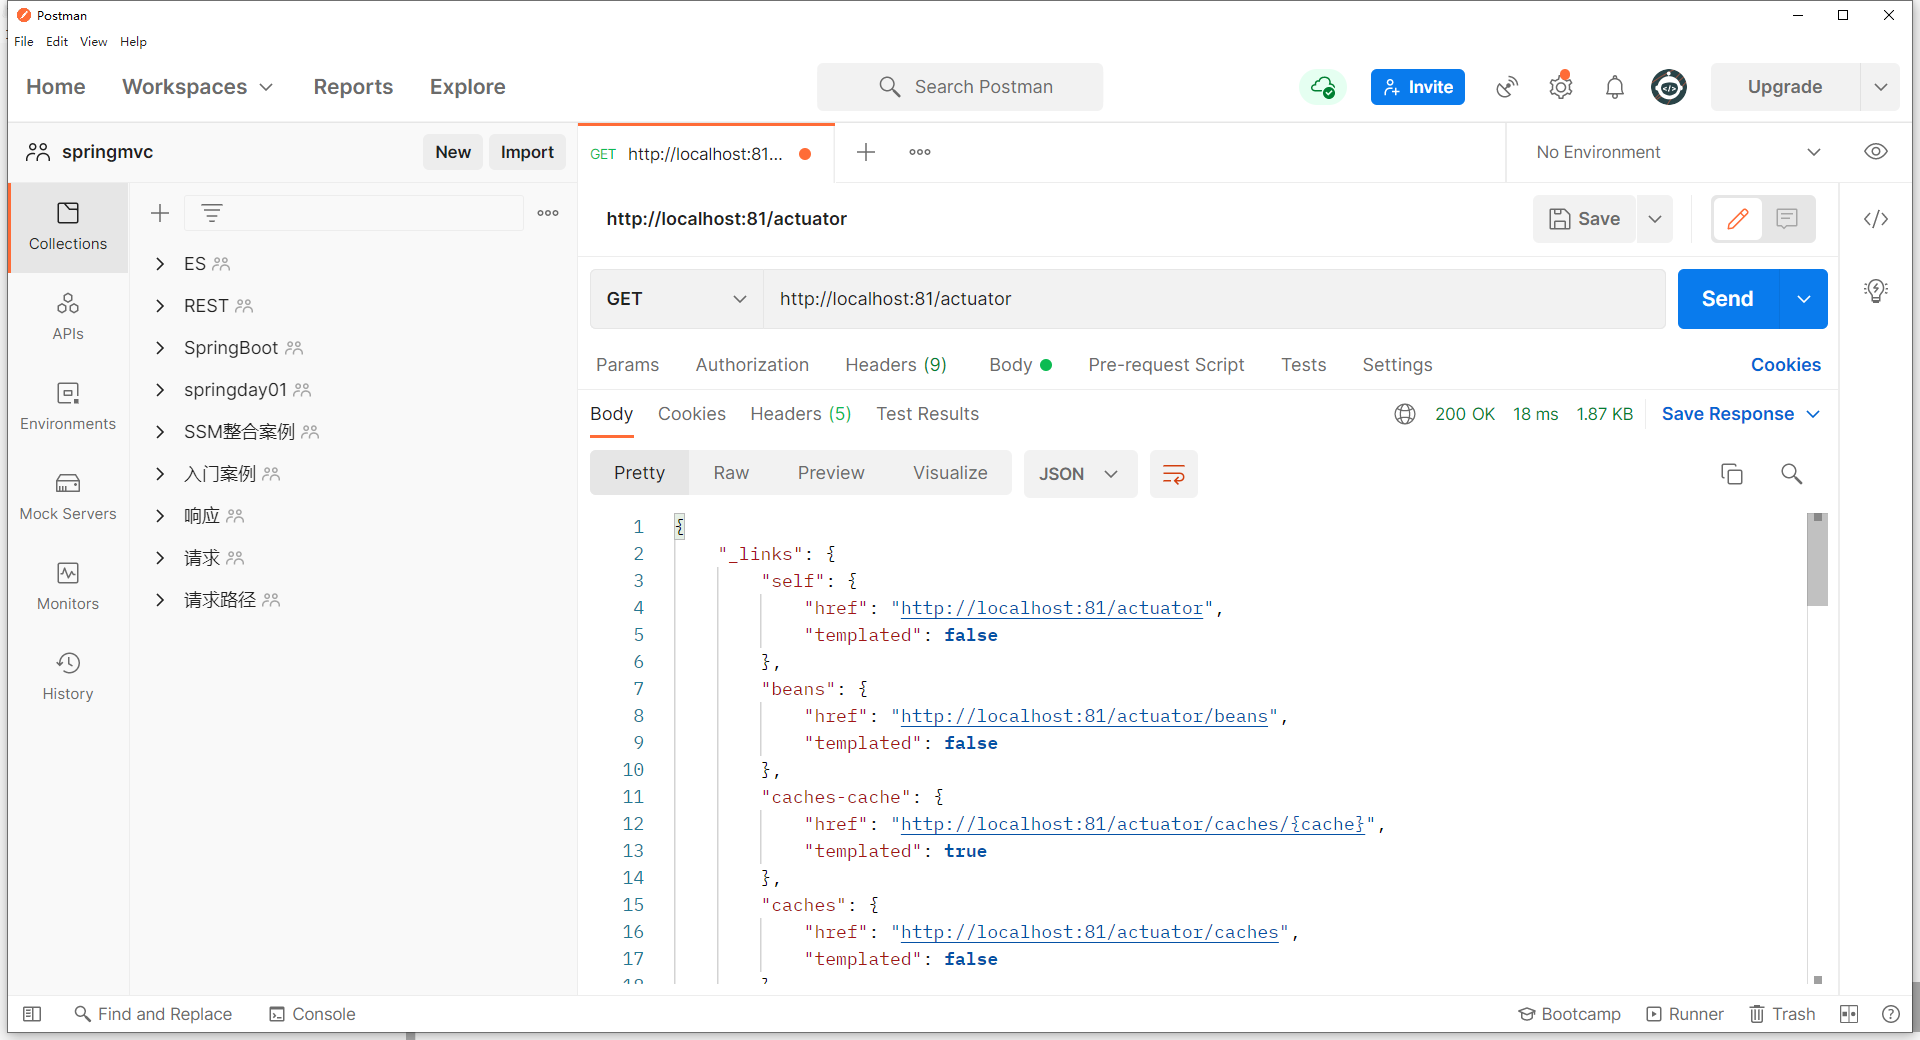
通过发送请求,可以得到一组json信息,如下
{ "_links" : { "self" : { "href" : "http://localhost:81/actuator" , "templated" : false } , "beans" : { "href" : "http://localhost:81/actuator/beans" , "templated" : false } , "caches-cache" : { "href" : "http://localhost:81/actuator/caches/{cache}" , "templated" : true } , "caches" : { "href" : "http://localhost:81/actuator/caches" , "templated" : false } , "health" : { "href" : "http://localhost:81/actuator/health" , "templated" : false } , "health-path" : { "href" : "http://localhost:81/actuator/health/{*path}" , "templated" : true } , "info" : { "href" : "http://localhost:81/actuator/info" , "templated" : false } , "conditions" : { "href" : "http://localhost:81/actuator/conditions" , "templated" : false } , "shutdown" : { "href" : "http://localhost:81/actuator/shutdown" , "templated" : false } , "configprops" : { "href" : "http://localhost:81/actuator/configprops" , "templated" : false } , "configprops-prefix" : { "href" : "http://localhost:81/actuator/configprops/{prefix}" , "templated" : true } , "env" : { "href" : "http://localhost:81/actuator/env" , "templated" : false } , "env-toMatch" : { "href" : "http://localhost:81/actuator/env/{toMatch}" , "templated" : true } , "loggers" : { "href" : "http://localhost:81/actuator/loggers" , "templated" : false } , "loggers-name" : { "href" : "http://localhost:81/actuator/loggers/{name}" , "templated" : true } , "heapdump" : { "href" : "http://localhost:81/actuator/heapdump" , "templated" : false } , "threaddump" : { "href" : "http://localhost:81/actuator/threaddump" , "templated" : false } , "metrics-requiredMetricName" : { "href" : "http://localhost:81/actuator/metrics/{requiredMetricName}" , "templated" : true } , "metrics" : { "href" : "http://localhost:81/actuator/metrics" , "templated" : false } , "scheduledtasks" : { "href" : "http://localhost:81/actuator/scheduledtasks" , "templated" : false } , "mappings" : { "href" : "http://localhost:81/actuator/mappings" , "templated" : false } } }
其中每一组数据都有一个请求路径,而在这里请求路径中有之前看到过的health,发送此请求又得到了一组信息
{ "status" : "UP" , "components" : { "diskSpace" : { "status" : "UP" , "details" : { "total" : 297042808832 , "free" : 72284409856 , "threshold" : 10485760 , "exists" : true } } , "ping" : { "status" : "UP" } } }
当前信息与监控面板中的数据存在着对应关系
原来监控中显示的信息实际上是通过发送请求后得到json数据,然后展示出来。按照上述操作,可以发送更多的以/actuator开头的链接地址,获取更多的数据,这些数据汇总到一起组成了监控平台显示的所有数据。
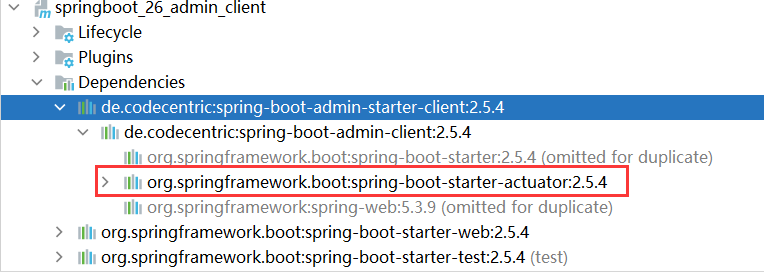
到这里我们得到了一个核心信息,监控平台中显示的信息实际上是通过对被监控的应用发送请求得到的。那这些请求谁开发的呢?打开被监控应用的pom文件,其中导入了springboot admin的对应的client,在这个资源中导入了一个名称叫做actuator的包。被监控的应用之所以可以对外提供上述请求路径,就是因为添加了这个包。
这个actuator是什么呢?这就是本节要讲的核心内容,监控的端点。
Actuator,可以称为端点,描述了一组监控信息,SpringBootAdmin提供了多个内置端点,通过访问端点就可以获取对应的监控信息,也可以根据需要自定义端点信息。通过发送请求路劲/actuator 可以访问应用所有端点信息,如果端点中还有明细信息可以发送请求/actuator/端点名称 来获取详细信息。以下列出了所有端点信息说明:
ID
描述
默认启用
auditevents
暴露当前应用程序的审计事件信息。
是
beans
显示应用程序中所有 Spring bean 的完整列表。
是
caches
暴露可用的缓存。
是
conditions
显示在配置和自动配置类上评估的条件以及它们匹配或不匹配的原因。
是
configprops
显示所有 @ConfigurationProperties 的校对清单。
是
env
暴露 Spring ConfigurableEnvironment 中的属性。
是
flyway
显示已应用的 Flyway 数据库迁移。
是
health 显示应用程序健康信息
是
httptrace
显示 HTTP 追踪信息(默认情况下,最后 100 个 HTTP 请求/响应交换)。
是
info
显示应用程序信息。
是
integrationgraph
显示 Spring Integration 图。
是
loggers 显示和修改应用程序中日志记录器的配置。
是
liquibase
显示已应用的 Liquibase 数据库迁移。
是
metrics 显示当前应用程序的指标度量信息。
是
mappings
显示所有 @RequestMapping 路径的整理清单。
是
scheduledtasks
显示应用程序中的调度任务。
是
sessions
允许从 Spring Session 支持的会话存储中检索和删除用户会话。当使用 Spring Session 的响应式 Web 应用程序支持时不可用。
是
shutdown
正常关闭应用程序。
否
threaddump
执行线程 dump。
是
heapdump
返回一个 hprof 堆 dump 文件。
是
jolokia
通过 HTTP 暴露 JMX bean(当 Jolokia 在 classpath 上时,不适用于 WebFlux)。
是
logfile
返回日志文件的内容(如果已设置 logging.file 或 logging.path 属性)。支持使用 HTTP Range 头来检索部分日志文件的内容。
是
prometheus
以可以由 Prometheus 服务器抓取的格式暴露指标。
是
上述端点每一项代表被监控的指标,如果对外开放则监控平台可以查询到对应的端点信息,如果未开放则无法查询对应的端点信息。通过配置可以设置端点是否对外开放功能。使用enable属性控制端点是否对外开放。其中health端点为默认端点,不能关闭。
management: endpoint: health: show-details: always info: enabled: true
为了方便开发者快速配置端点,springboot admin设置了13个较为常用的端点作为默认开放的端点,如果需要控制默认开放的端点的开放状态,可以通过配置设置,如下:
management: endpoints: enabled-by-default: true
上述端点开启后,就可以通过端点对应的路径查看对应的信息了。但是此时还不能通过HTTP请求查询此信息,还需要开启通过HTTP请求查询的端点名称,使用“*”可以简化配置成开放所有端点的WEB端HTTP请求权限。
management:
  endpoints:
    web:
      exposure:
        include: "*"
整体上来说,对于端点的配置有两组信息,一组是endpoints开头的,对所有端点进行配置,一组是endpoint开头的,对具体端点进行配置。
management: endpoint: health: show-details: always info: enabled: true endpoints: web: exposure: include: "*" enabled-by-default: true
总结
被监控客户端通过添加actuator的坐标可以对外提供被访问的端点功能
端点功能的开放与关闭可以通过配置进行控制
web端默认无法获取所有端点信息,通过配置开放端点功能
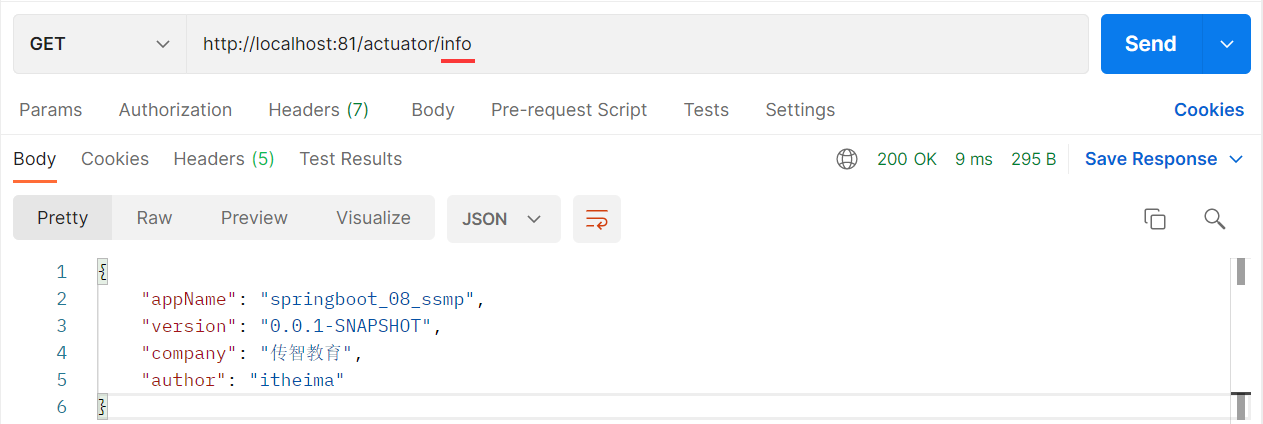
info端点指标控制 info端点描述了当前应用的基本信息,可以通过两种形式快速配置info端点的信息
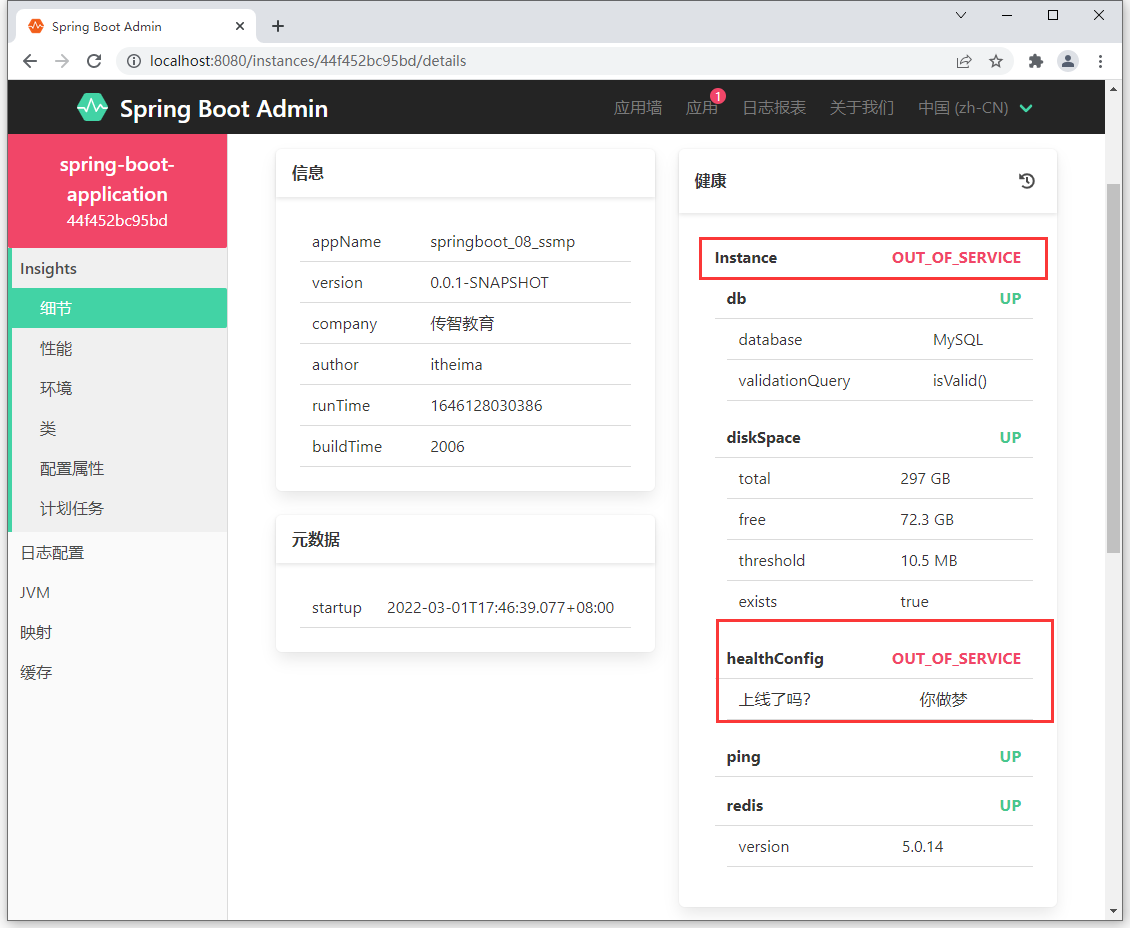
health端点指标控制 health端点描述当前应用的运行健康指标,即应用的运行是否成功。通过编程的形式可以扩展指标信息。
@Component public class HealthConfig extends AbstractHealthIndicator { @Override protected void doHealthCheck (Health.Builder builder) throws Exception { boolean condition = true ; if (condition) { builder.status(Status.UP); builder.withDetail("runTime" , System.currentTimeMillis()); Map infoMap = new HashMap (); infoMap.put("buildTime" , "2006" ); builder.withDetails(infoMap); }else { builder.status(Status.OUT_OF_SERVICE); builder.withDetail("上线了吗?" ,"你做梦" ); } } }
当任意一个组件状态不为UP时,整体应用对外服务状态为非UP状态。
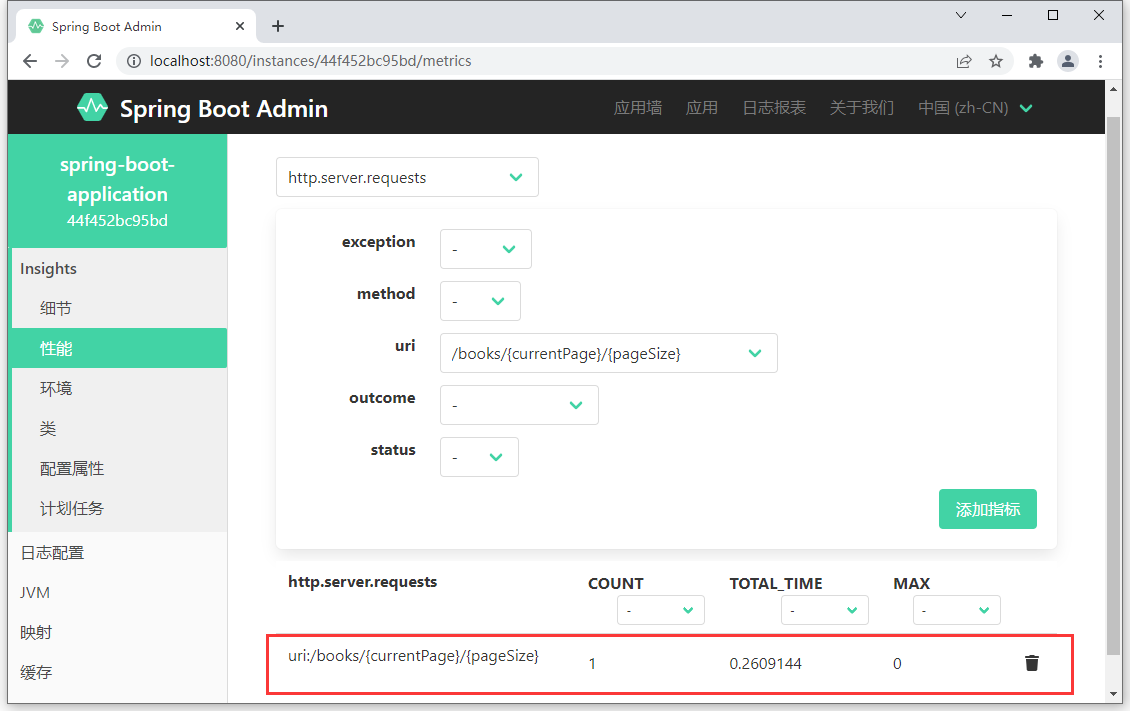
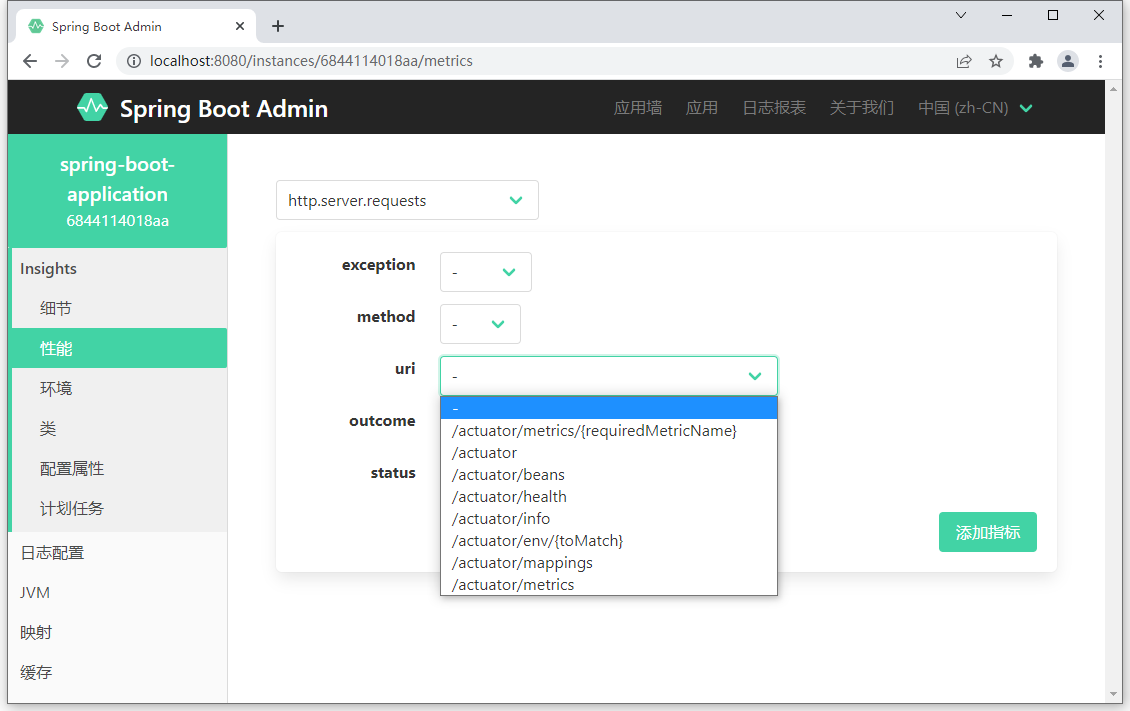
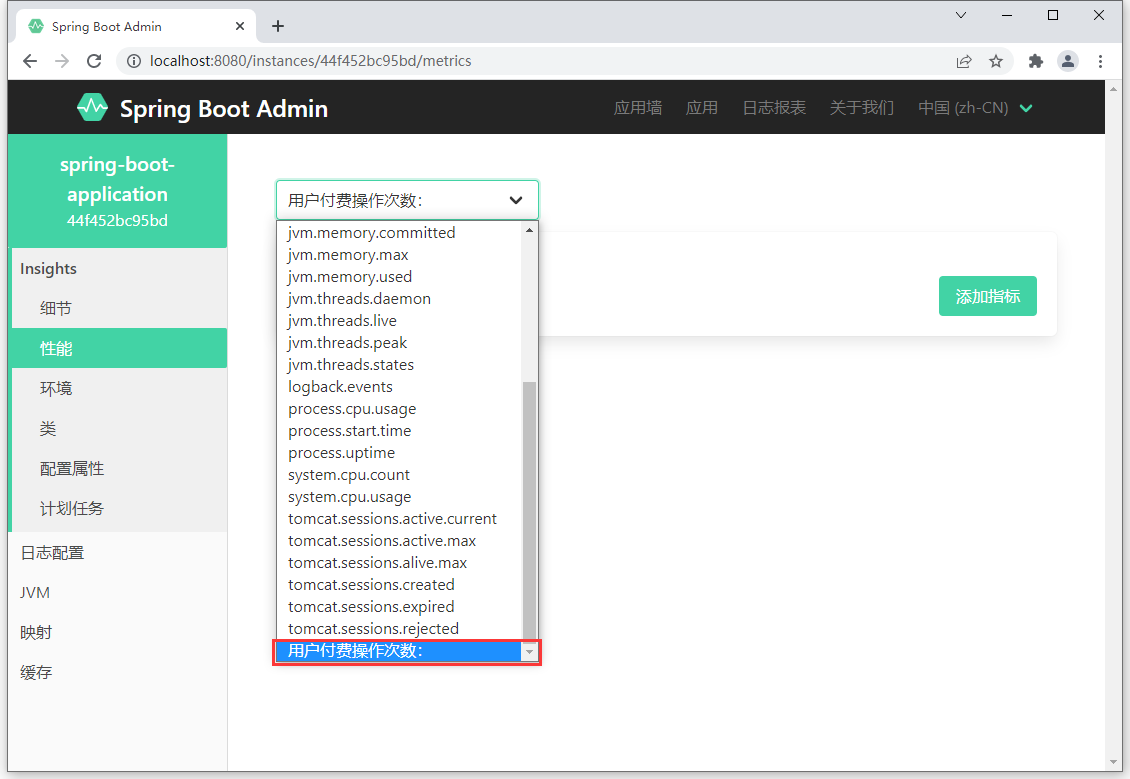
metrics端点指标控制 metrics端点描述了性能指标,除了系统自带的监控性能指标,还可以自定义性能指标。
@Service public class BookServiceImpl extends ServiceImpl <BookDao, Book> implements IBookService { @Autowired private BookDao bookDao; private Counter counter; public BookServiceImpl (MeterRegistry meterRegistry) { counter = meterRegistry.counter("用户付费操作次数:" ); } @Override public boolean delete (Integer id) { counter.increment(); return bookDao.deleteById(id) > 0 ; } }
在性能指标中就出现了自定义的性能指标监控项
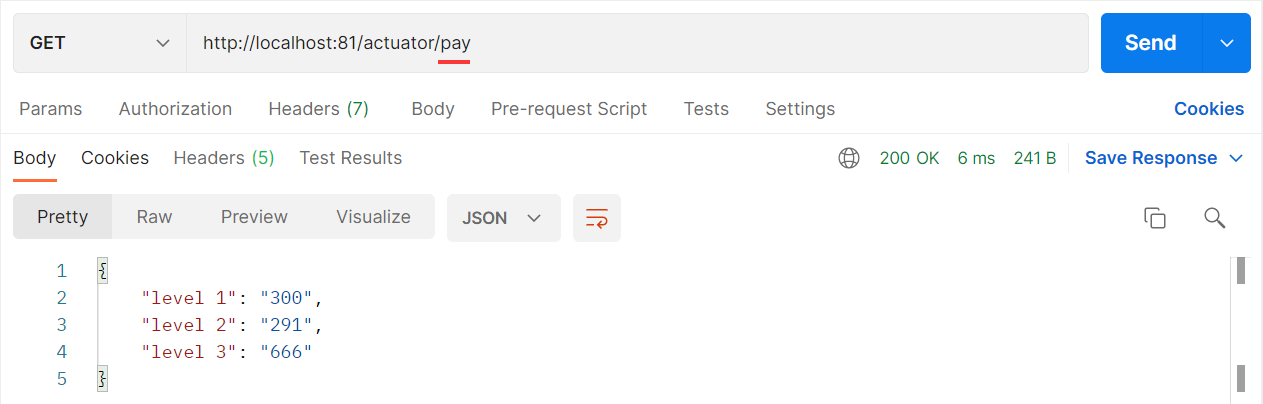
自定义端点(实用开发篇完结) 可以根据业务需要自定义端点,方便业务监控
@Component @Endpoint(id="pay",enableByDefault = true) public class PayEndpoint { @ReadOperation public Object getPay () { Map payMap = new HashMap (); payMap.put("level 1" ,"300" ); payMap.put("level 2" ,"291" ); payMap.put("level 3" ,"666" ); return payMap; } }
由于此端点数据spirng boot admin无法预知该如何展示,所以通过界面无法看到此数据,通过HTTP请求路径可以获取到当前端点的信息,但是需要先开启当前端点对外功能,或者设置当前端点为默认开发的端点。
小结
端点的指标可以自定义,但是每种不同的指标根据其功能不同,自定义方式不同
info端点通过配置和编程的方式都可以添加端点指标
health端点通过编程的方式添加端点指标,需要注意要为对应指标添加启动状态的逻辑设定
metrics指标通过在业务中添加监控操作设置指标
可以自定义端点添加更多的指标